Quick User Guide
Redouble AI provides an enterprise AI platform that allows users to:
- Quickly extract information from large volumes of documents and other file types
- Generate summaries, reports, and other types of documents
- Edit these AI-generated documents with full flexibility
- Work with a system that remembers user edits and modifications and applies them when creating similar documents
This quick guide will help you get started with the application.
- 1. Projects
- 1.1 Creating a project
- 1.2 Navigating between projects
- 1.3 Printing/ downloading the project
- 1.4 Upload documents to the newly created project
- 1.5 Deleting a project
- 1.6 Copying a project
- 1.7 Sharing a project
- 2. Questions
- 2.1 Creating a question
- 2.2 Navigating and editing questions
- 2.3 Question options
- 2.4 Deleting a question
- 3. Settings
- 4. Additional features
- 5. Attached documents
1. Projects
1.1 Creating a project
Preconditions:
- You are logged into the Redouble AI system
- You have permissions to create projects
Steps:
- Click the "+" icon button (New Project) in the top toolbar

- In the "New Project" dialog window, fill in the required fields:
- Name — enter the project name
- Description — describe the purpose of the project

- Select the project status:
- Open (default) — project is active
- Closed — project is completed

- Click the "Create Project" button

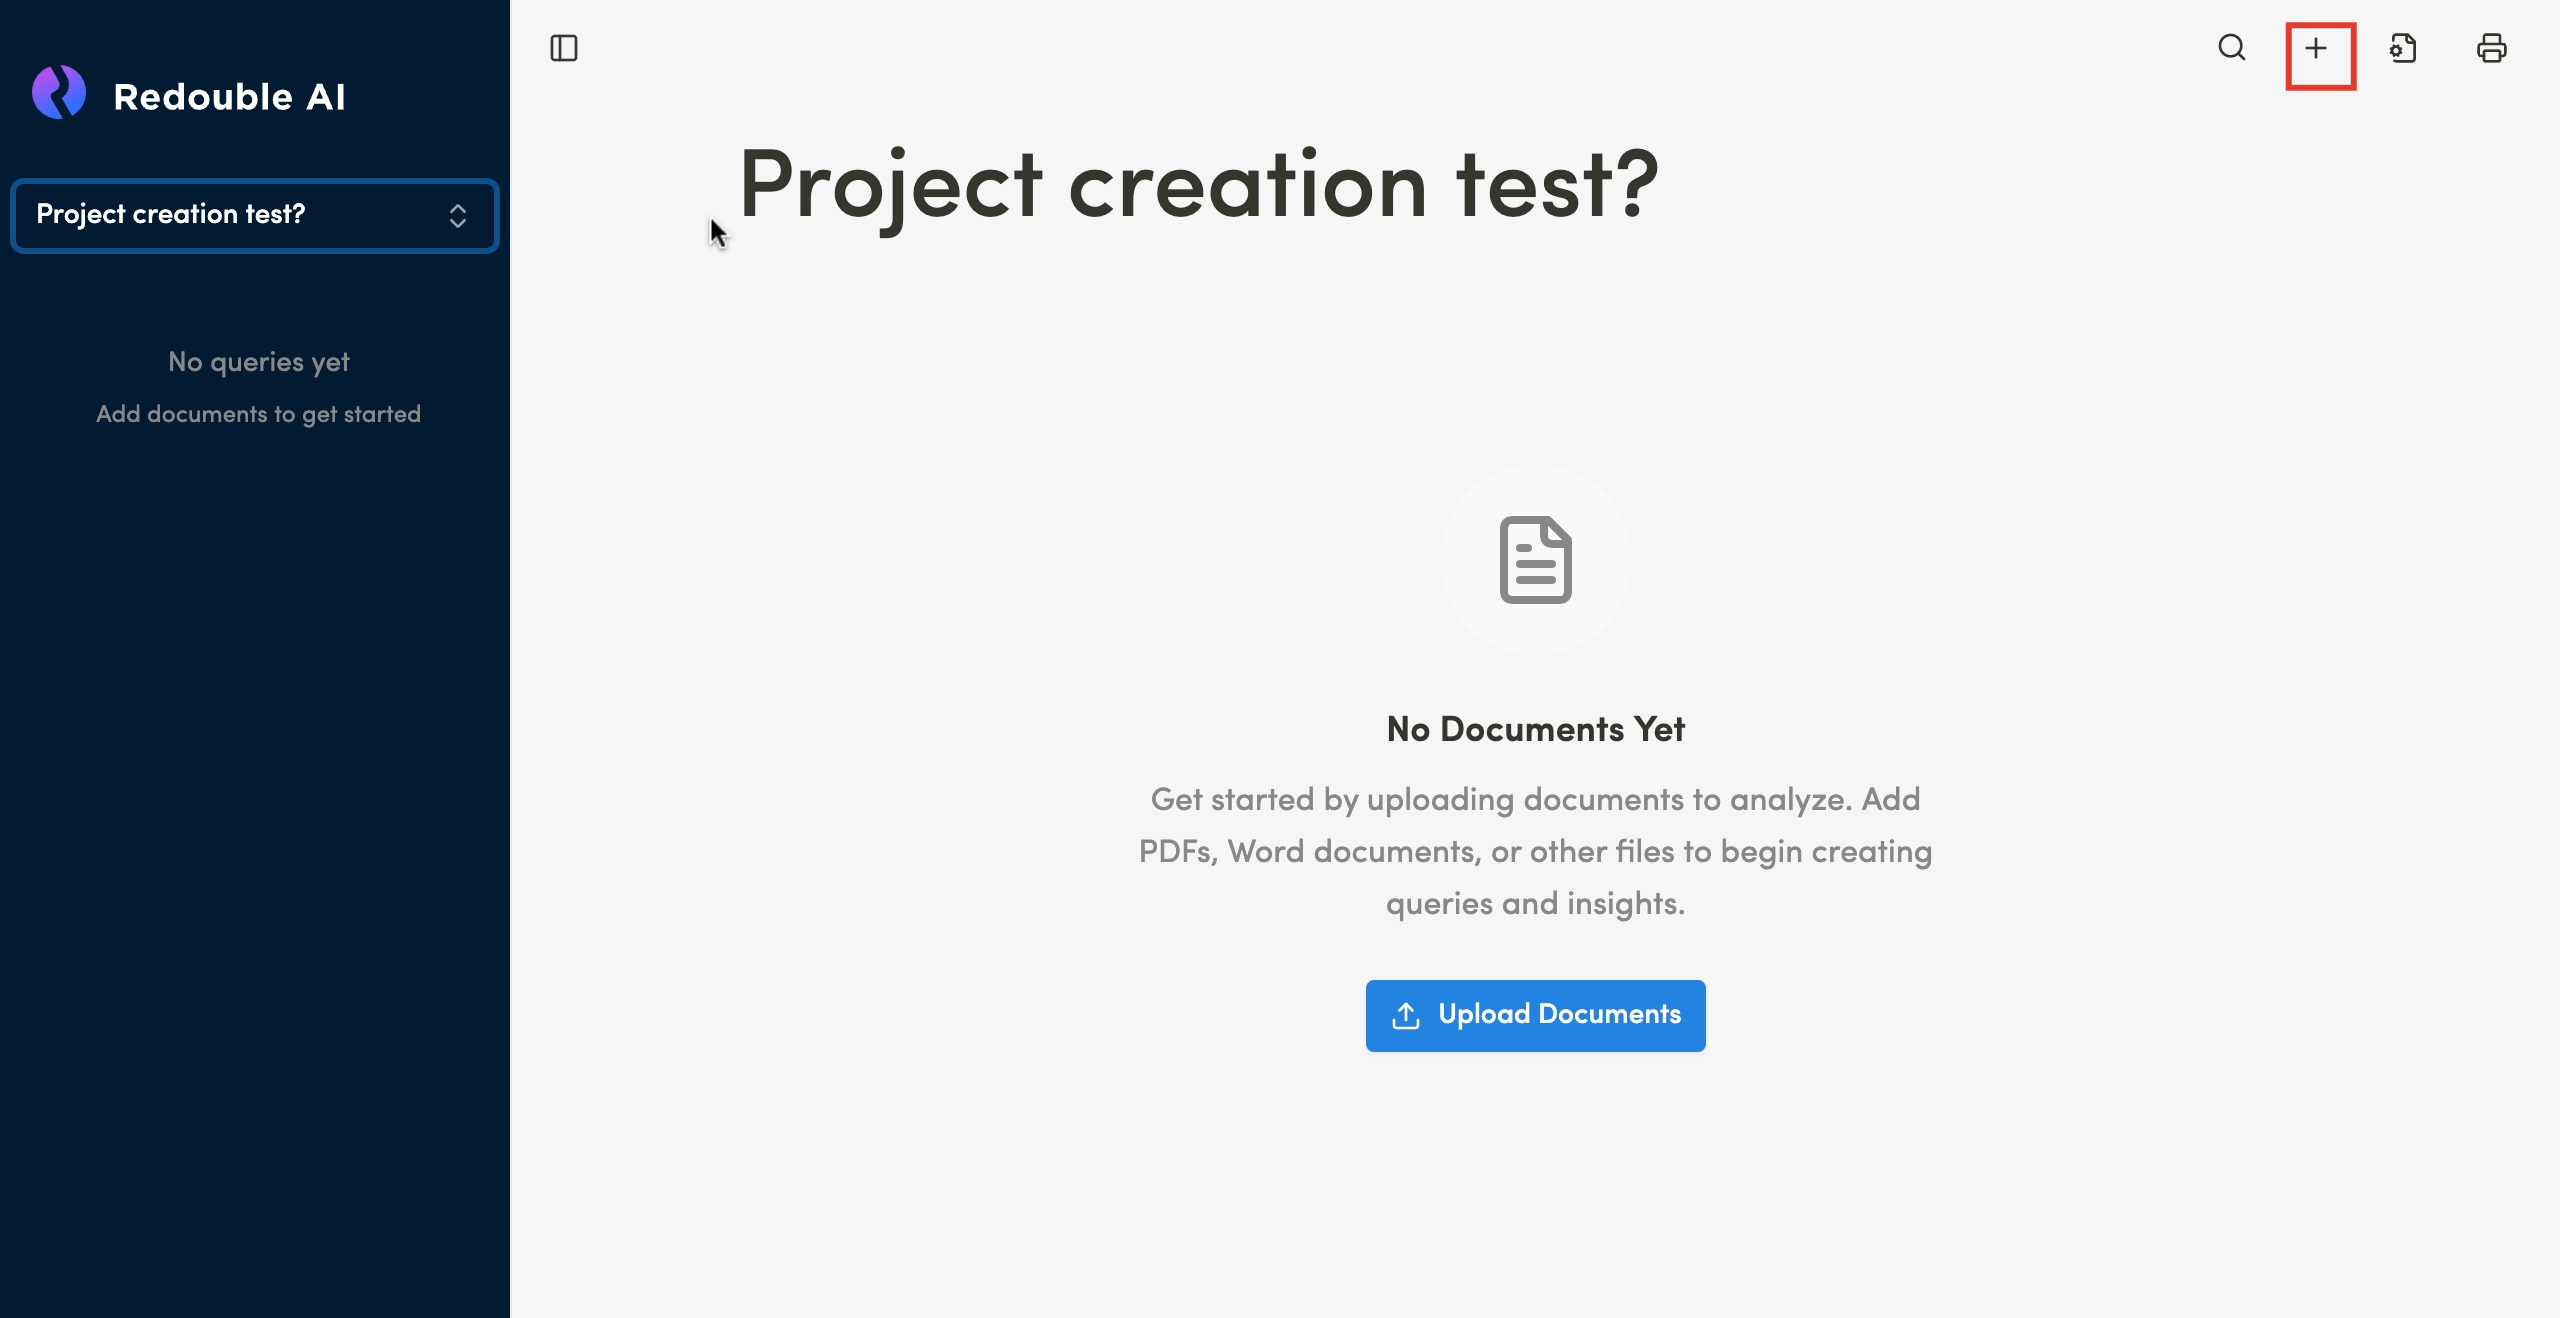
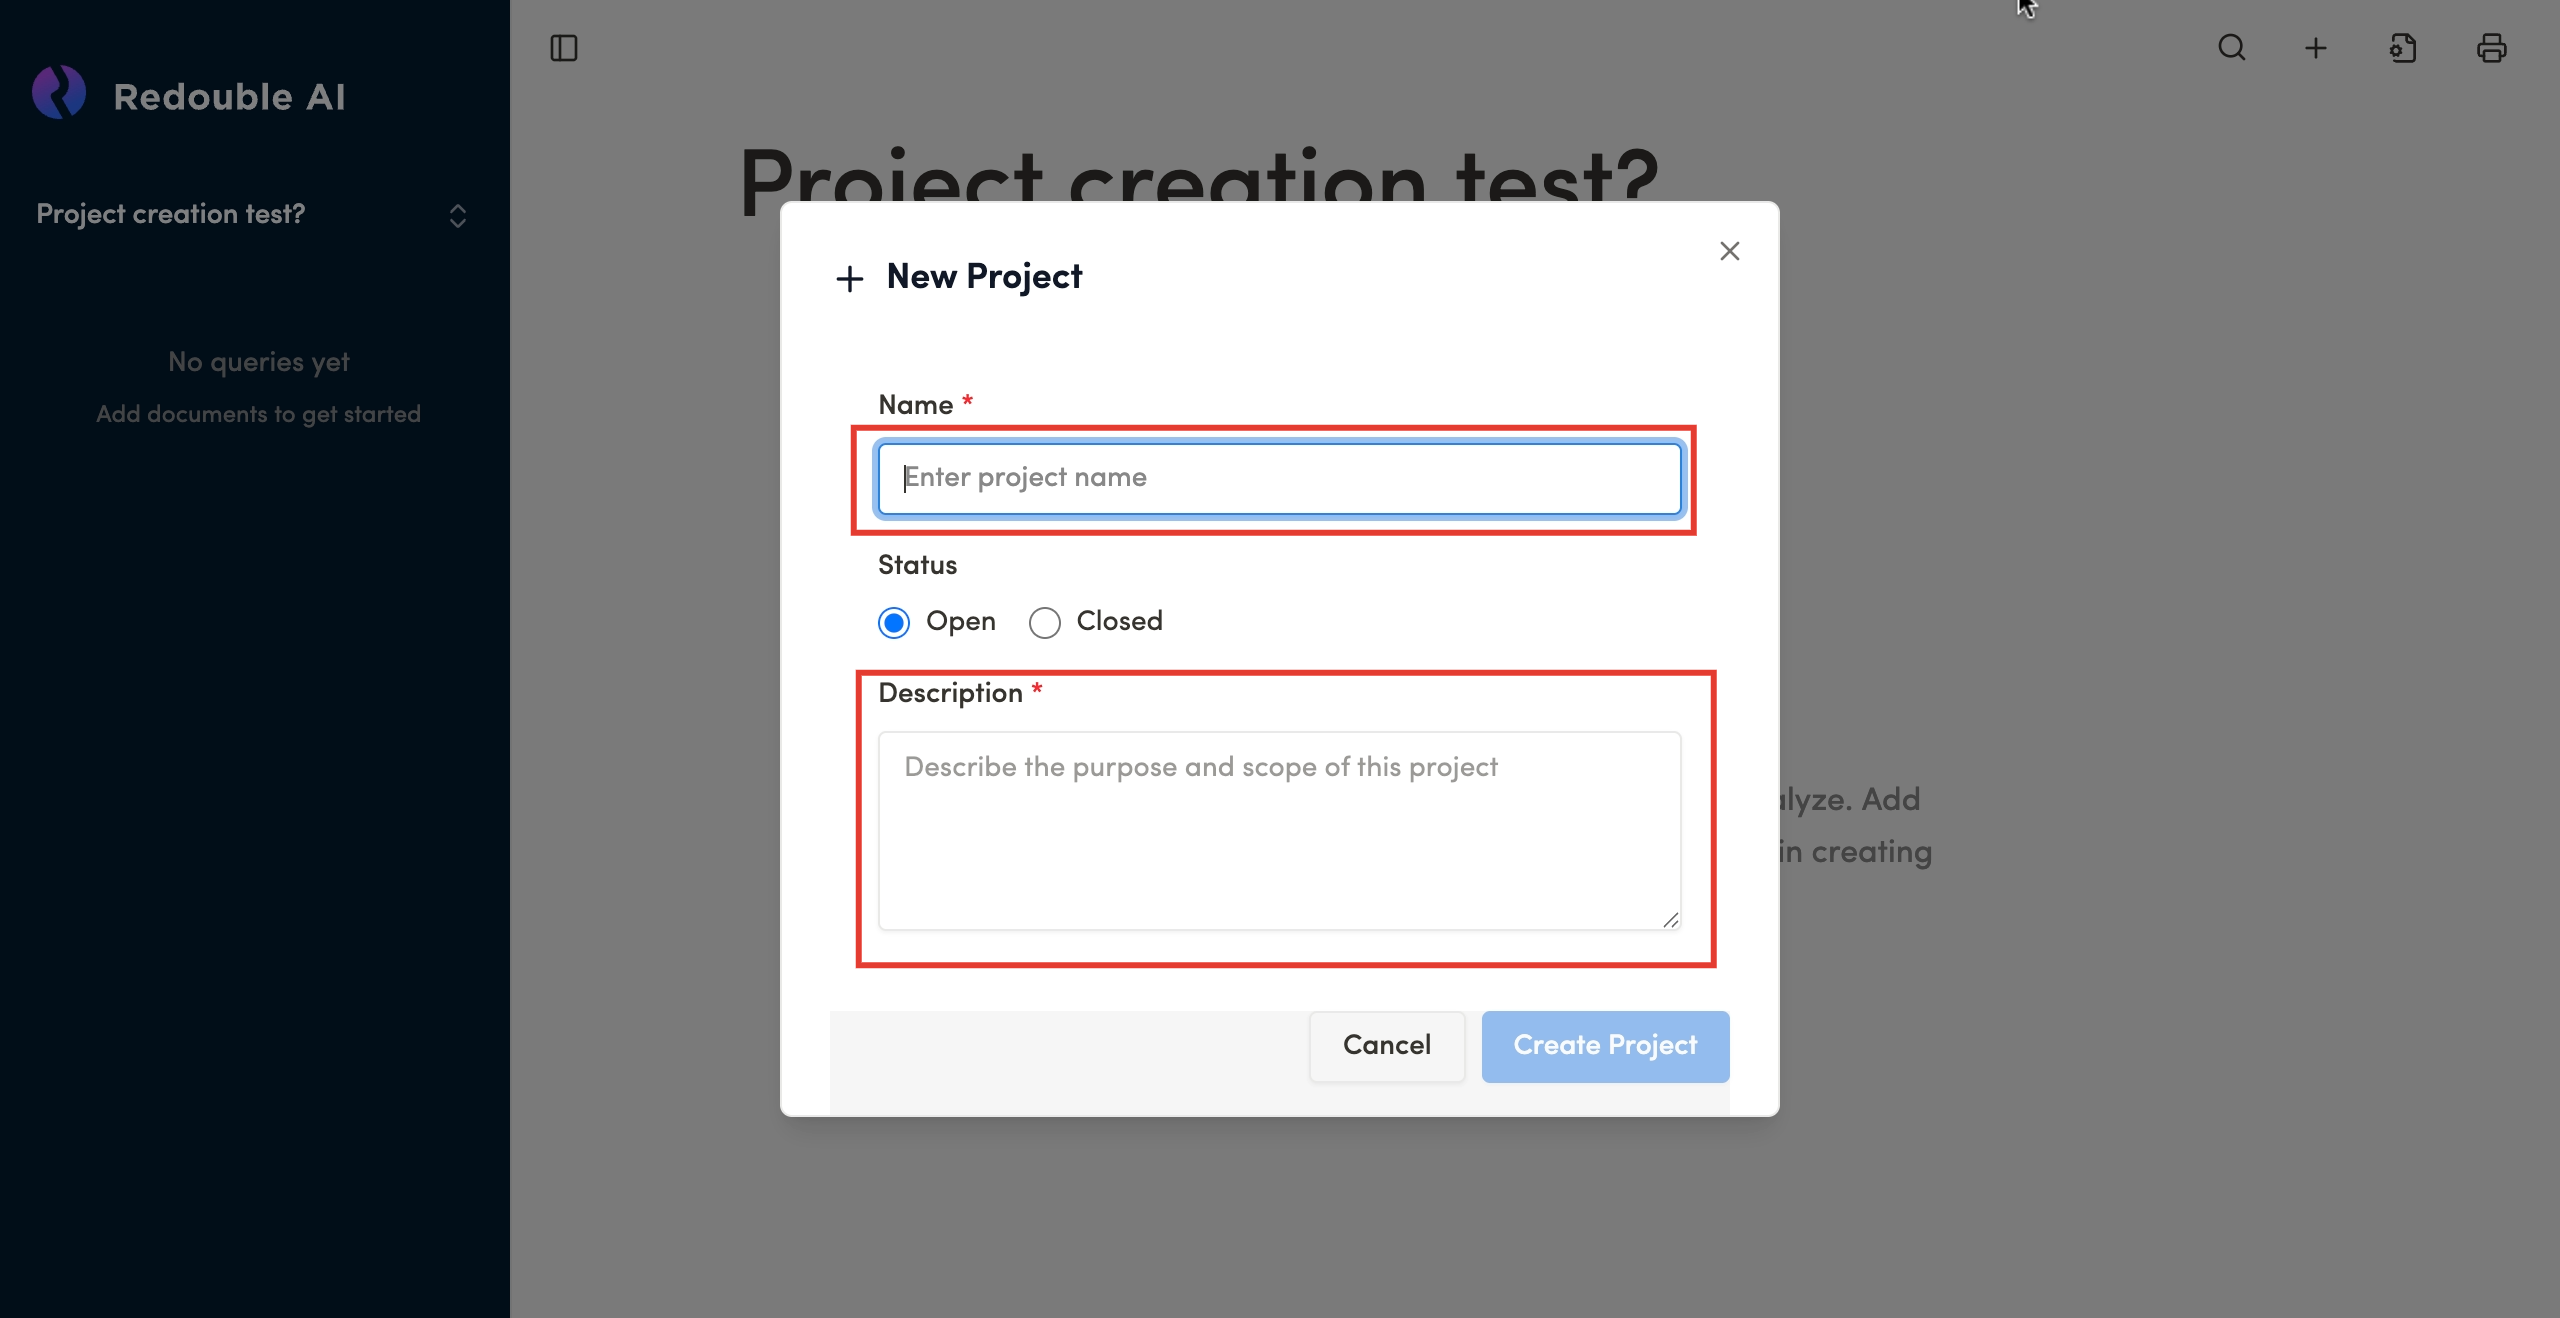
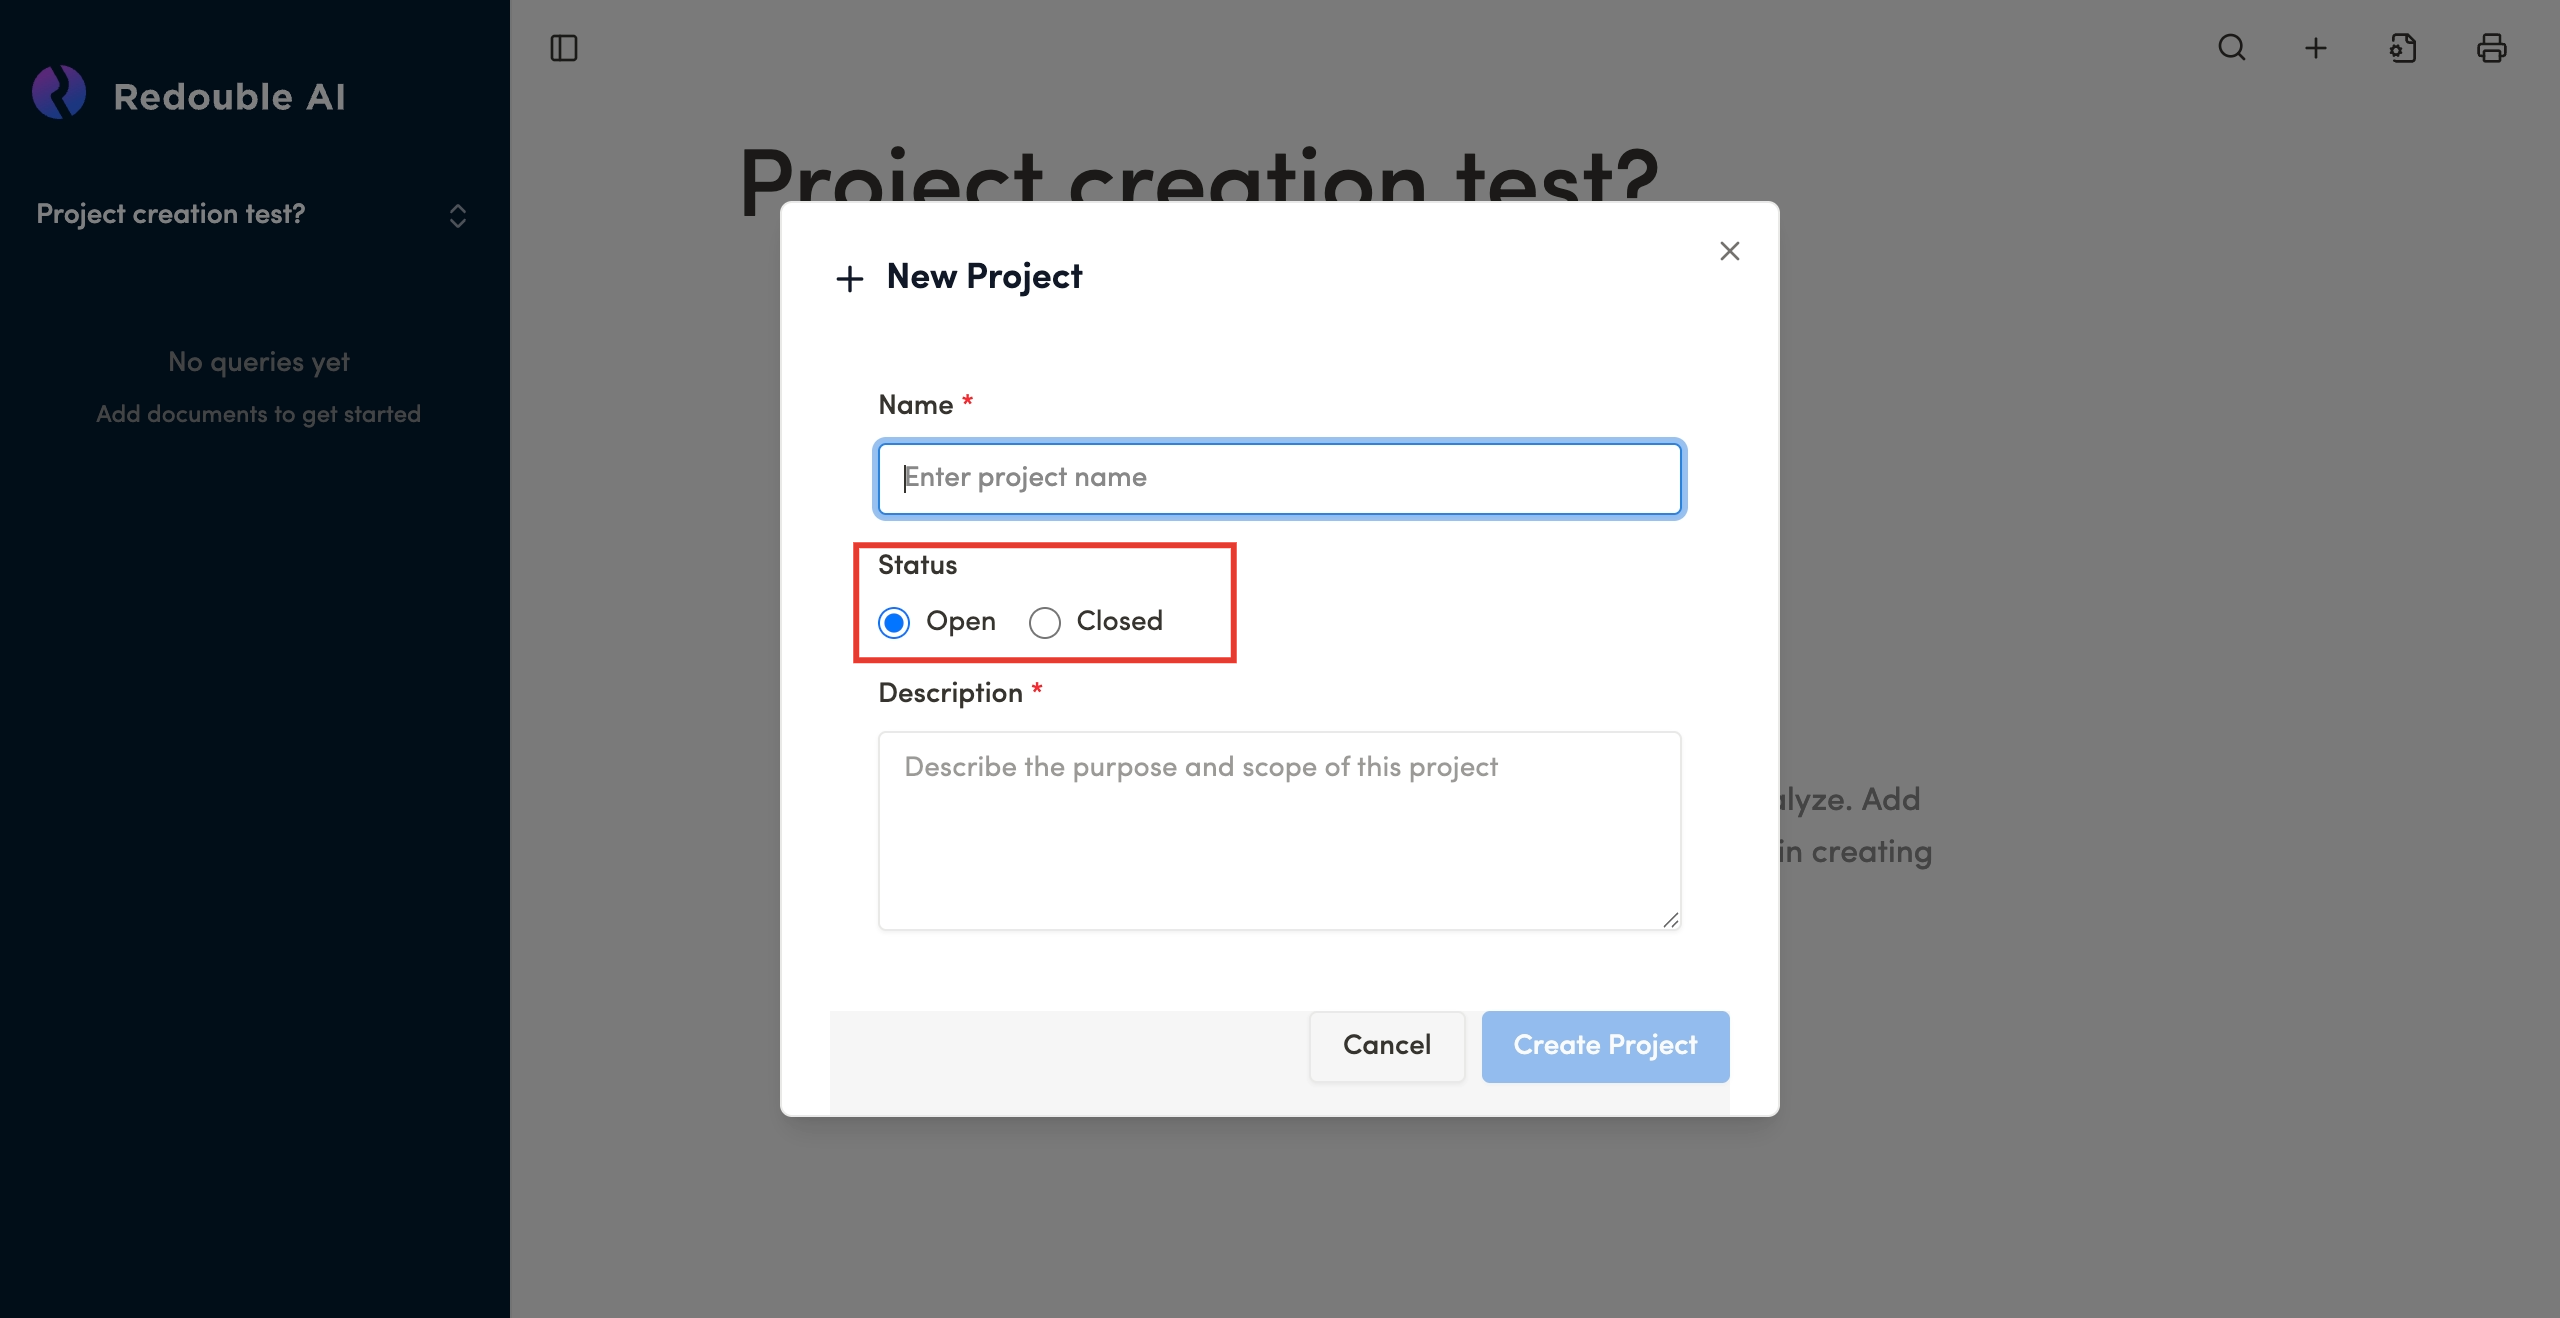
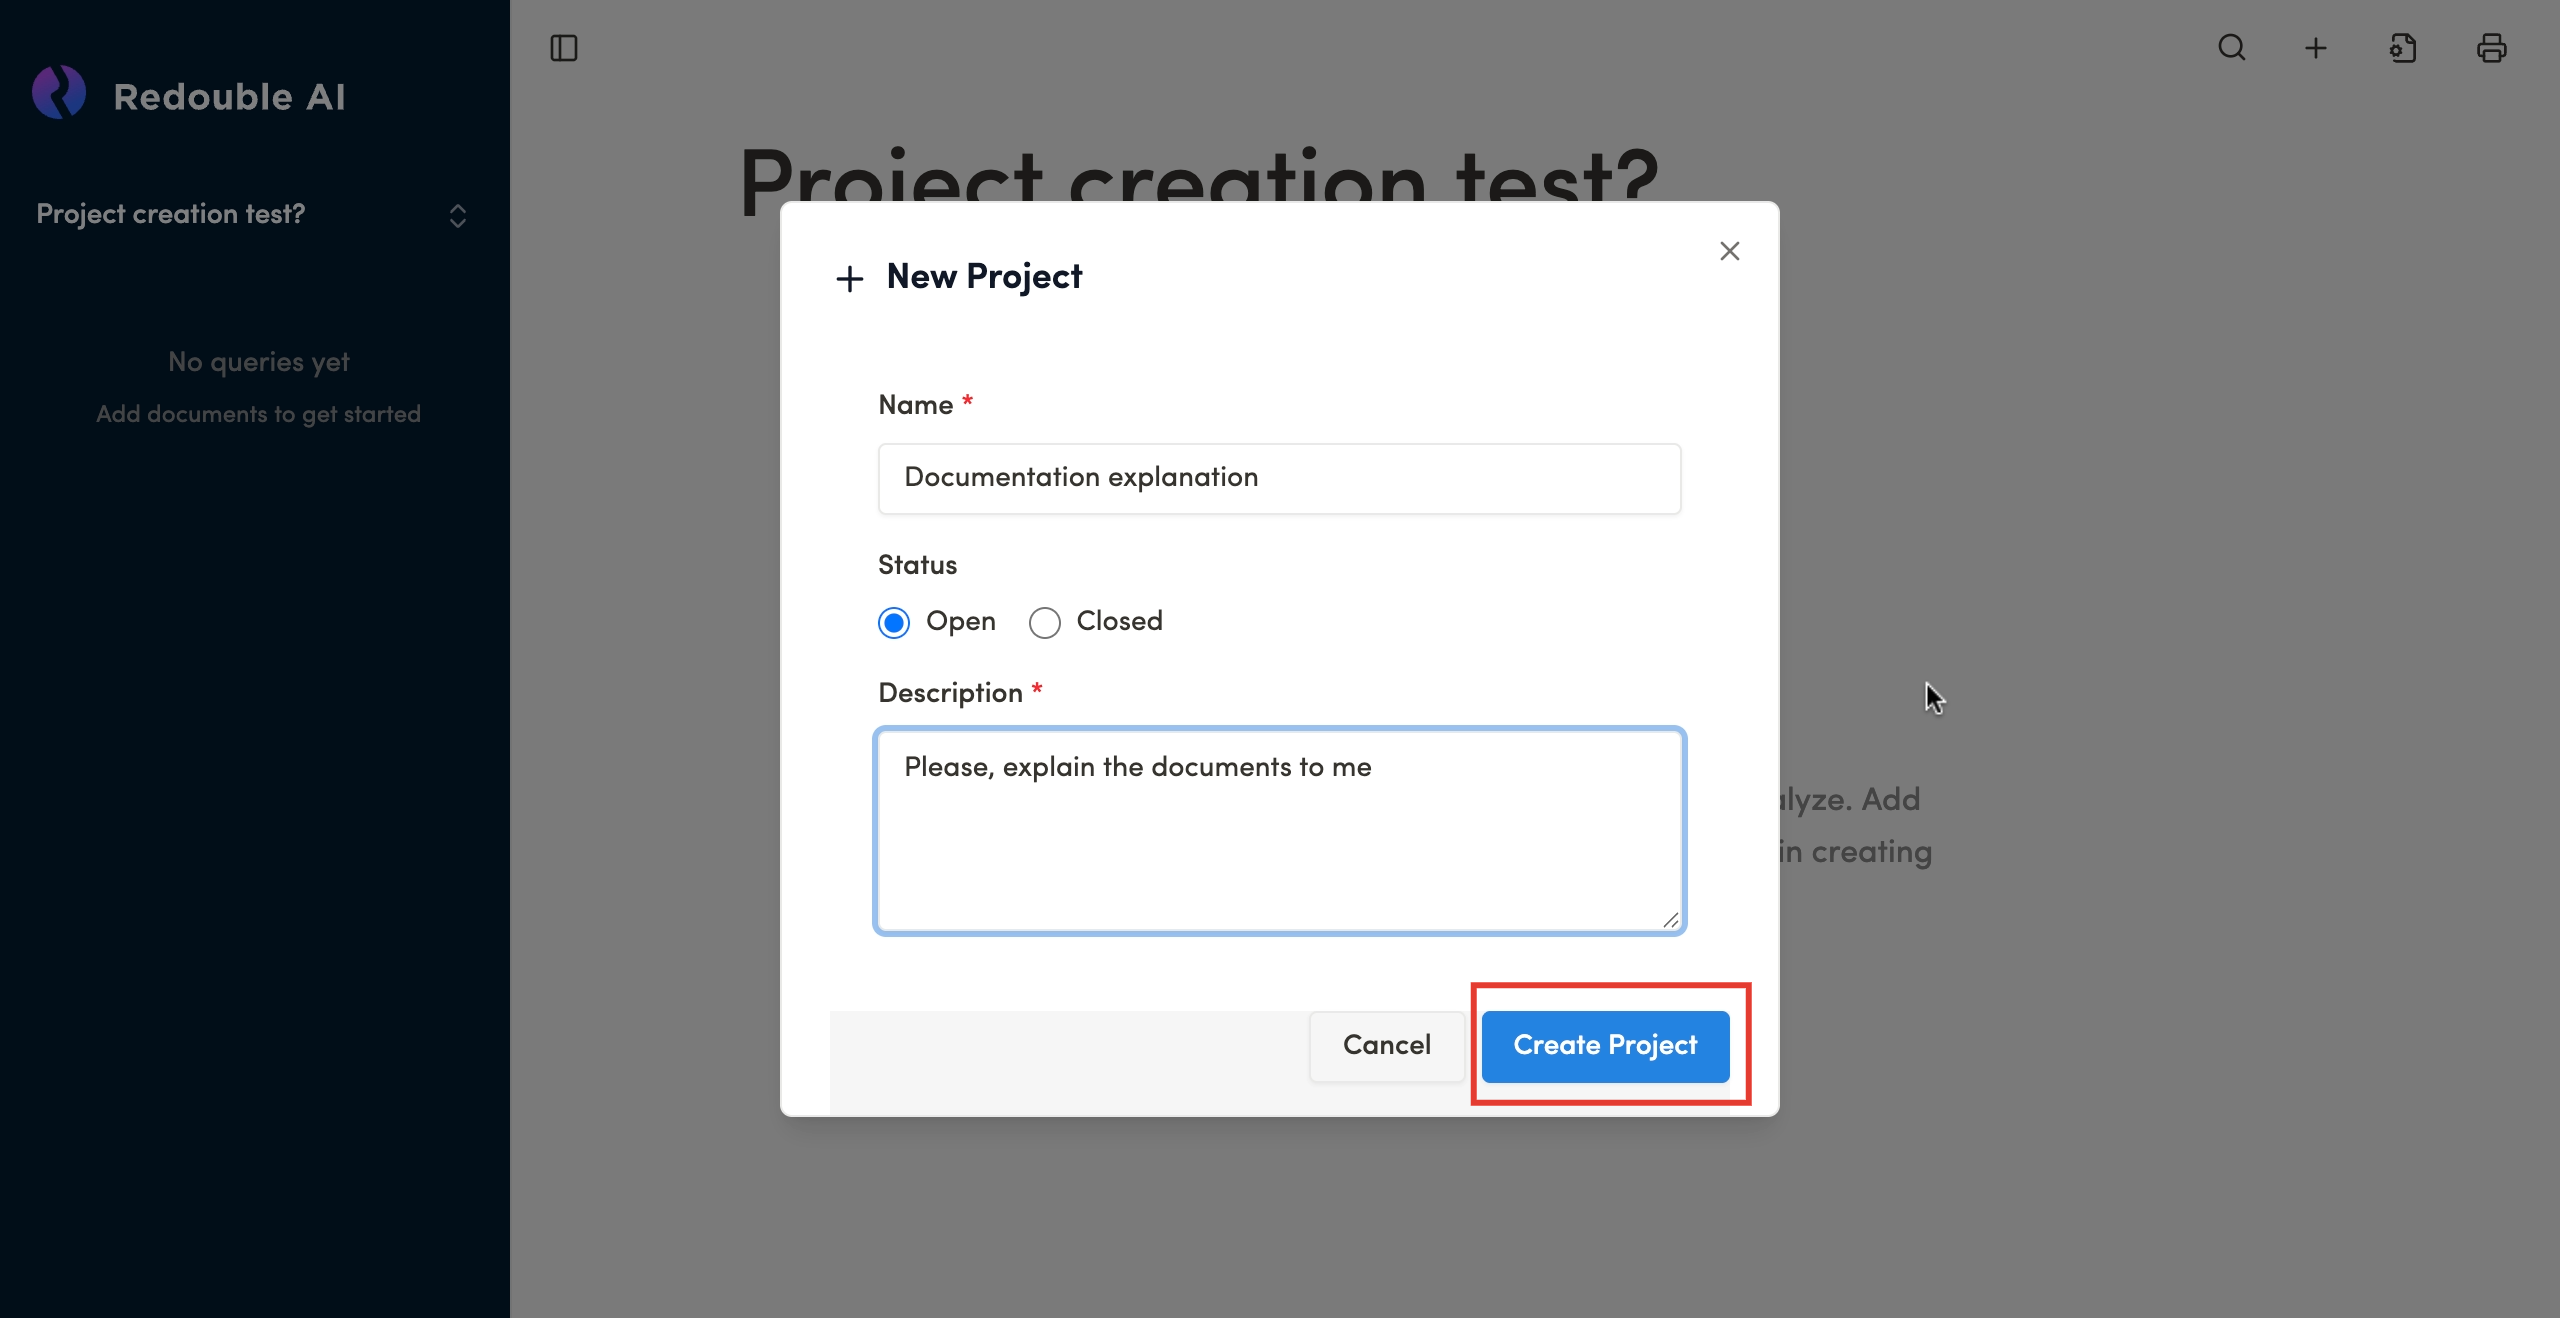
Result: The project is created and automatically opened for work. You will be redirected to the project's main page where you can add documents and create questions for analysis.
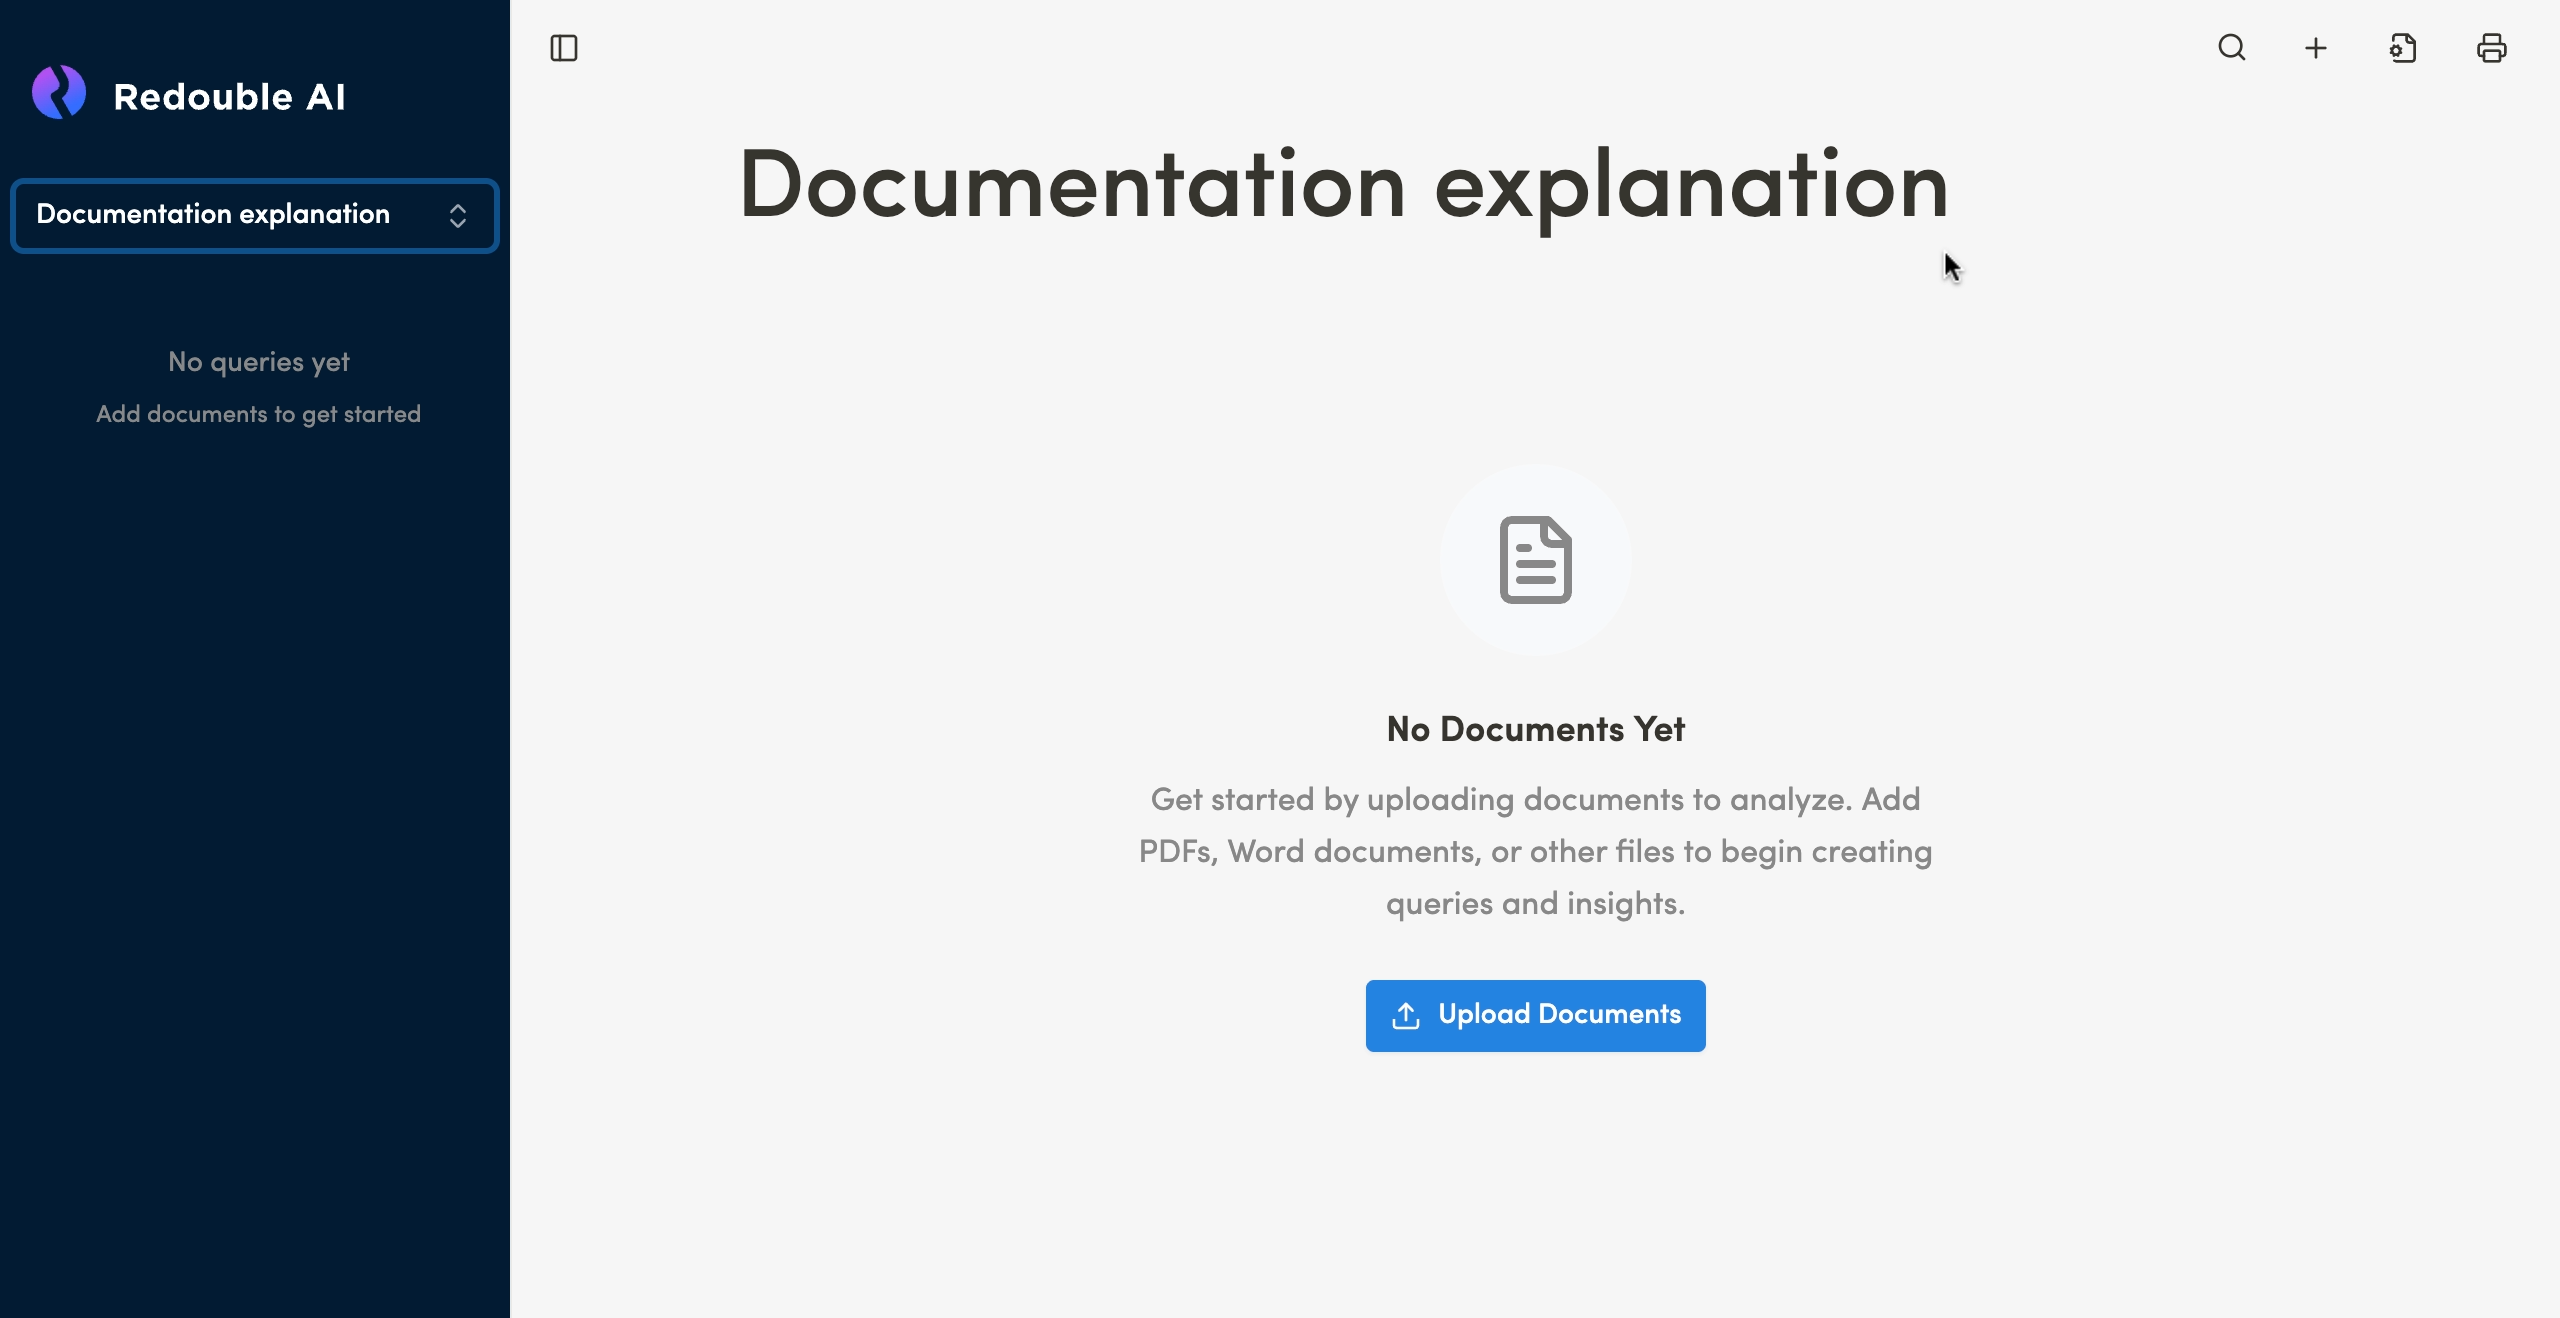
1.2 Navigating between projects
Preconditions:
- You are logged into the Redouble AI system
- At least one project exists in the system
Steps:
-
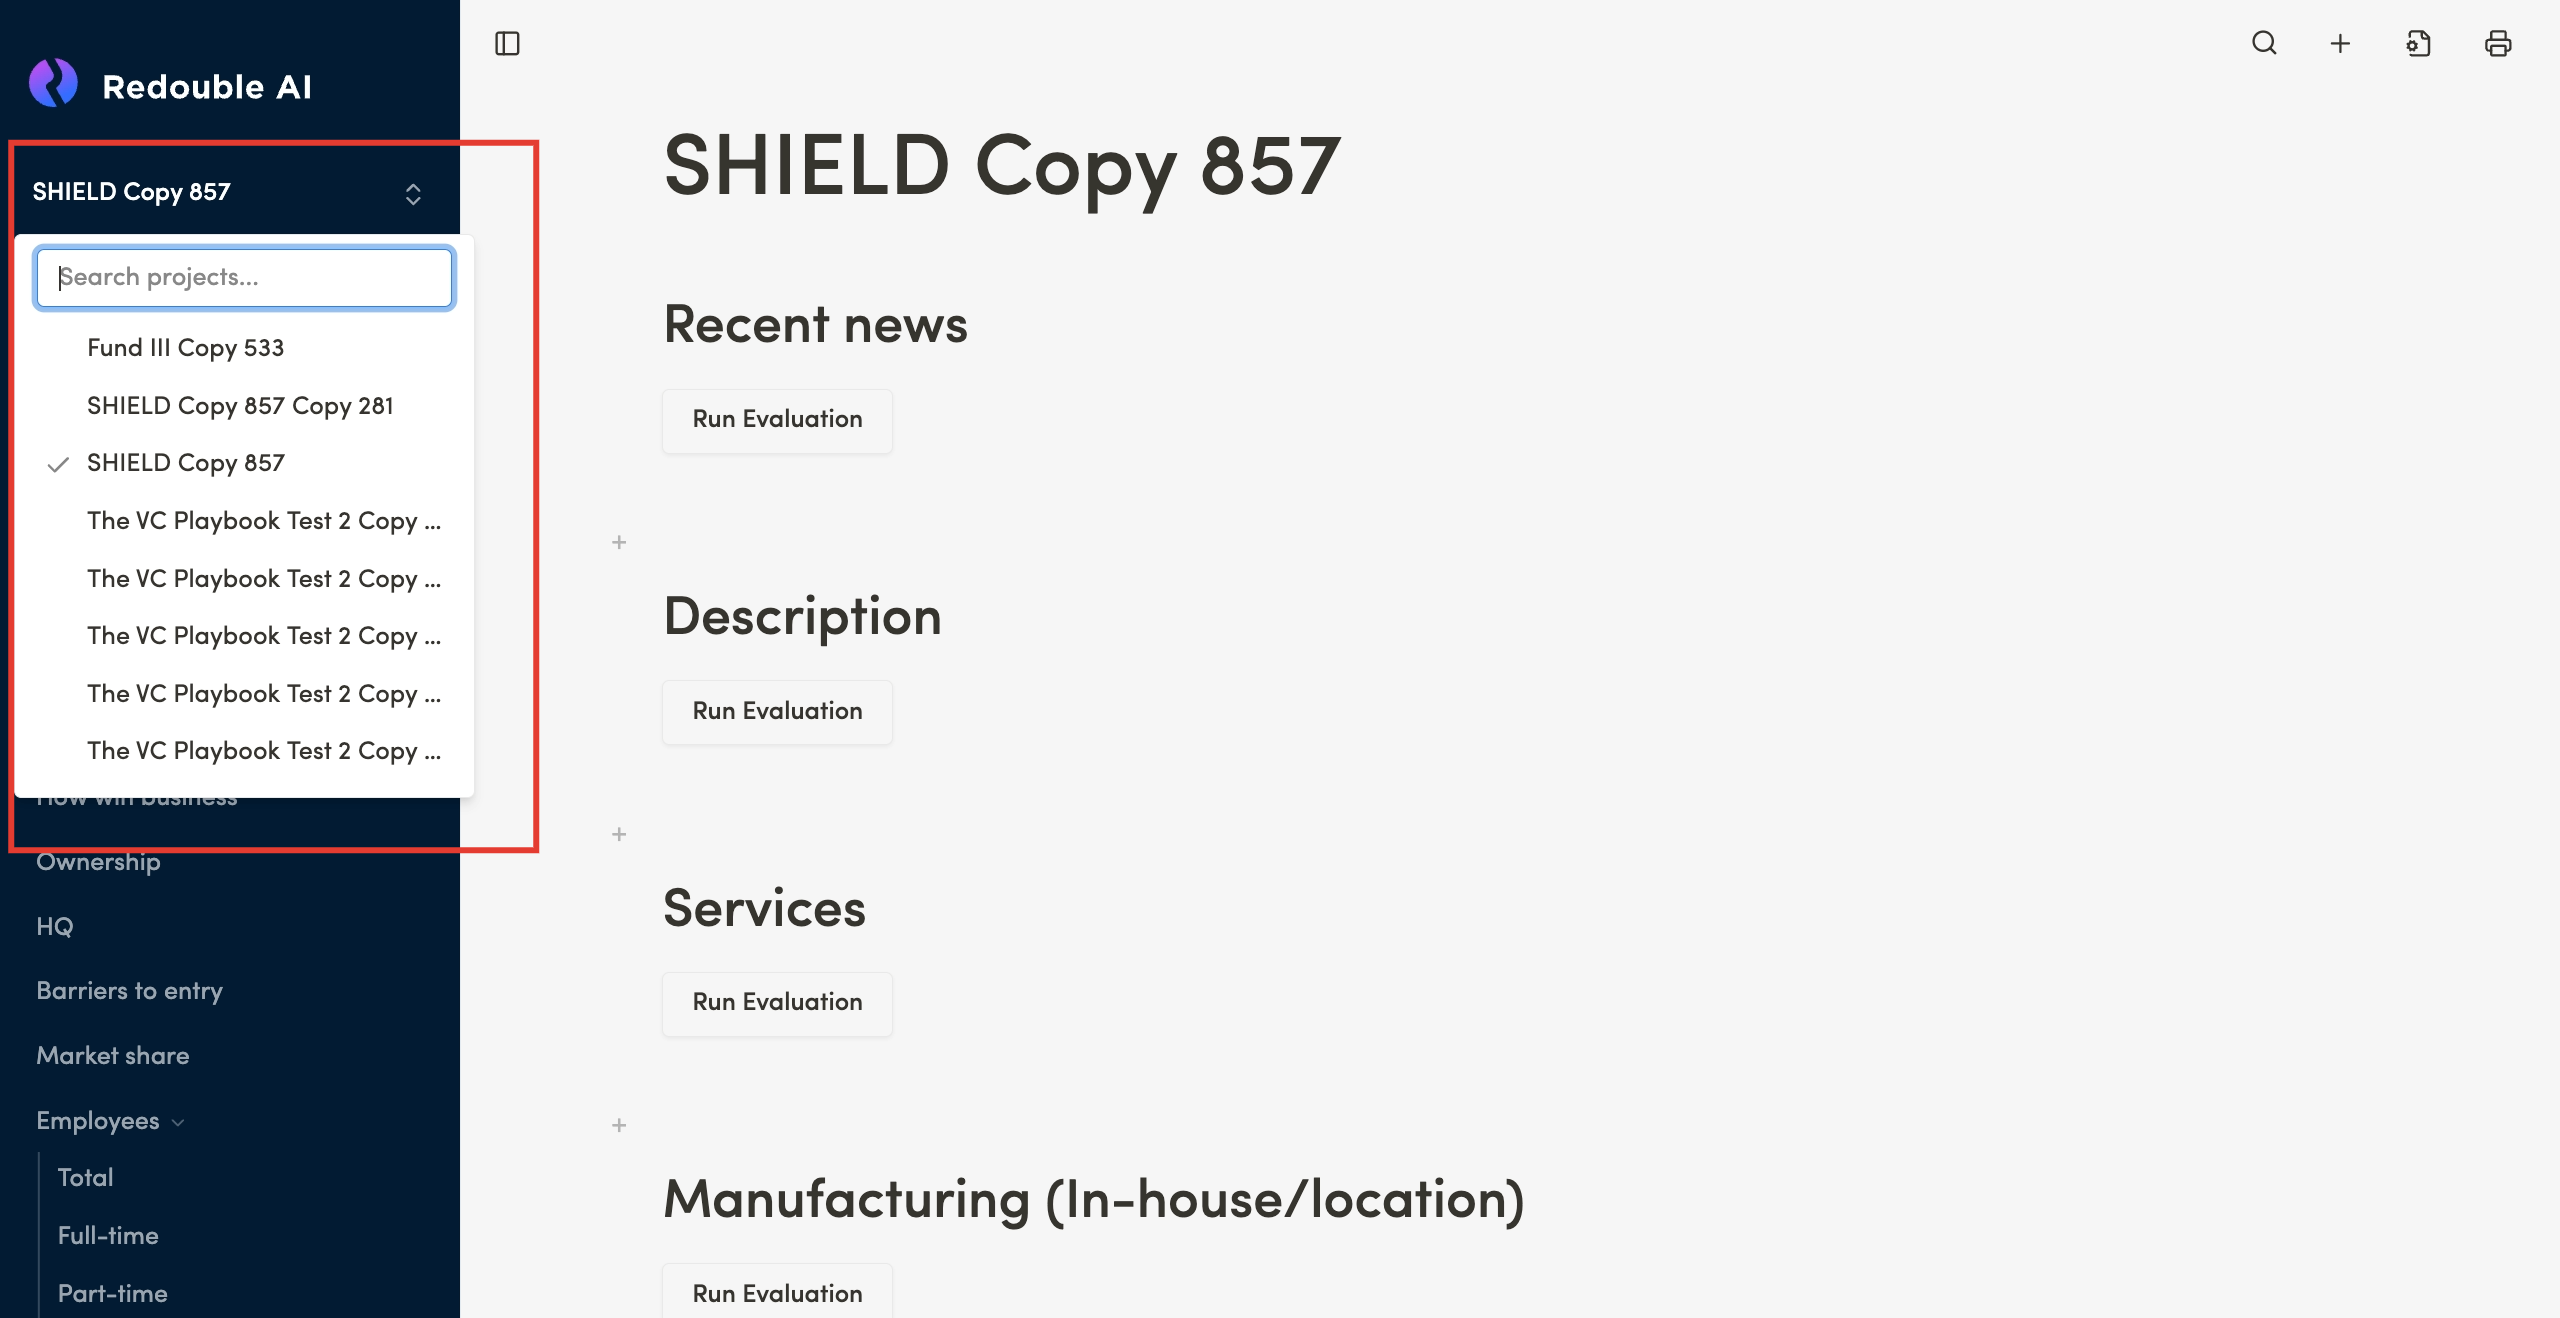
In the left sidebar, click on the current project name or the arrow icon
-
A dropdown menu will open and display:
- "Search projects..." — a search field enabling quick project lookup
- A list of all available projects

-
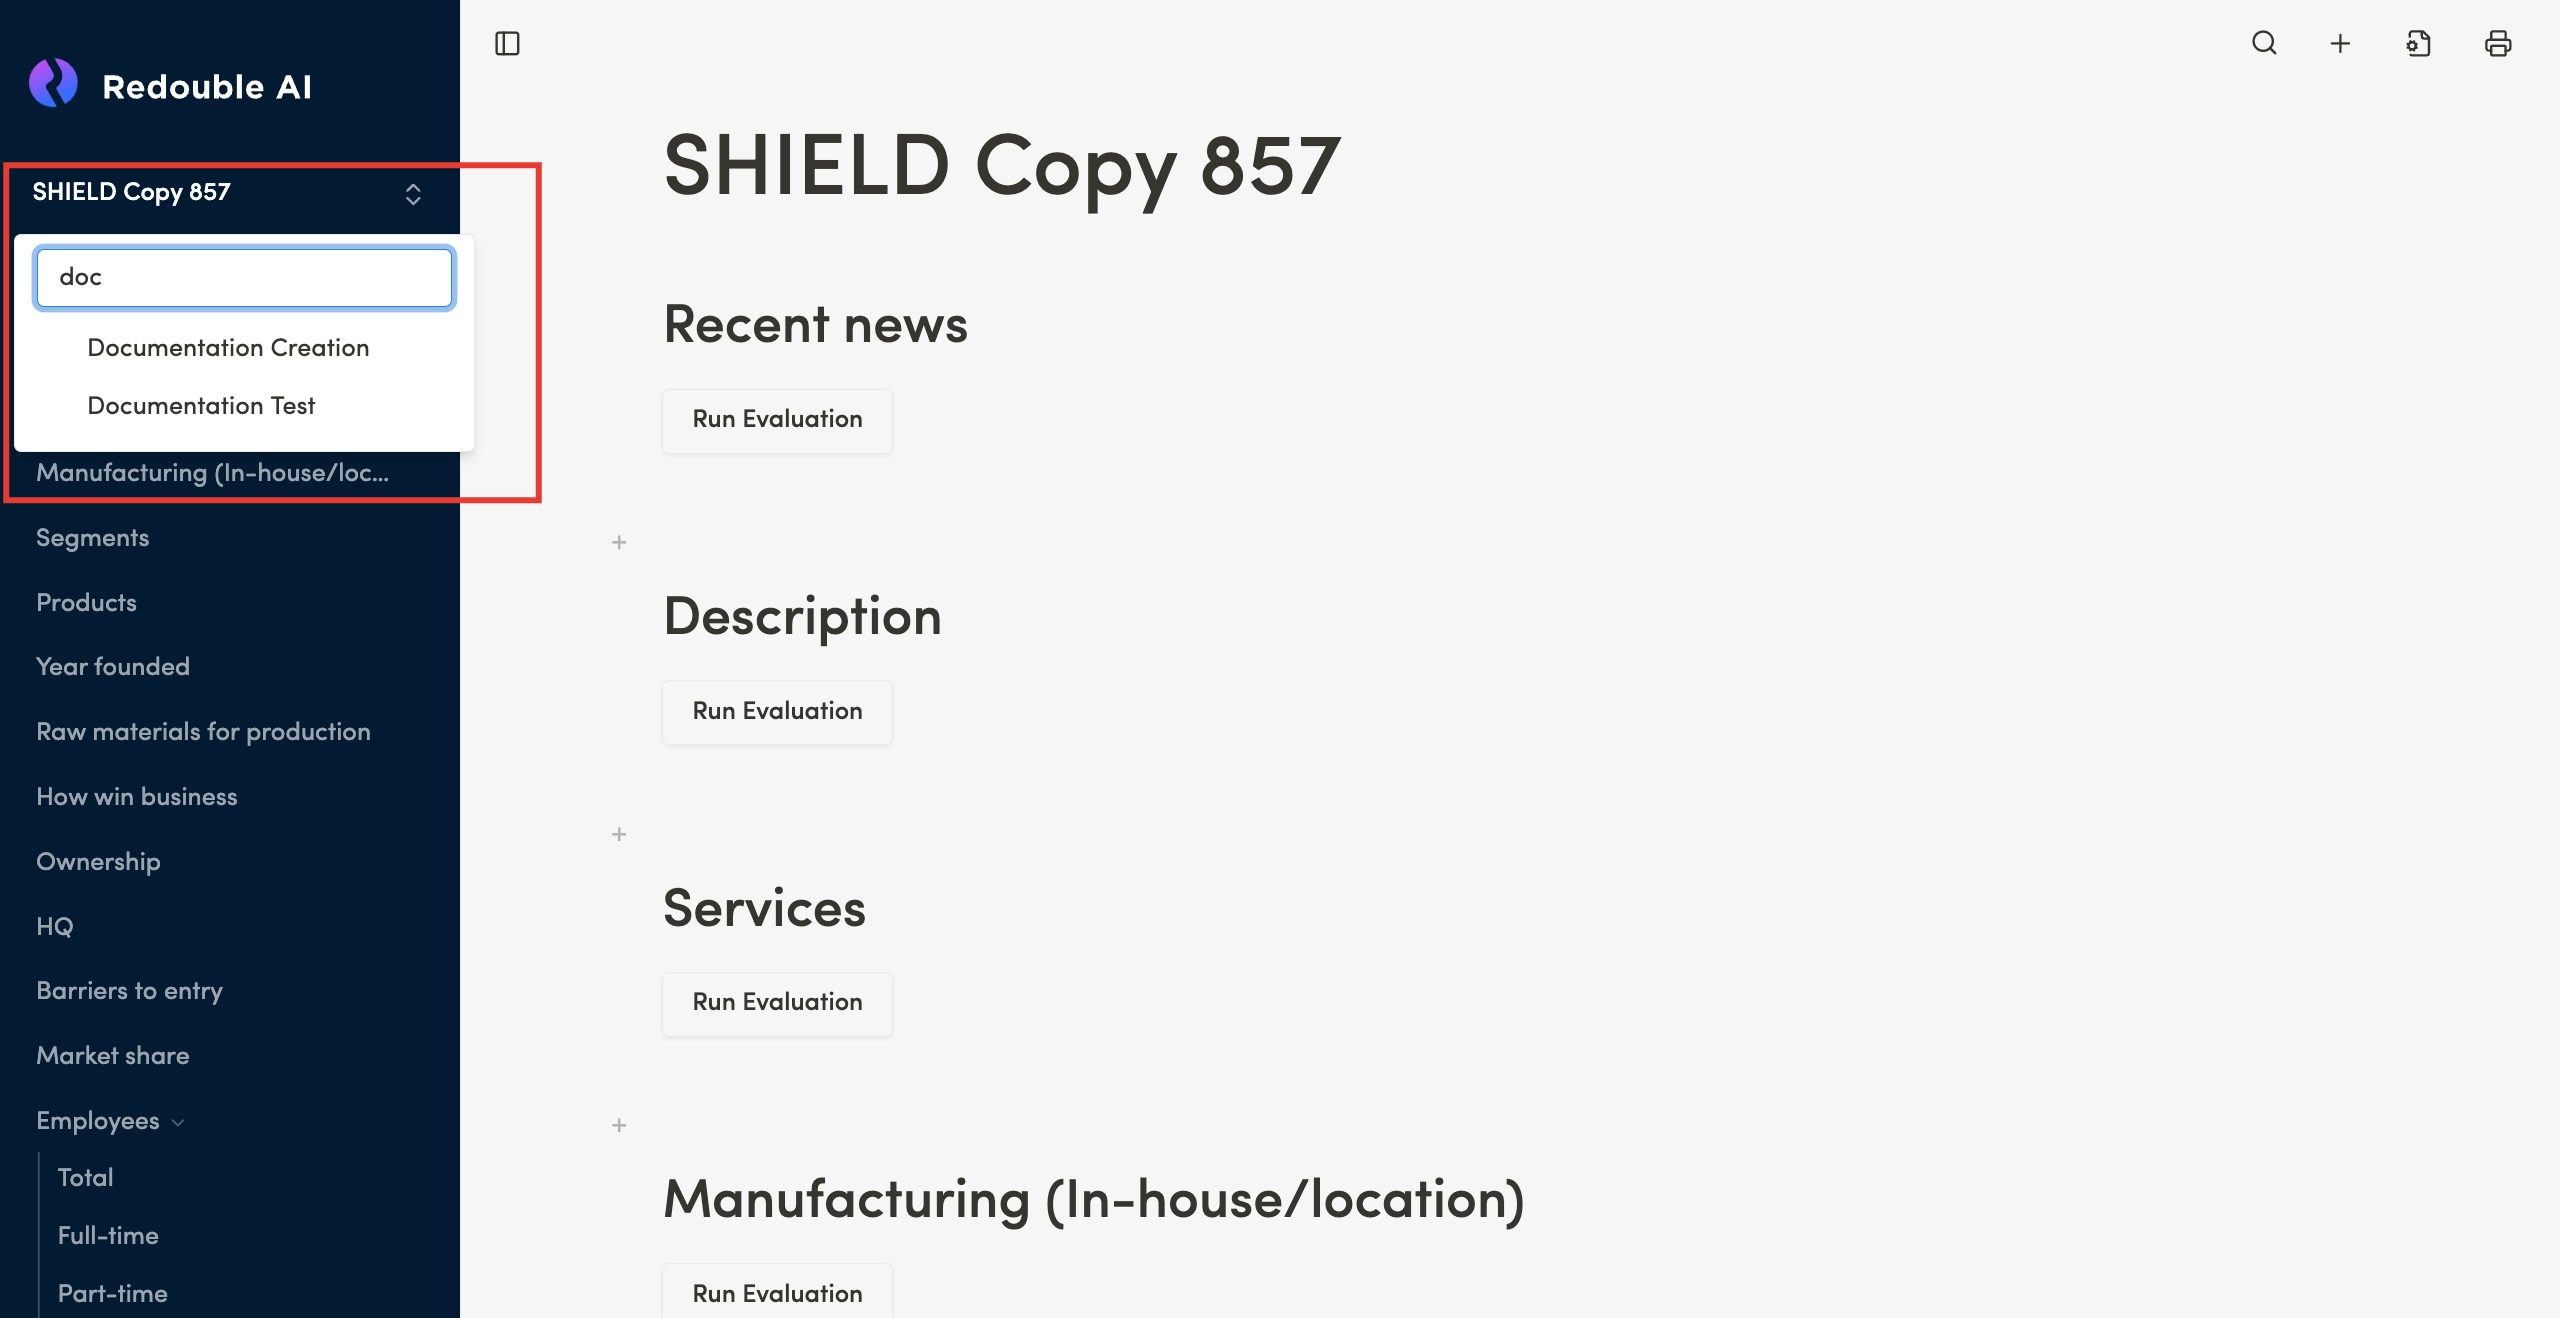
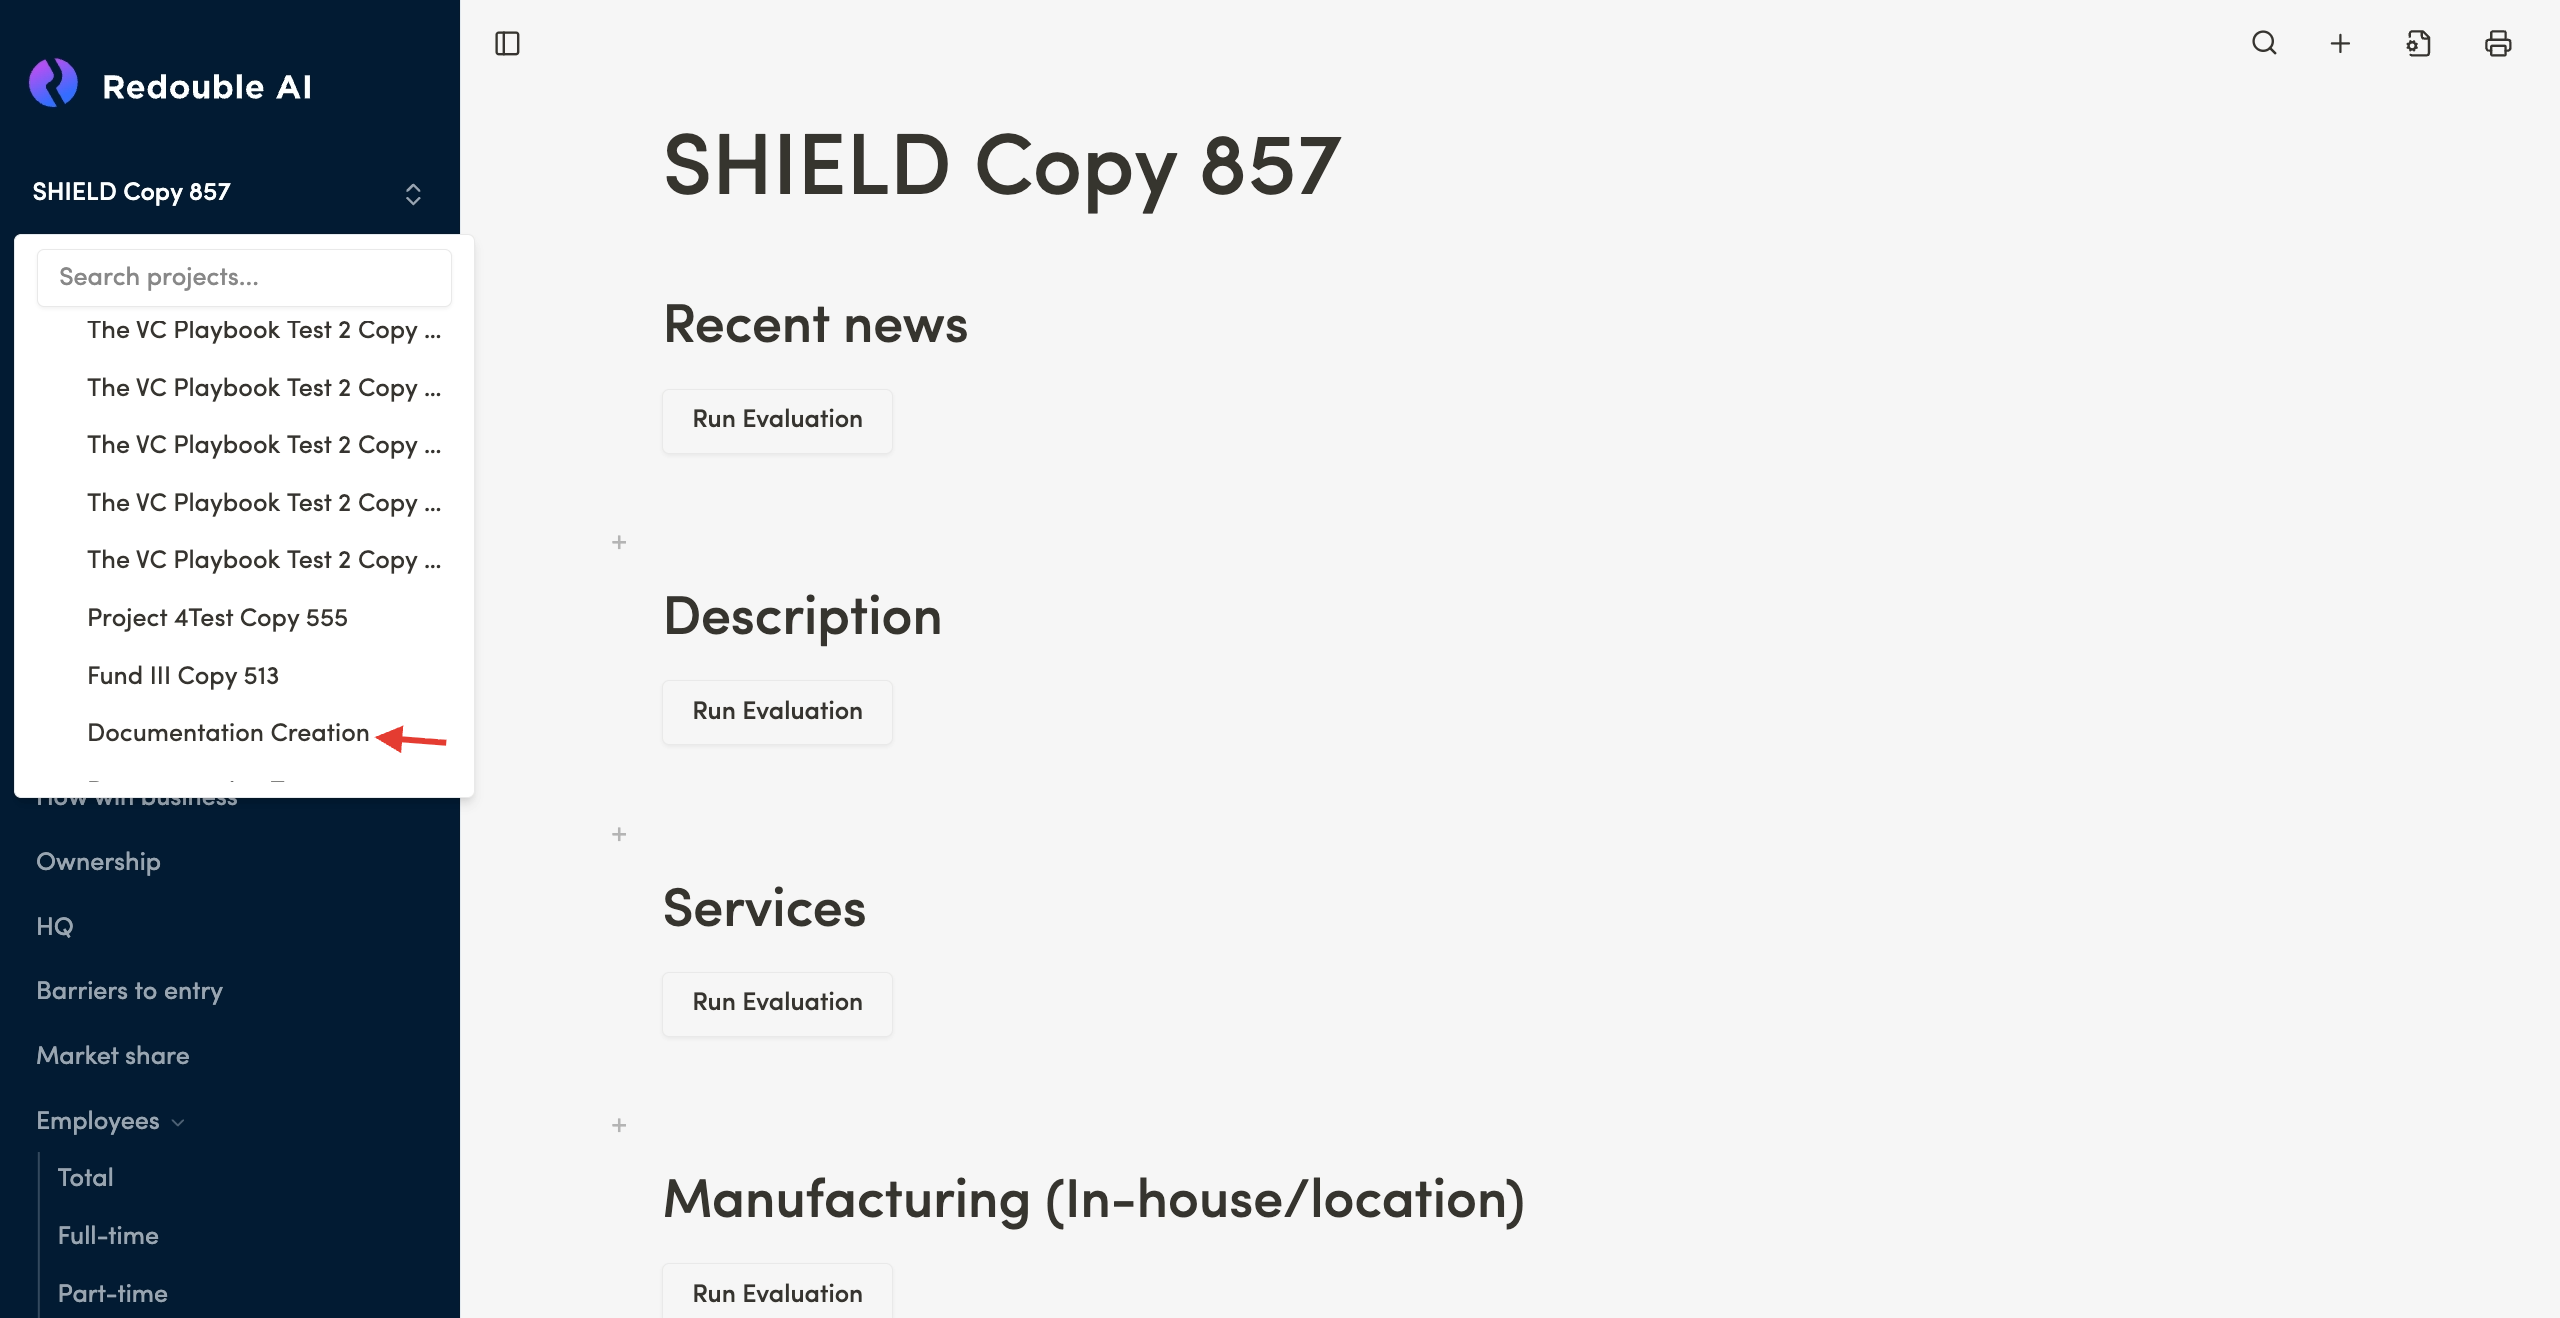
Select the needed project from the list or use search:
- Enter the project name in the search field
- Alternatively, scroll to select the project from the list


Result: You have switched to the selected project. The project's main page will open with all its questions and documents.
Additional information: The project list is displayed in order of last use or creation. The current active project is marked in the list.
1.3 Printing/ downloading the project
Preconditions:
- You are logged into the Redouble AI system
- You have at least one project
Steps:
- Open the project you would like to print
- In the top toolbar, click on the printer icon "Print Document"
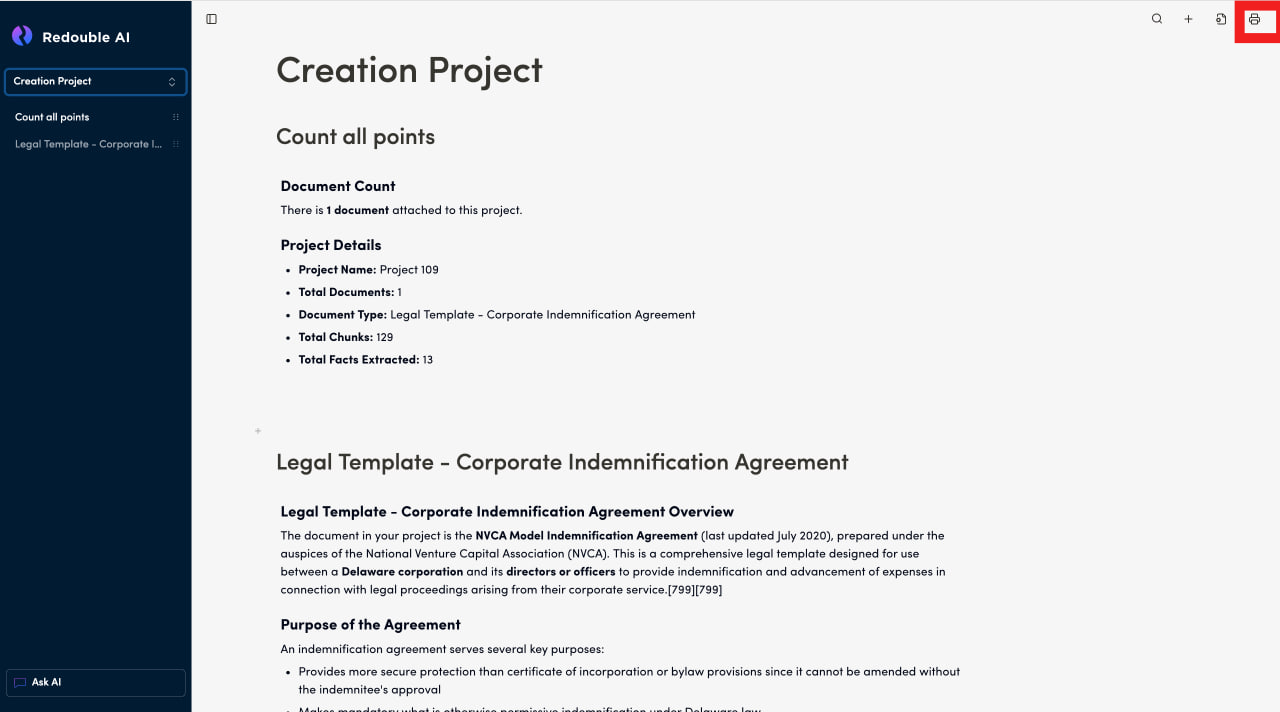
- A new browser tab will open within which you can:
- Print a project
- Save to PDF
- Click the "Print" or "Save" button
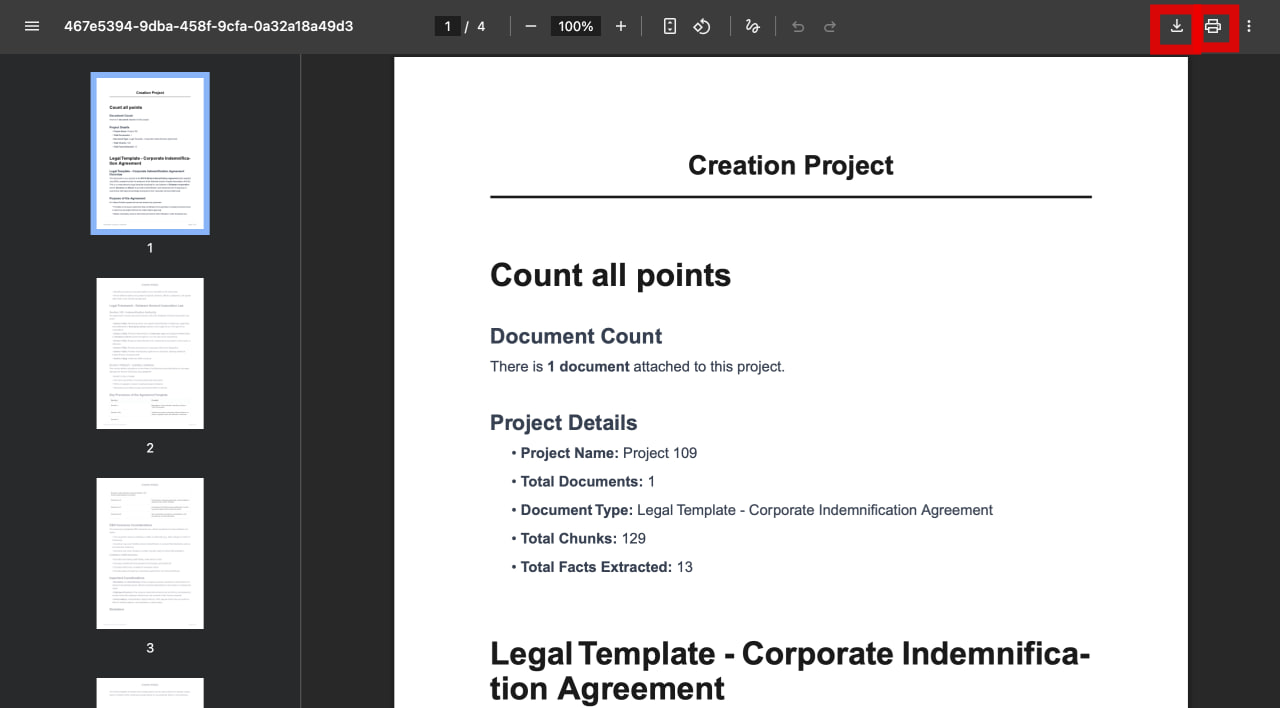
Result: The section or document has been printed or saved as a PDF file to your computer.
1.4 Upload documents to the newly created project
Preconditions:
- You are logged into the Redouble AI system
- You have a newly created project with no documents currently attached
Steps:
-
Click the "Upload Documents" button

-
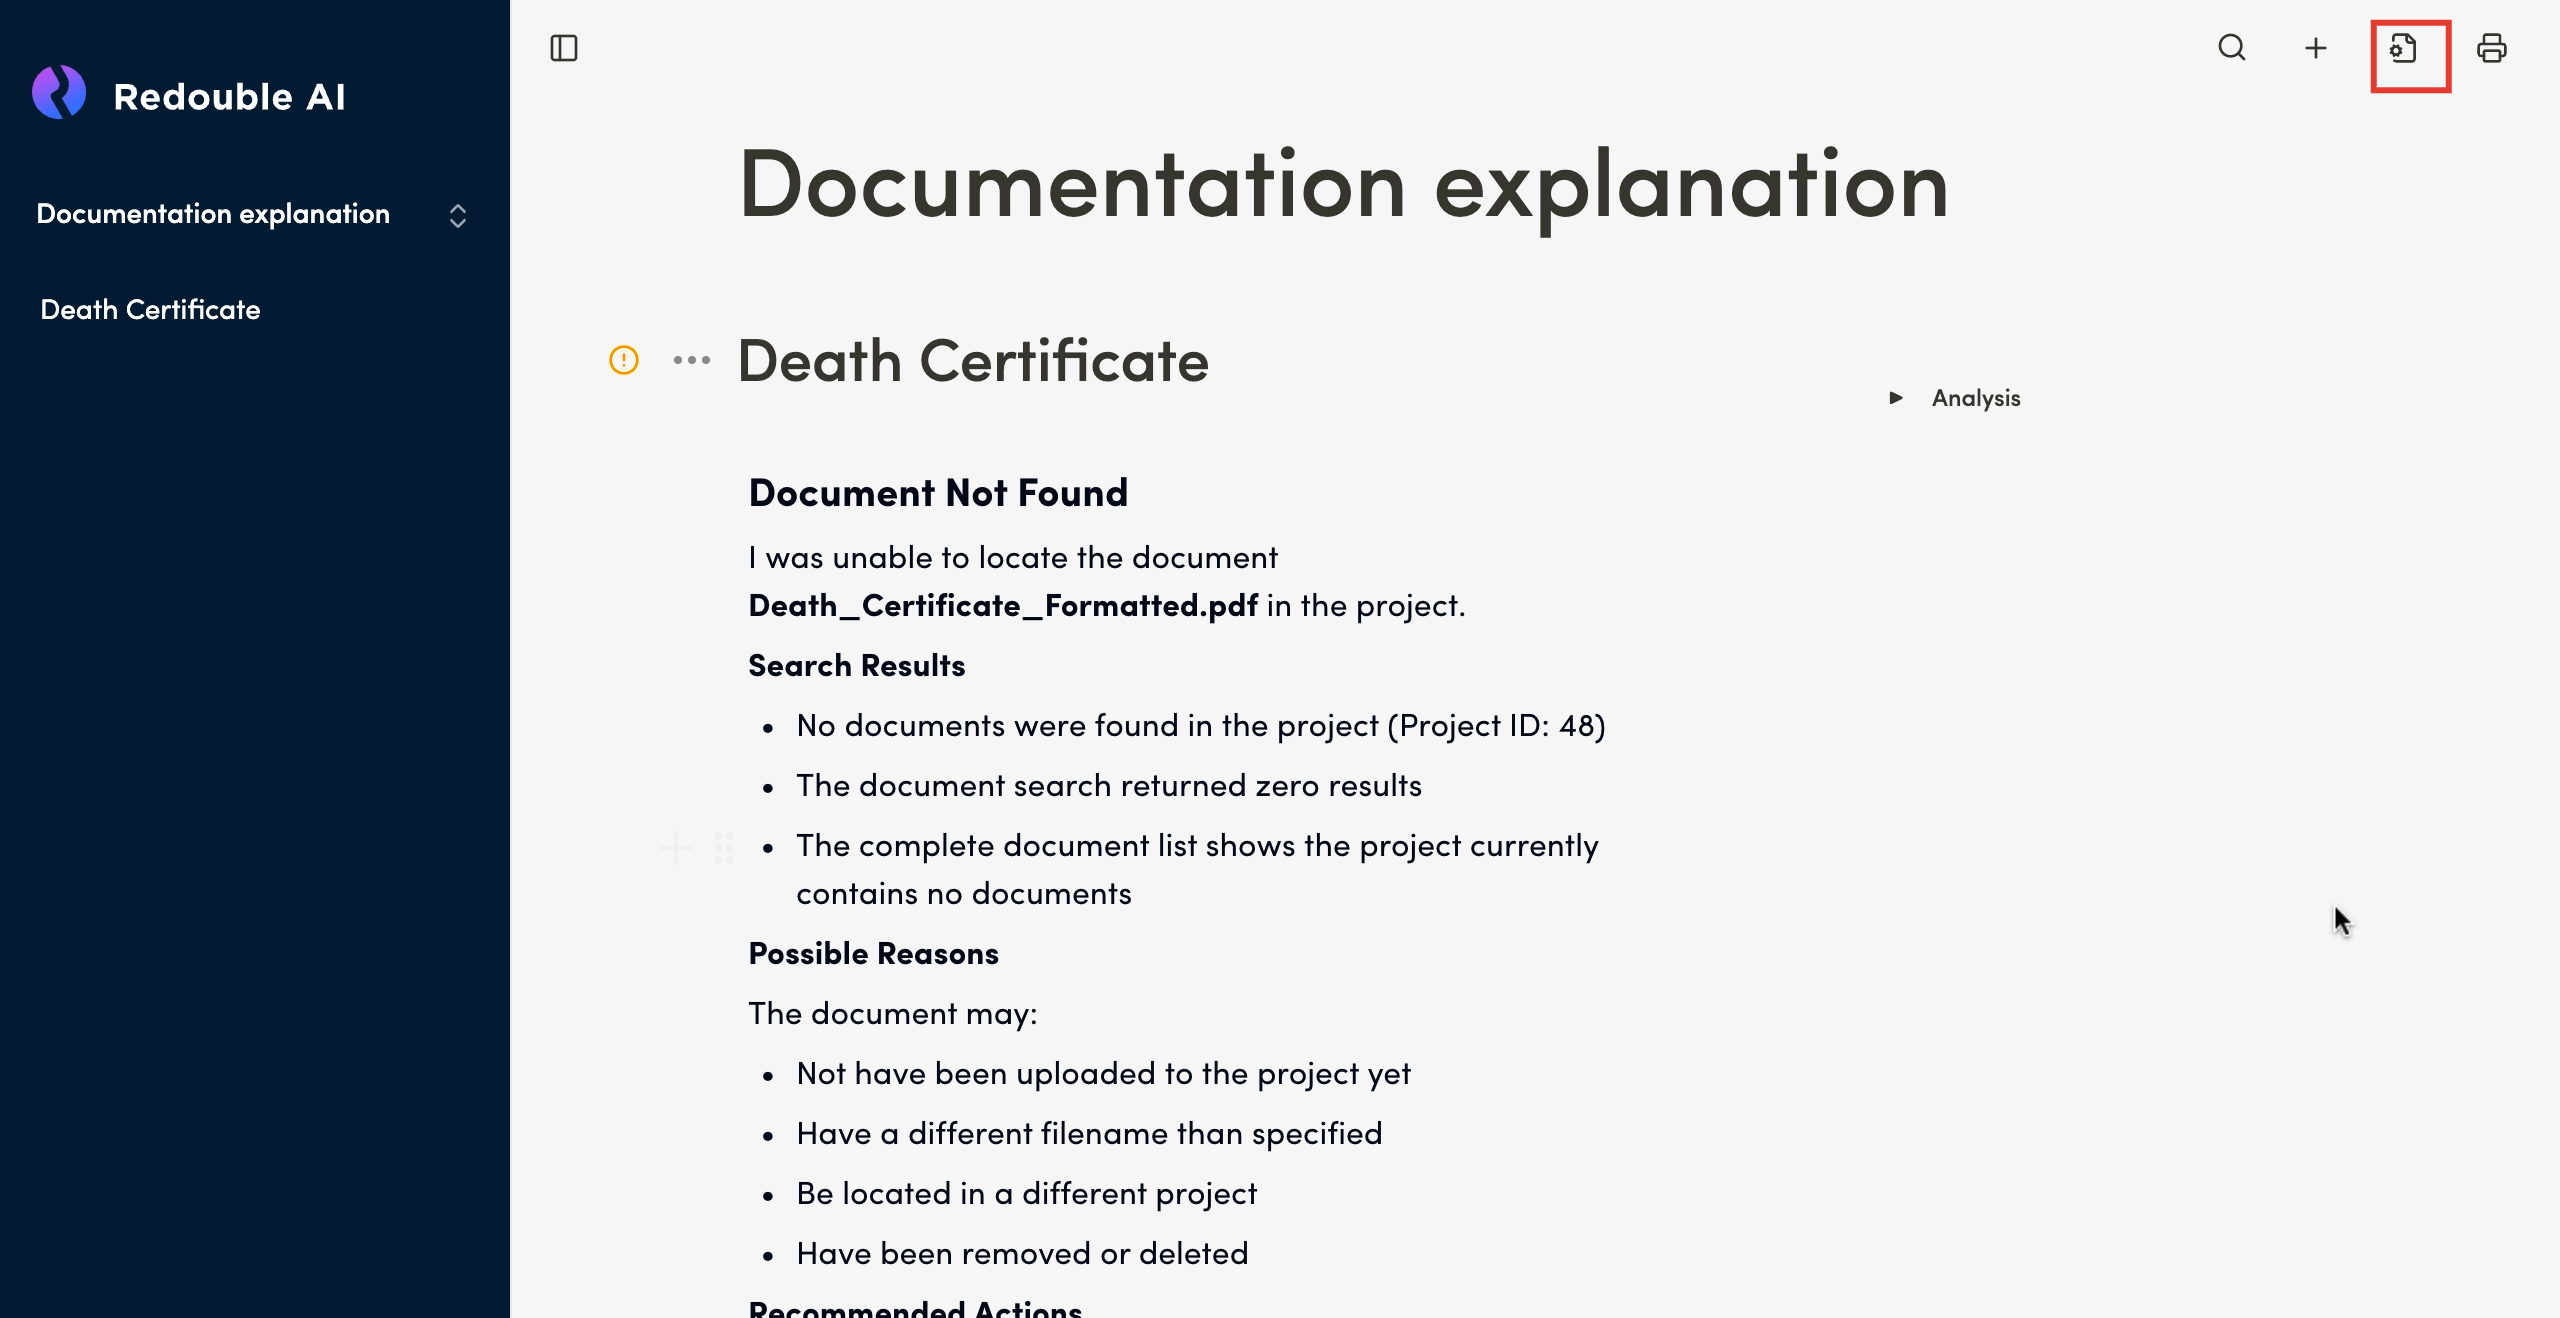
In the dialog window, select "Attachments" in the "Workspace" list, click on the field to select files from your computer or drag files and documents directly into the field

-
Wait for the upload to be completed and see documents added to the list

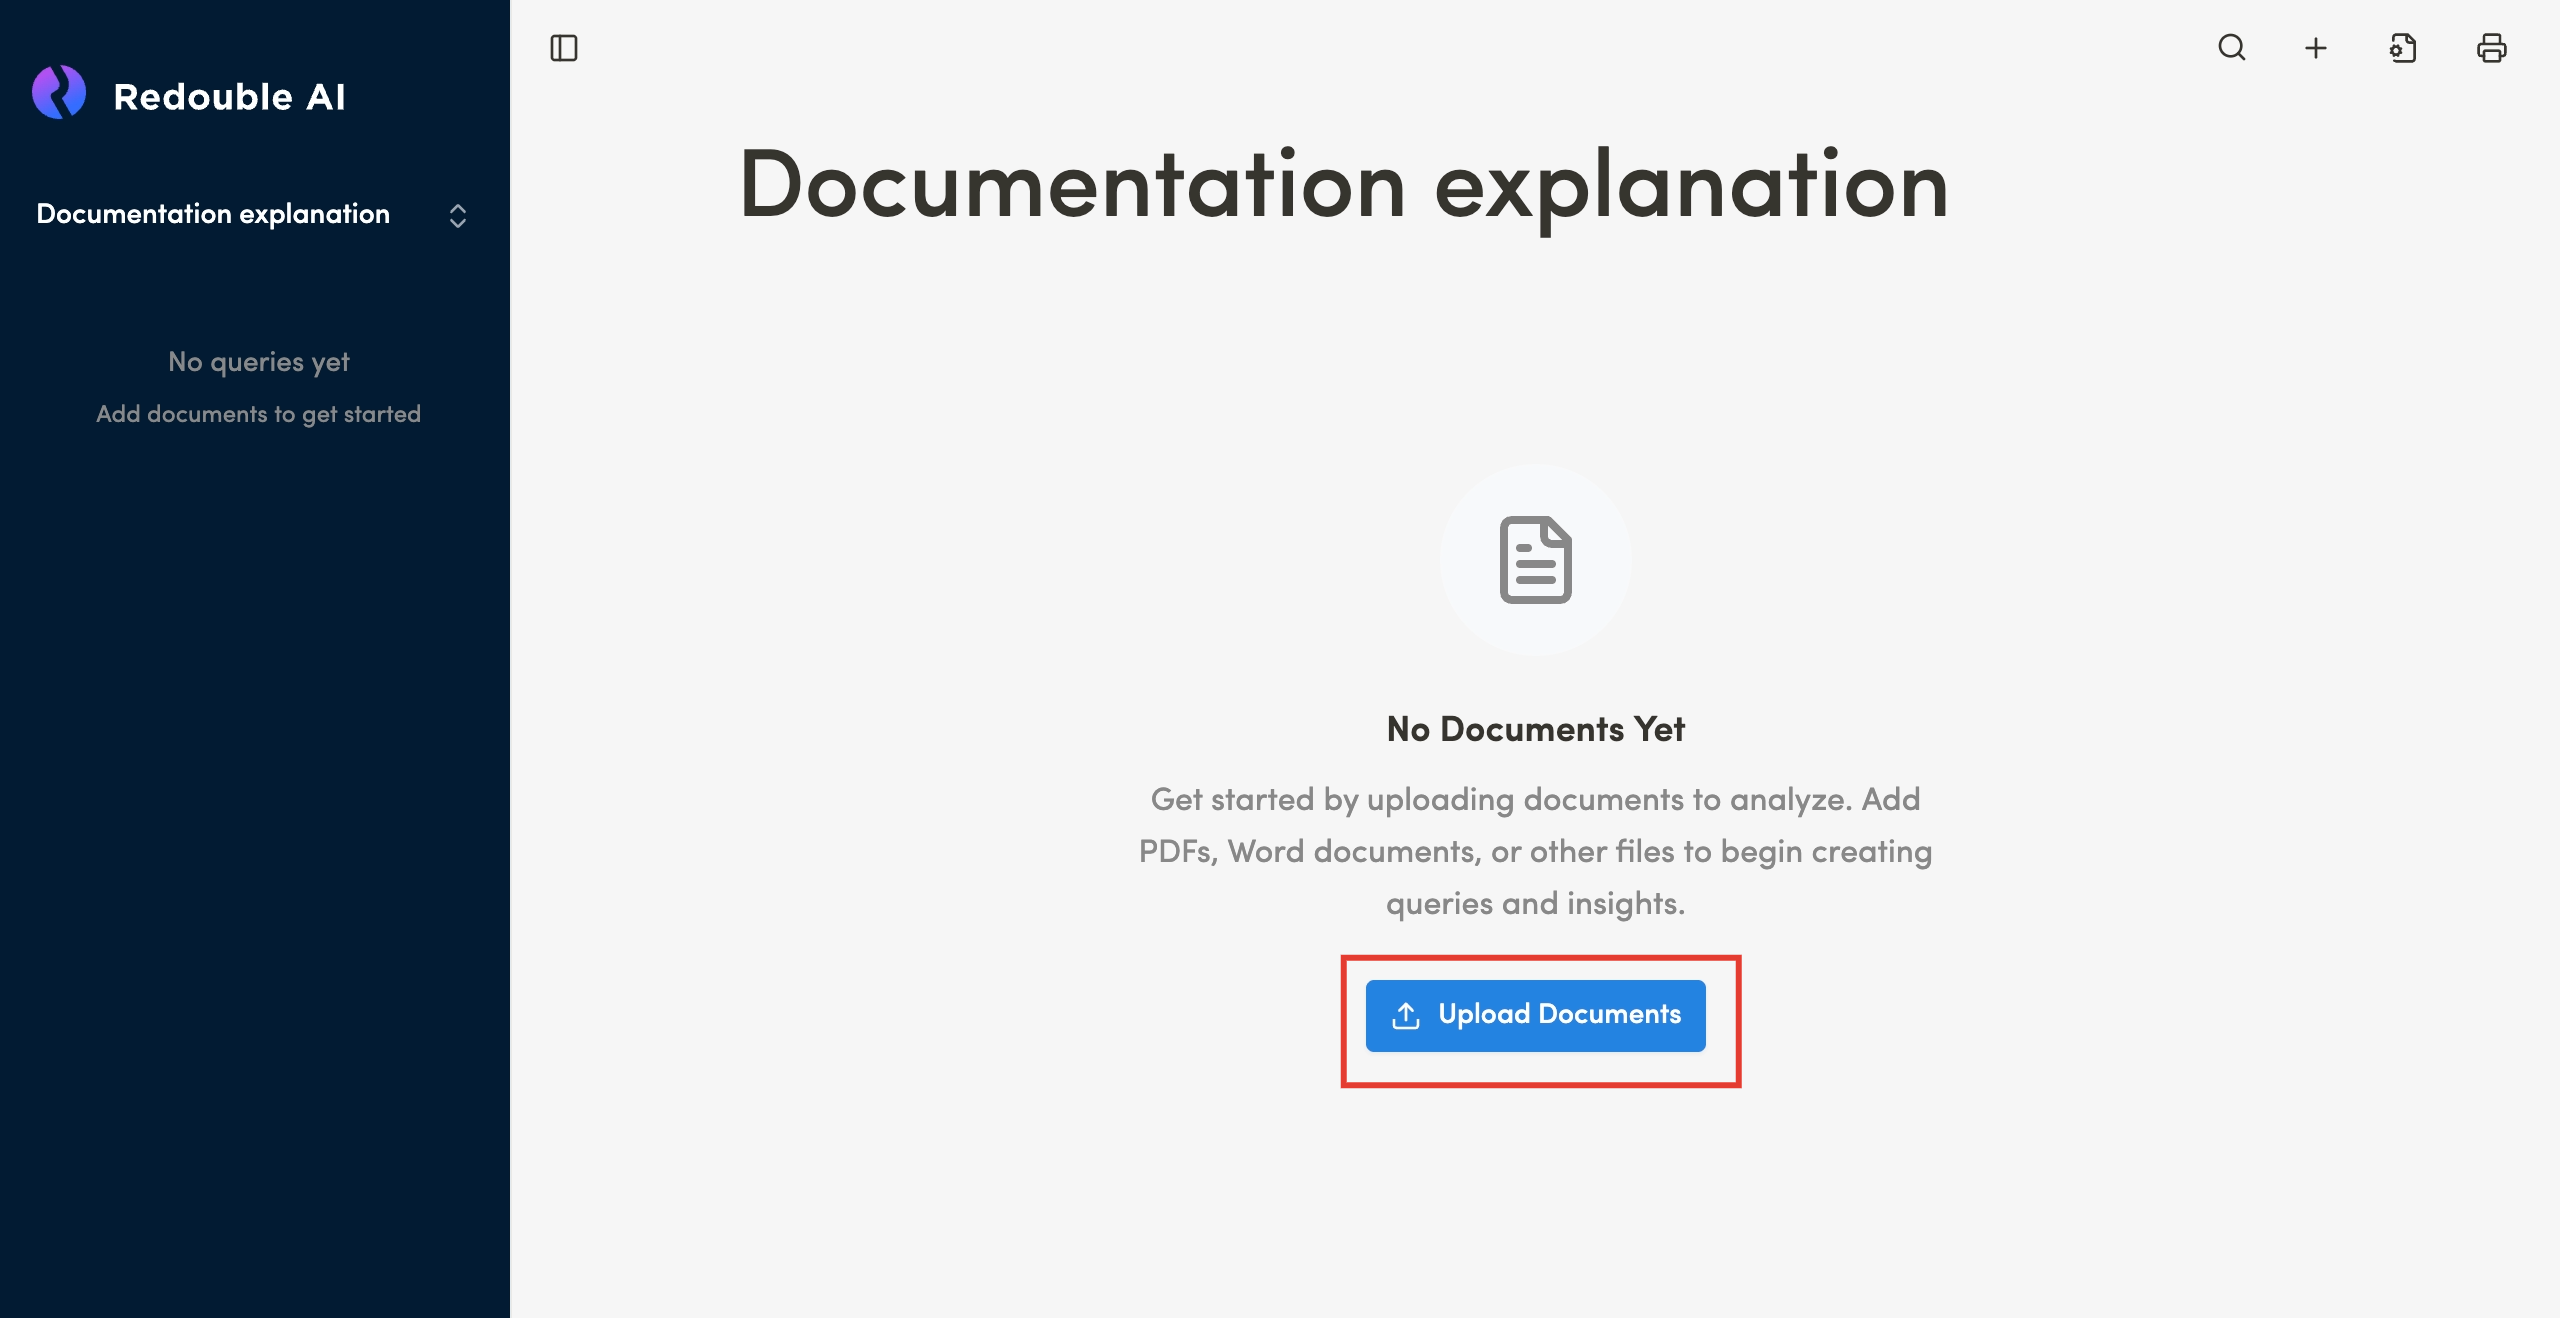
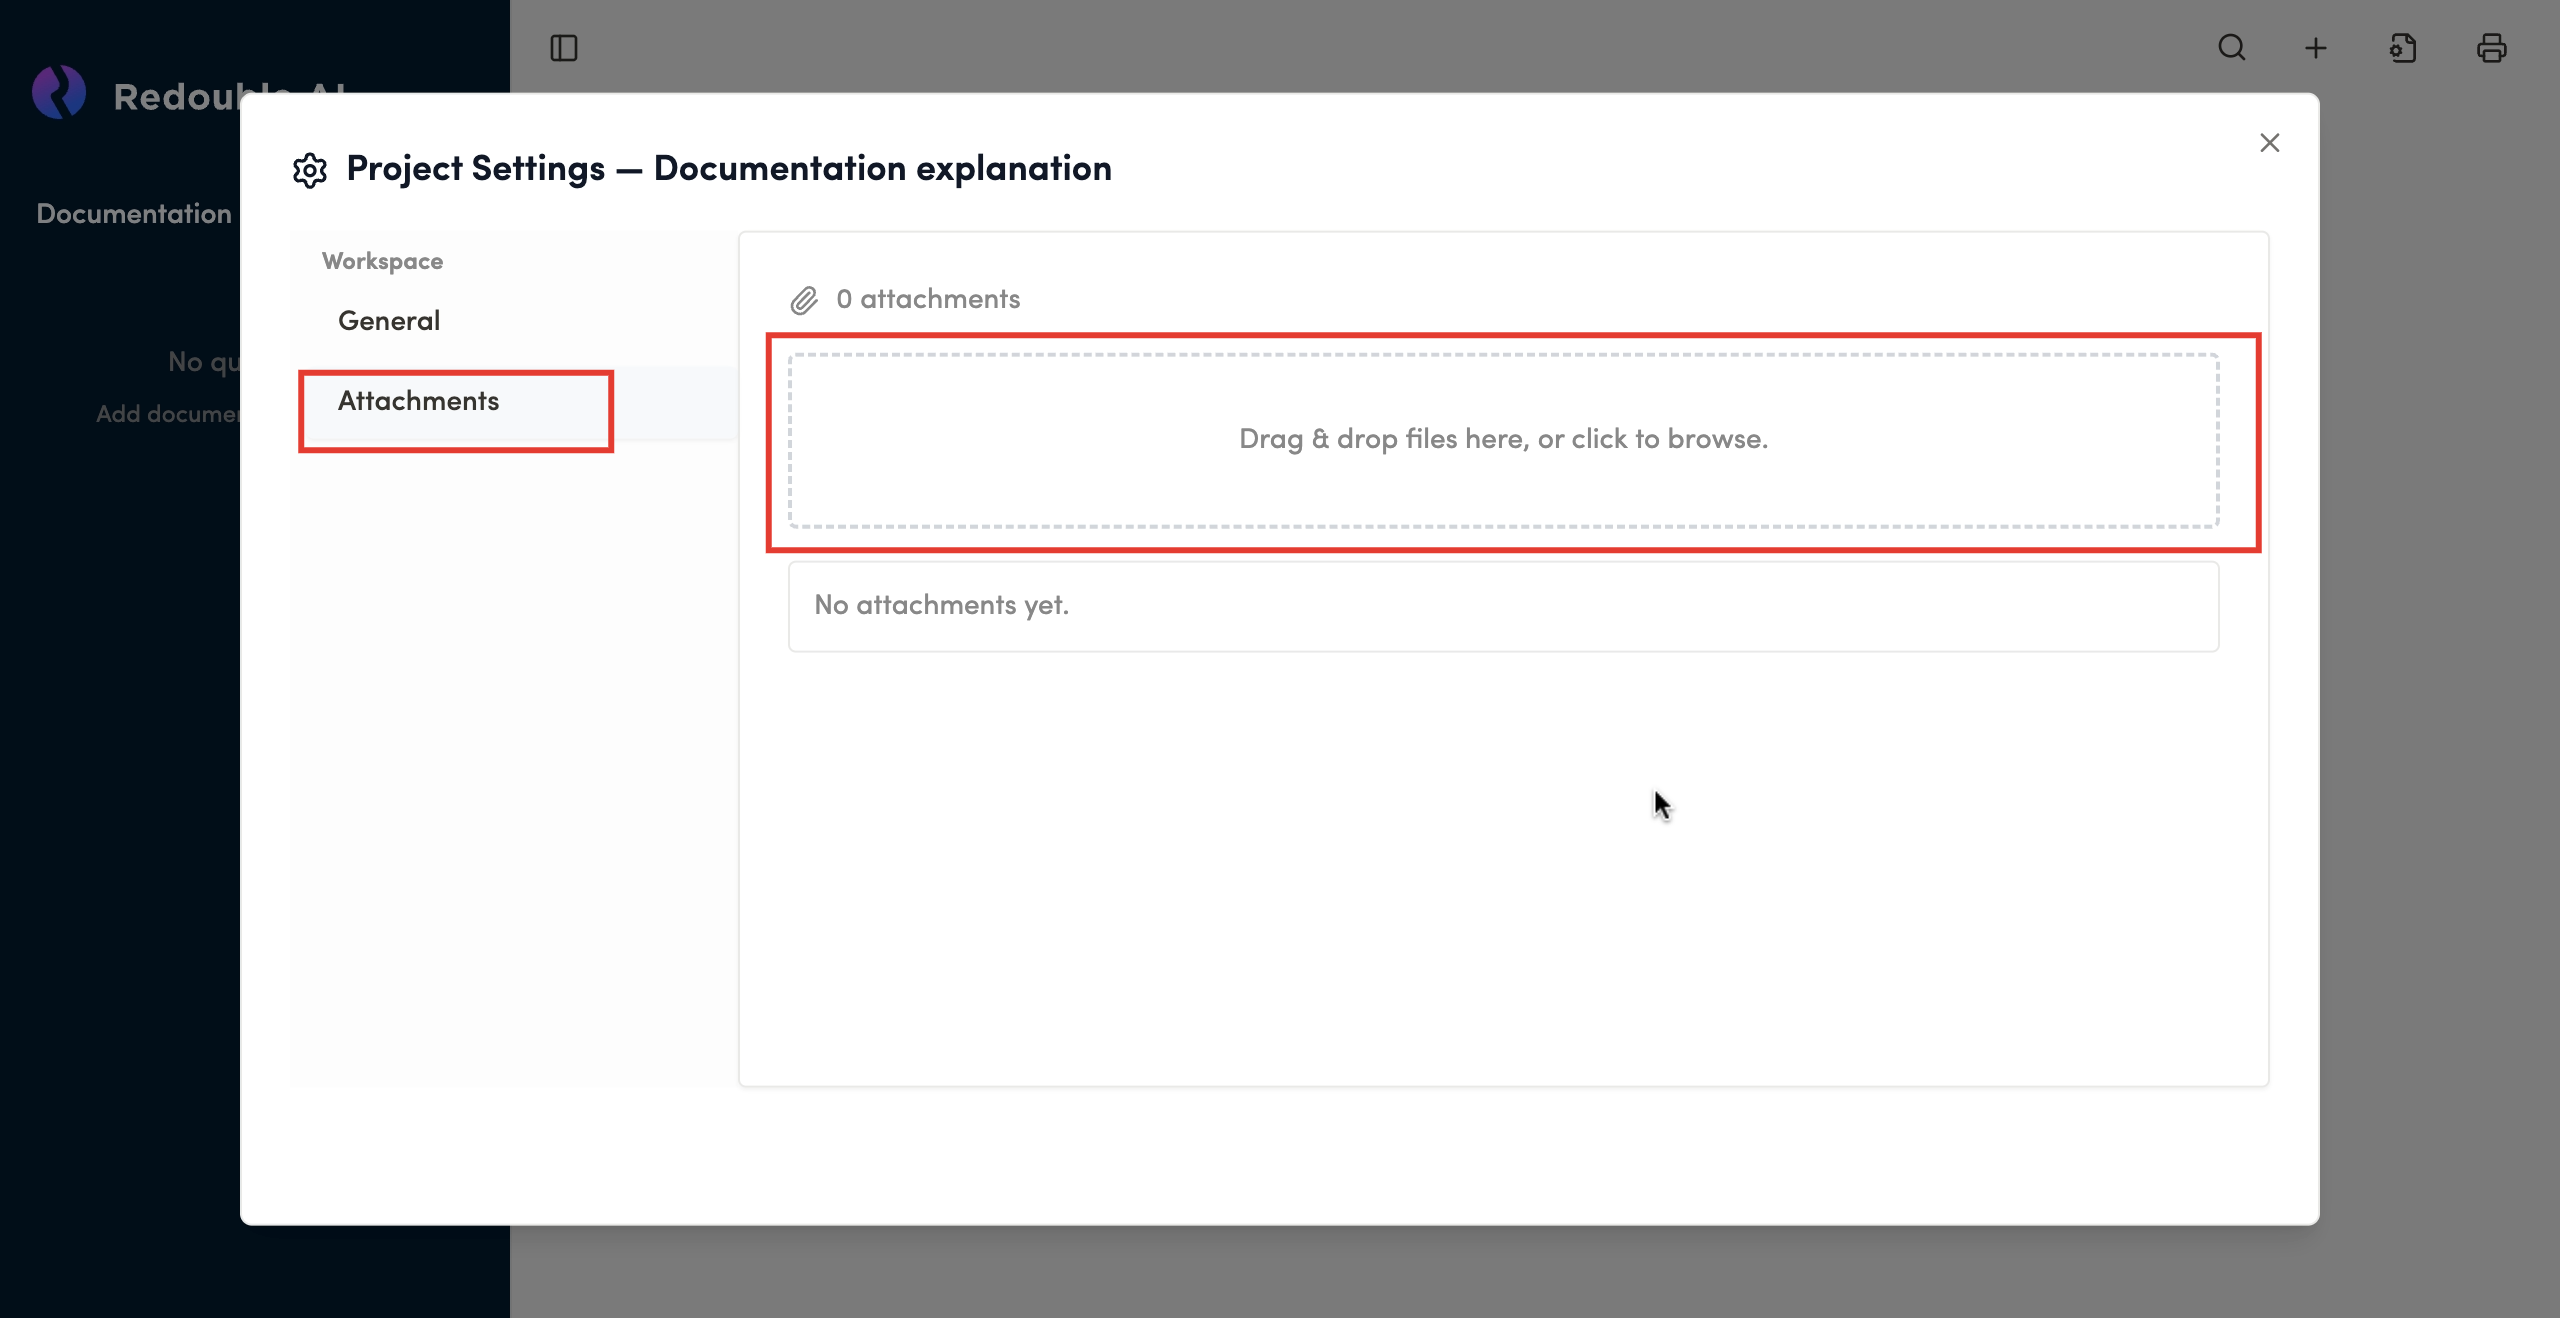
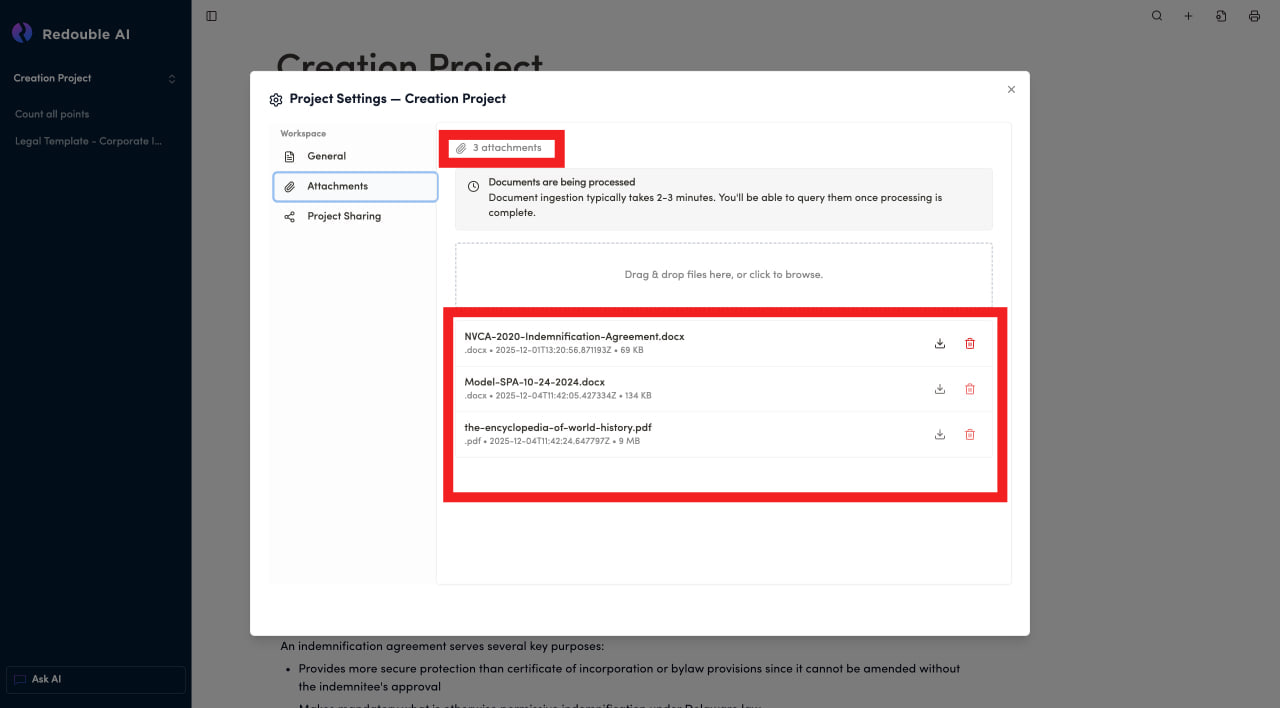
Result: Documents have been successfully attached to the project.
Note: Documents may need 2-3 minutes to ingest.
1.5 Deleting a project
Preconditions:
- You are logged into the Redouble AI system
- You have a project
Steps:
-
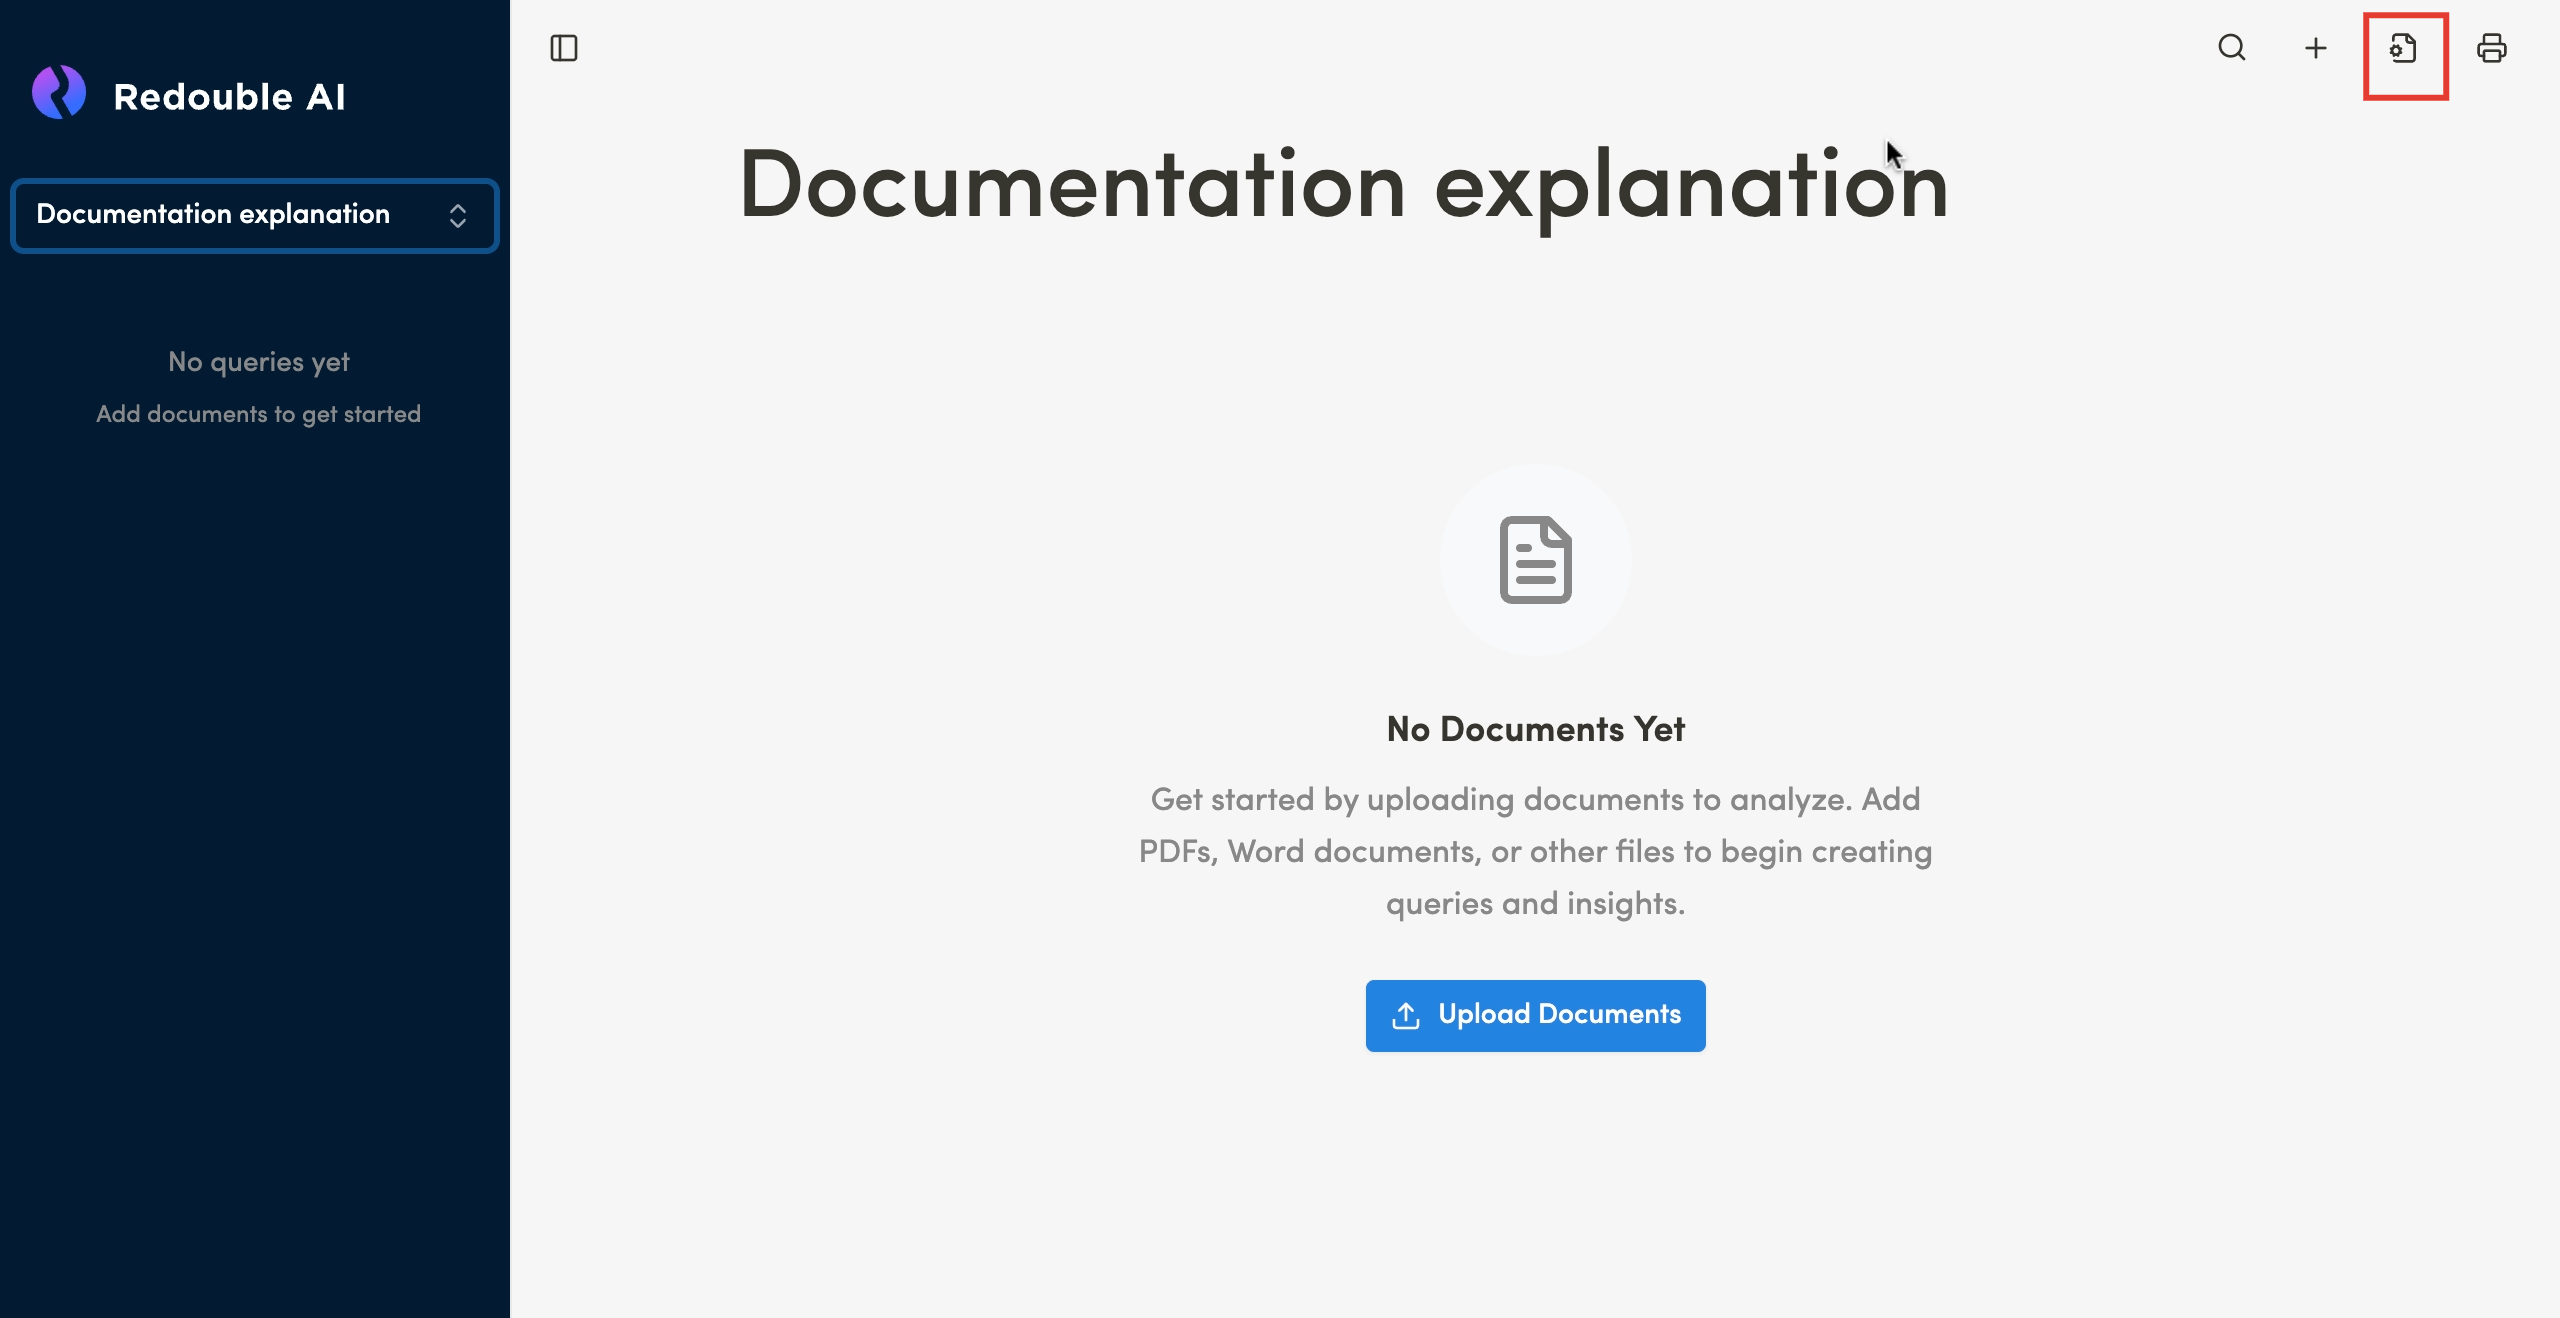
Click on the "Settings" icon in the top toolbar

-
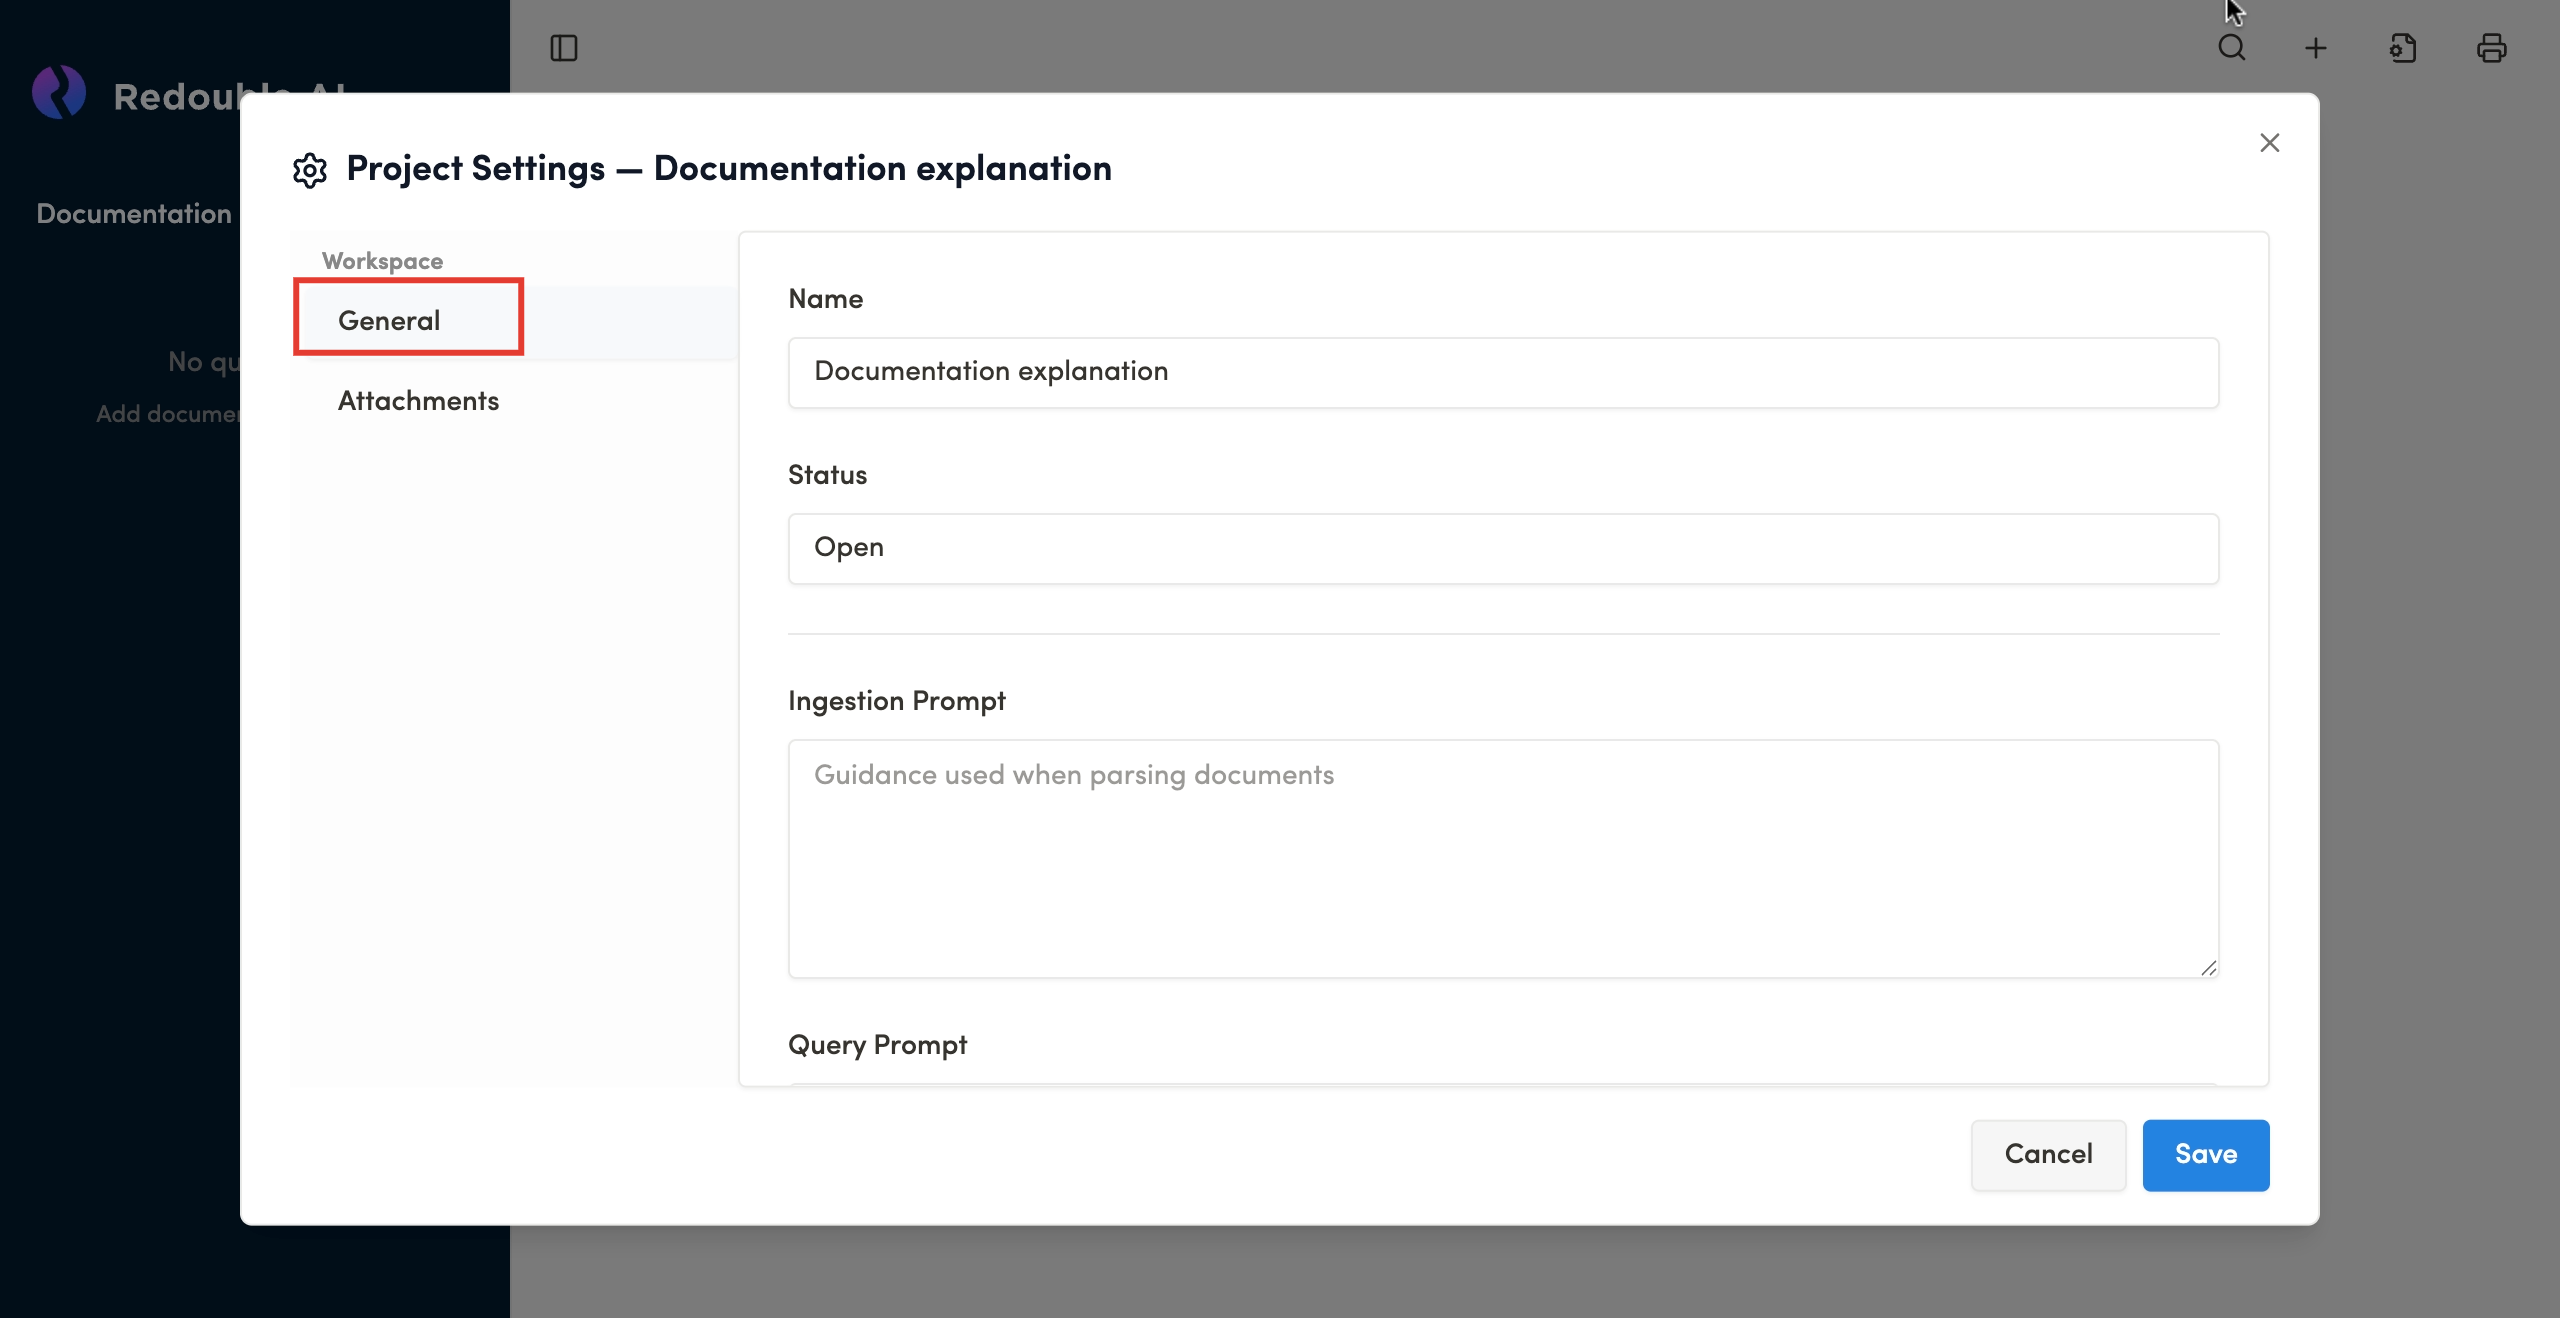
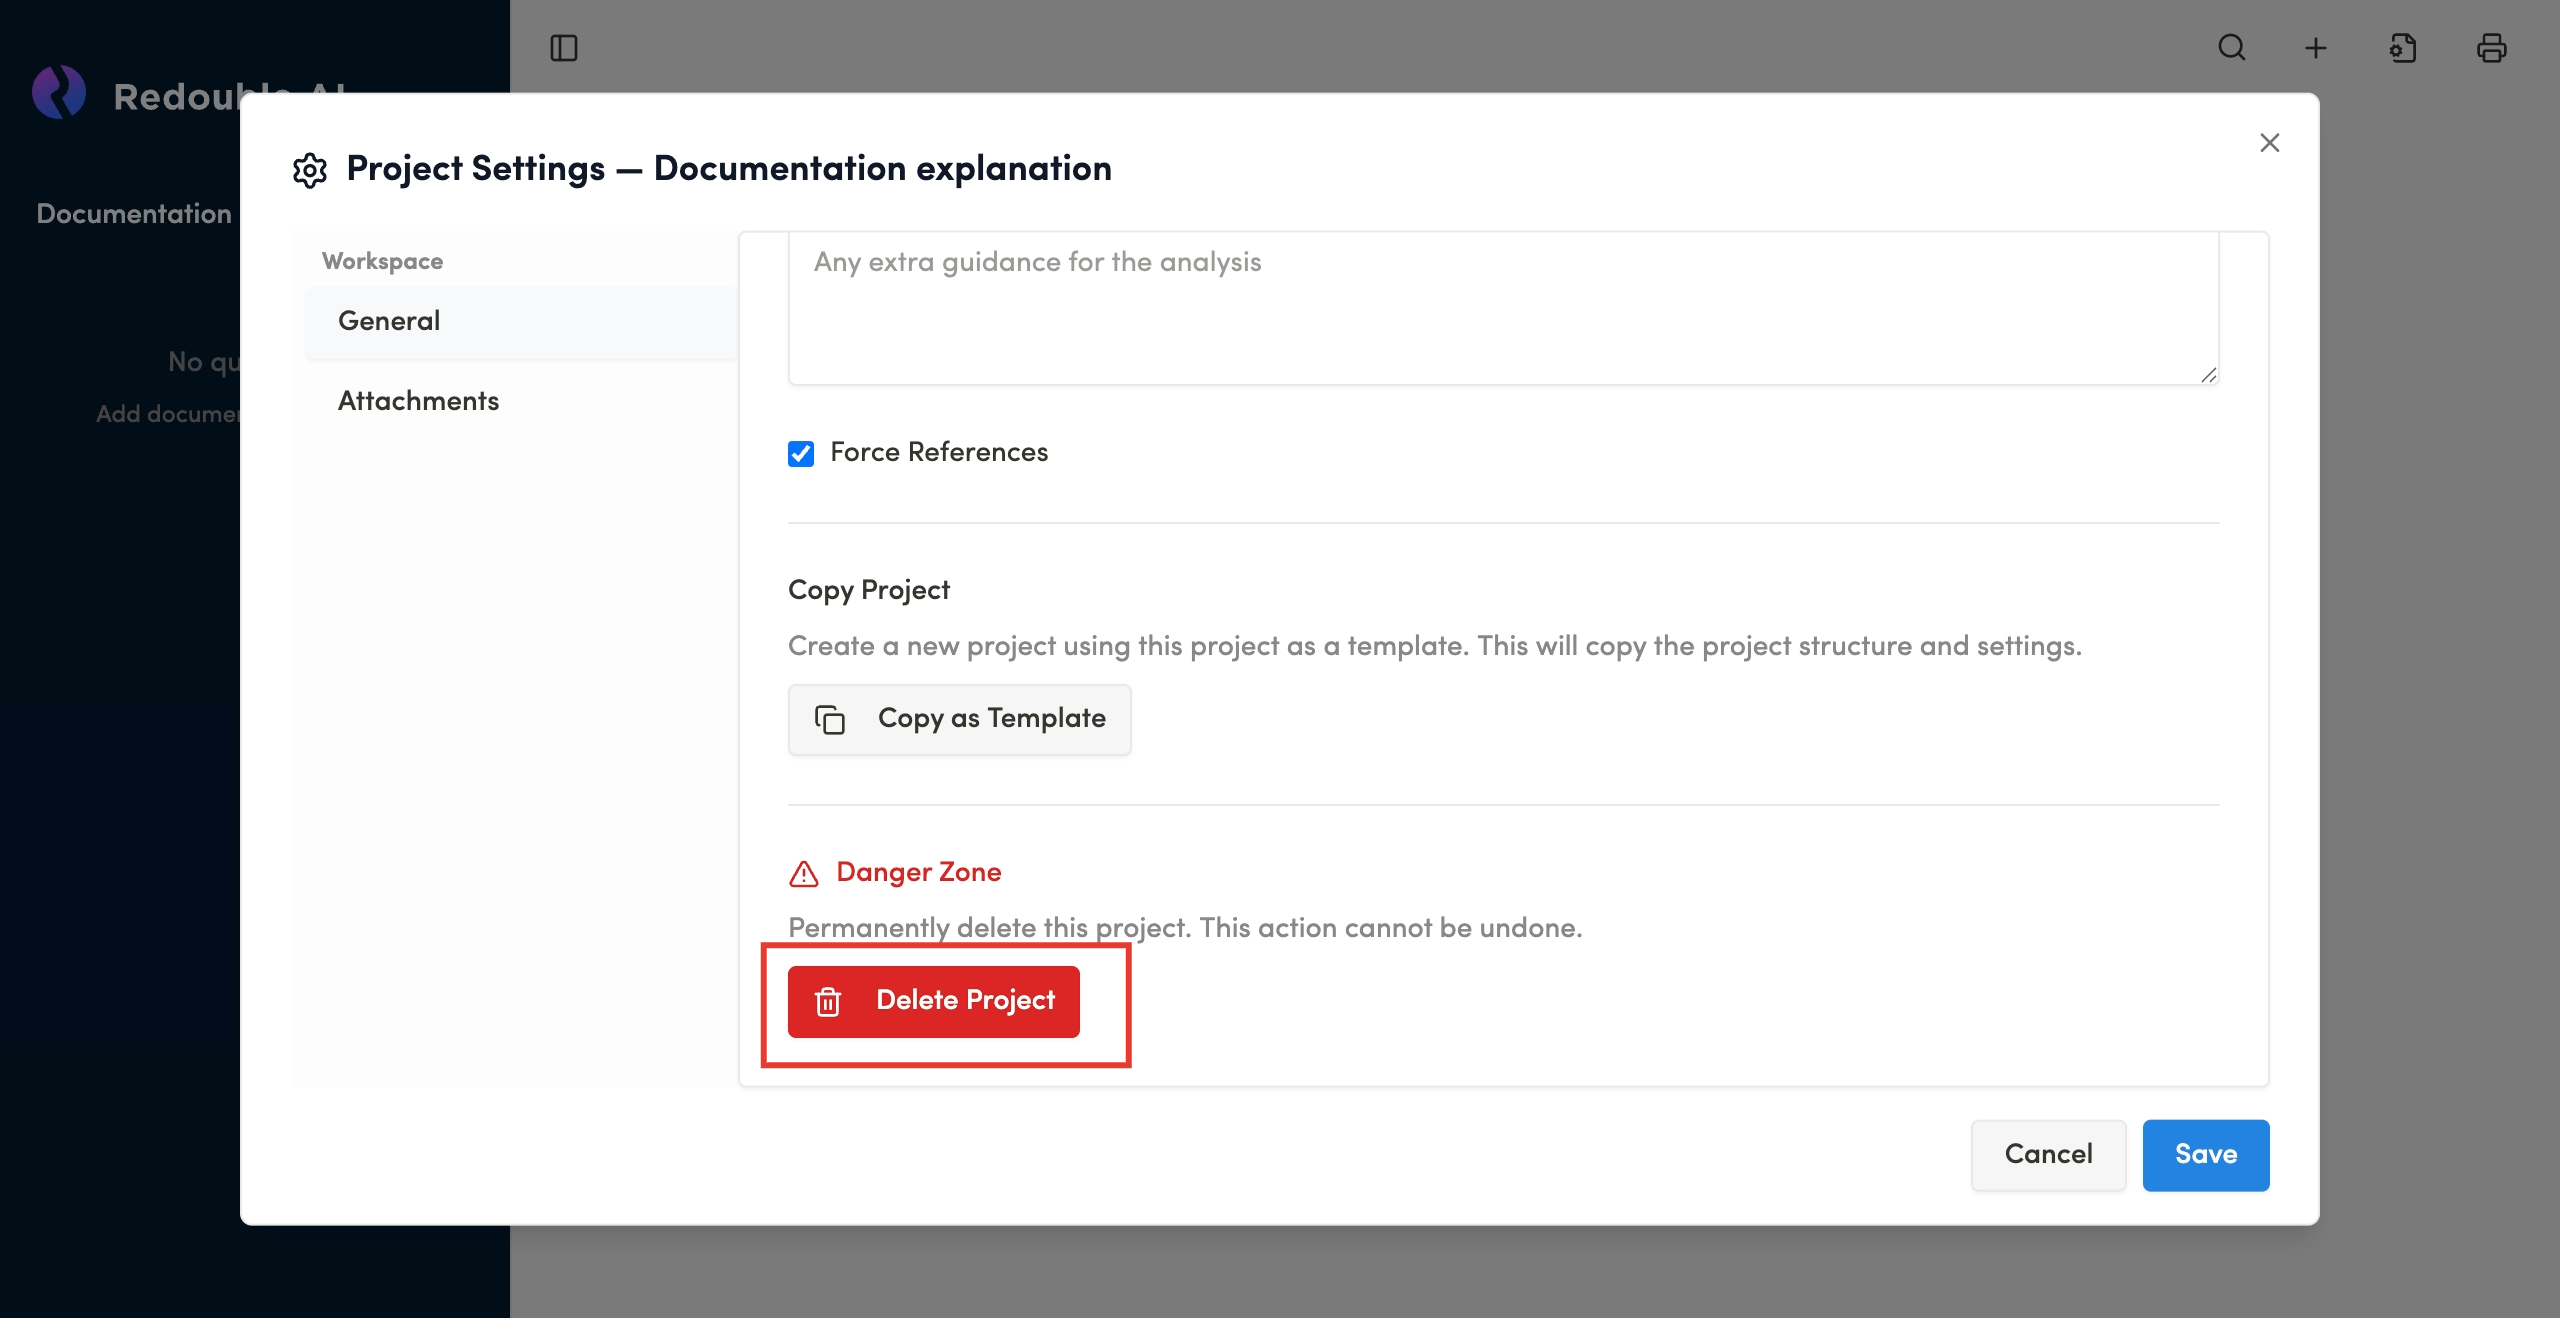
In the dialog window, select "General" in the "Workspace" list and scroll to the bottom of the page

-
Click the "Delete Project" button

-
Confirm that you want to delete the project in the popup

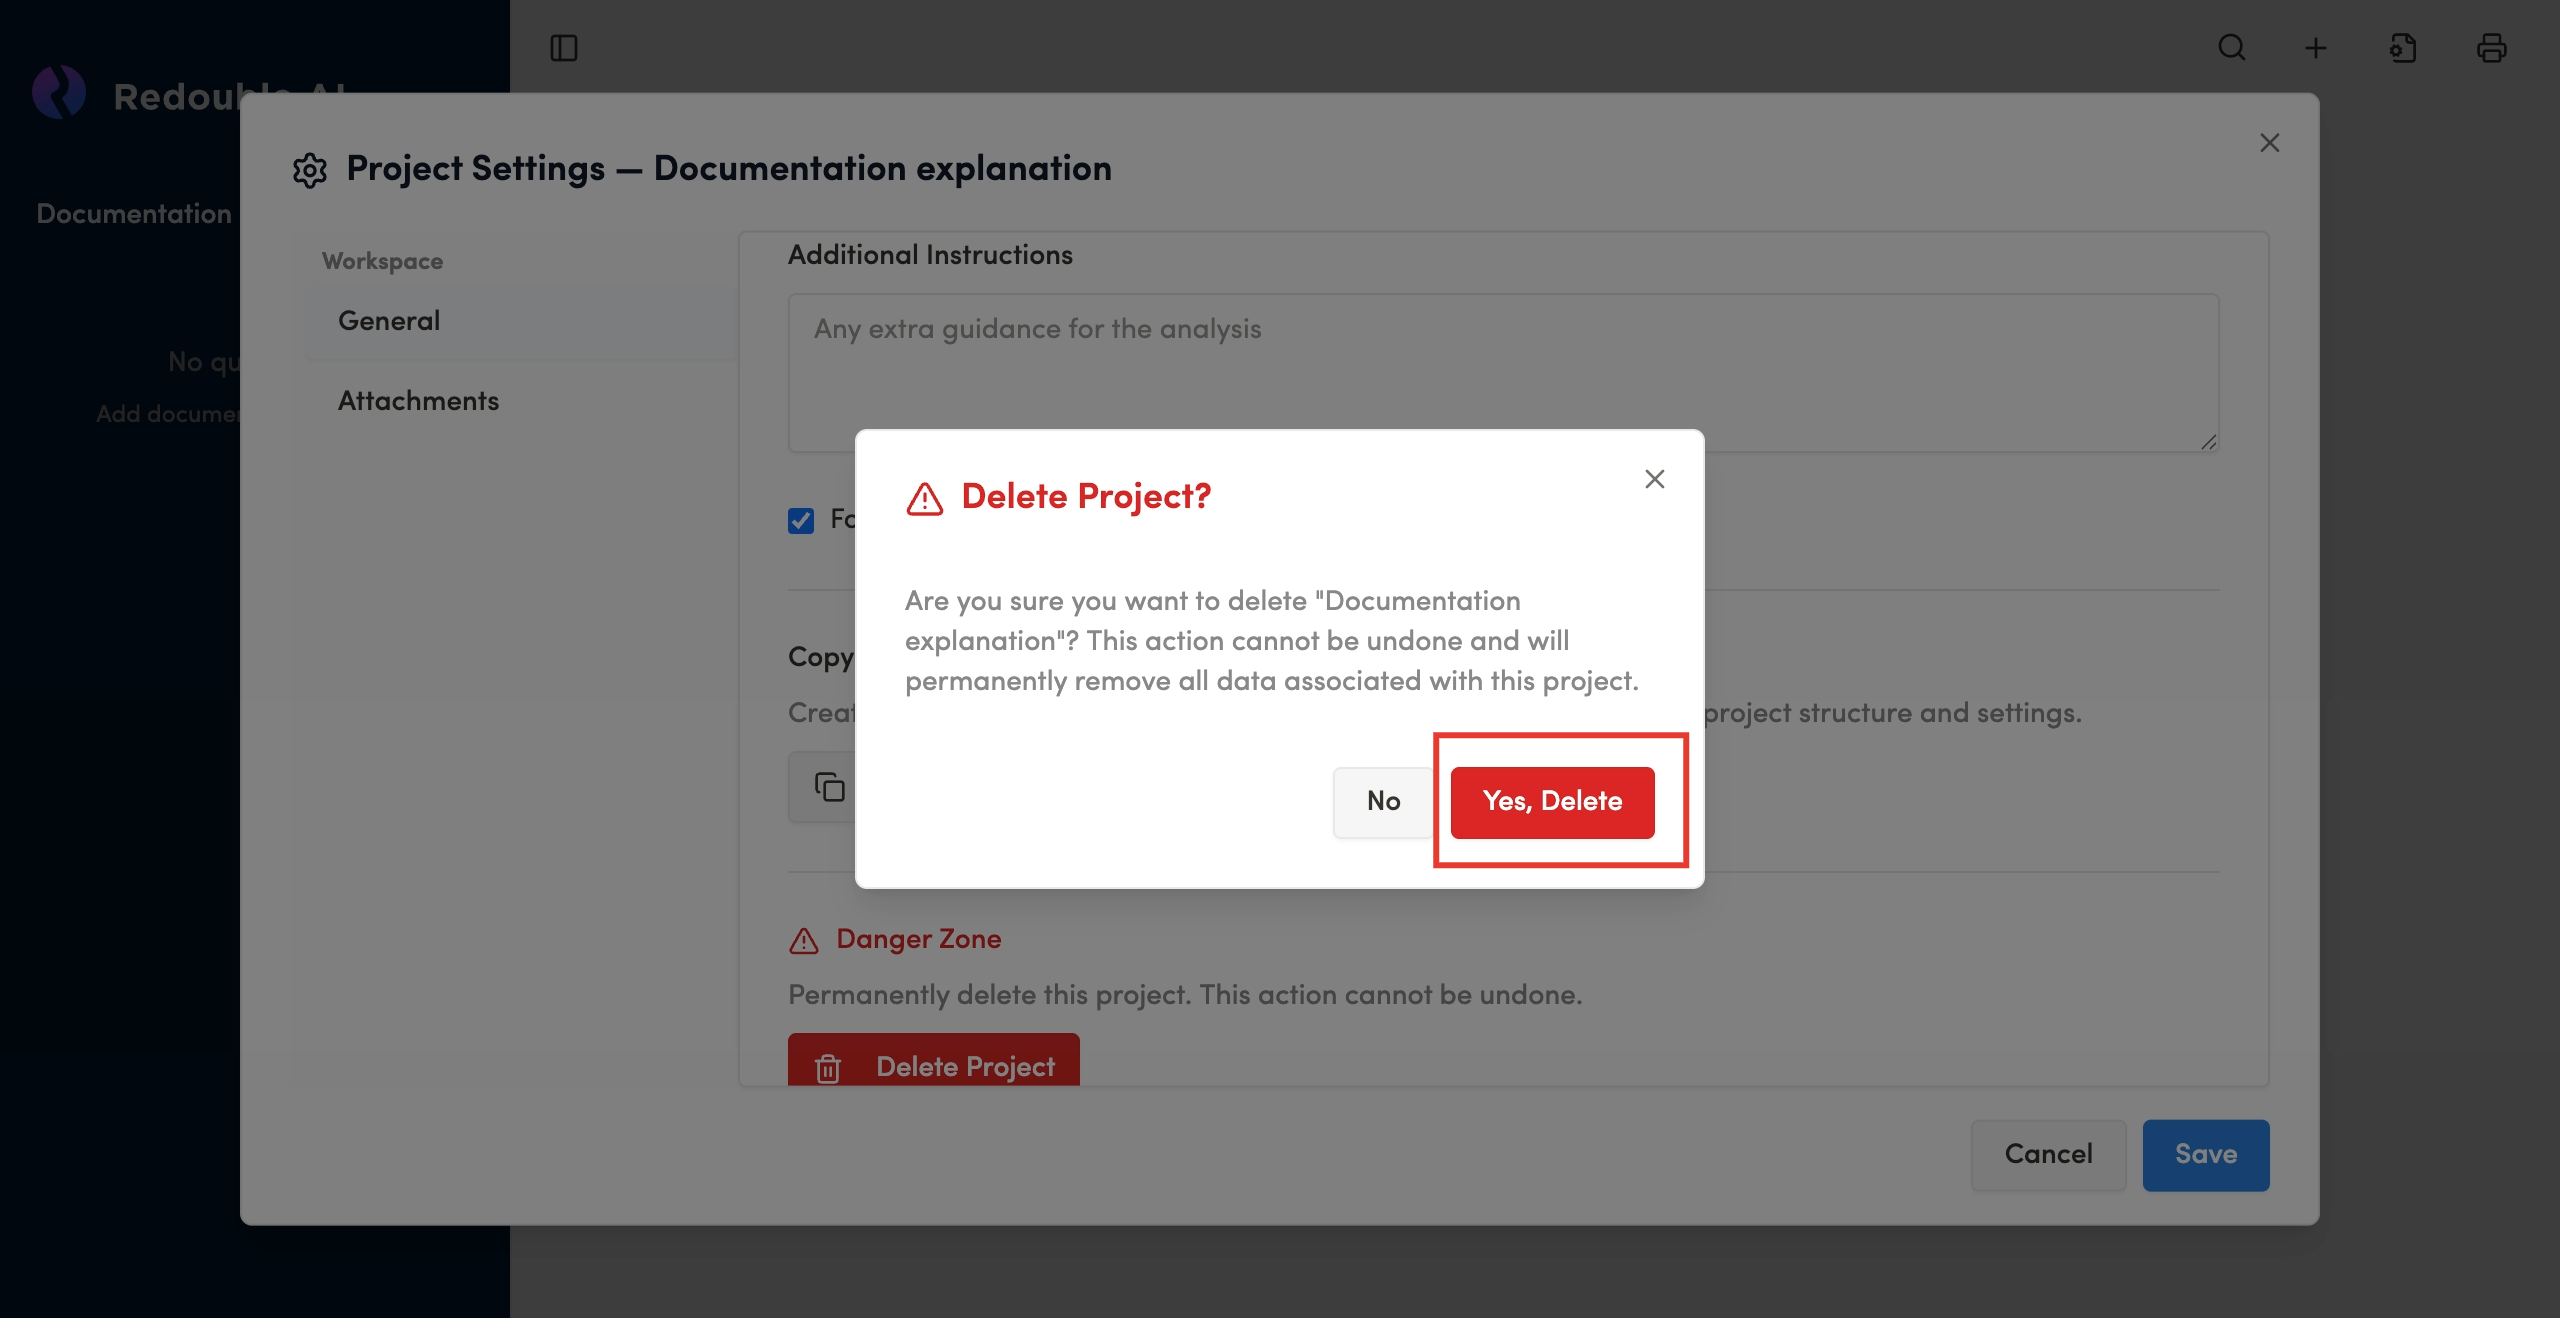
Result: The project has been deleted.
1.6 Copying a project
Purpose: Create a new project using an existing project as a template, copying the project structure and settings without duplicating input documents or answers.
Steps:
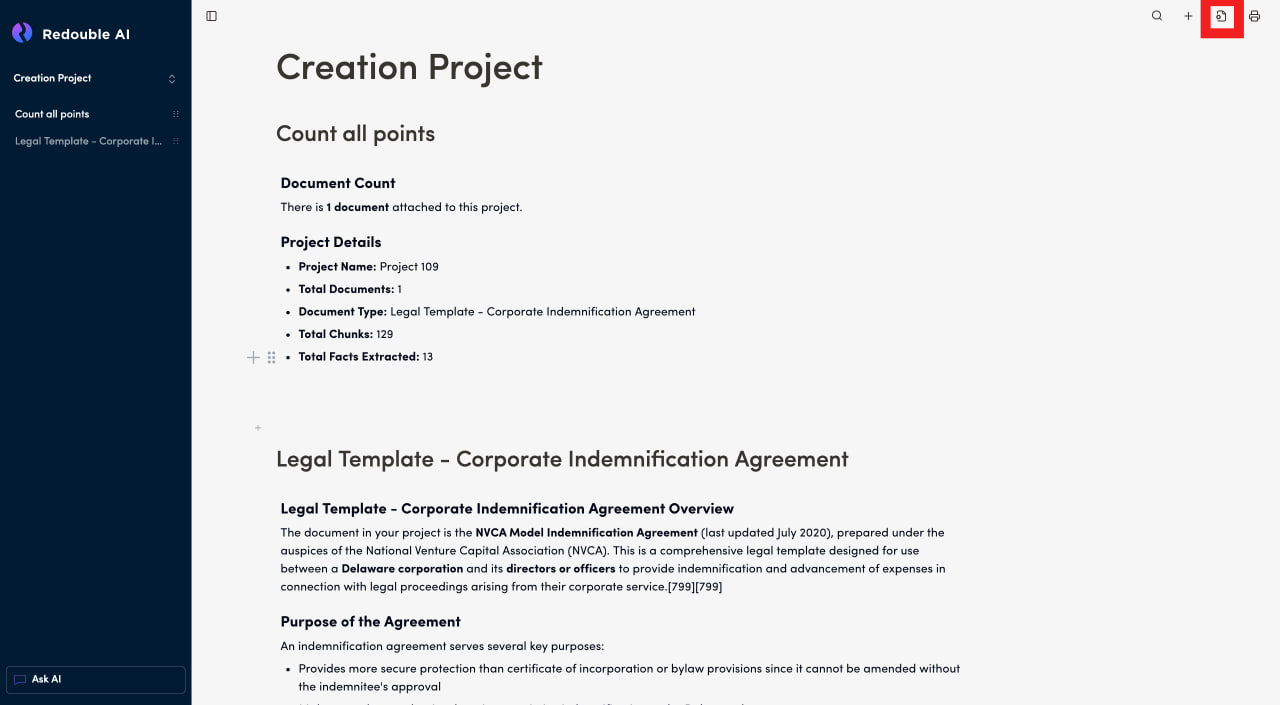
- Click on the "Document Settings" icon in the top toolbar
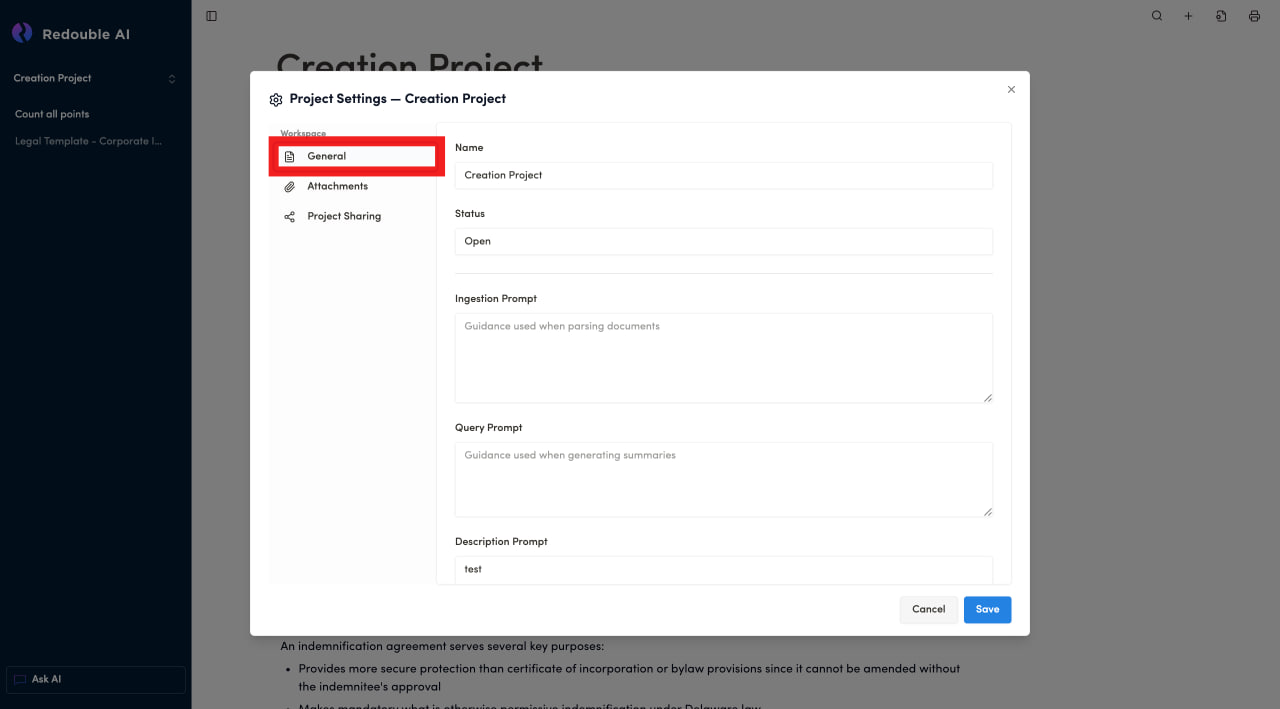
- In the dialog window, select "General" in the "Workspace" list and scroll down to the "Copy Project" section
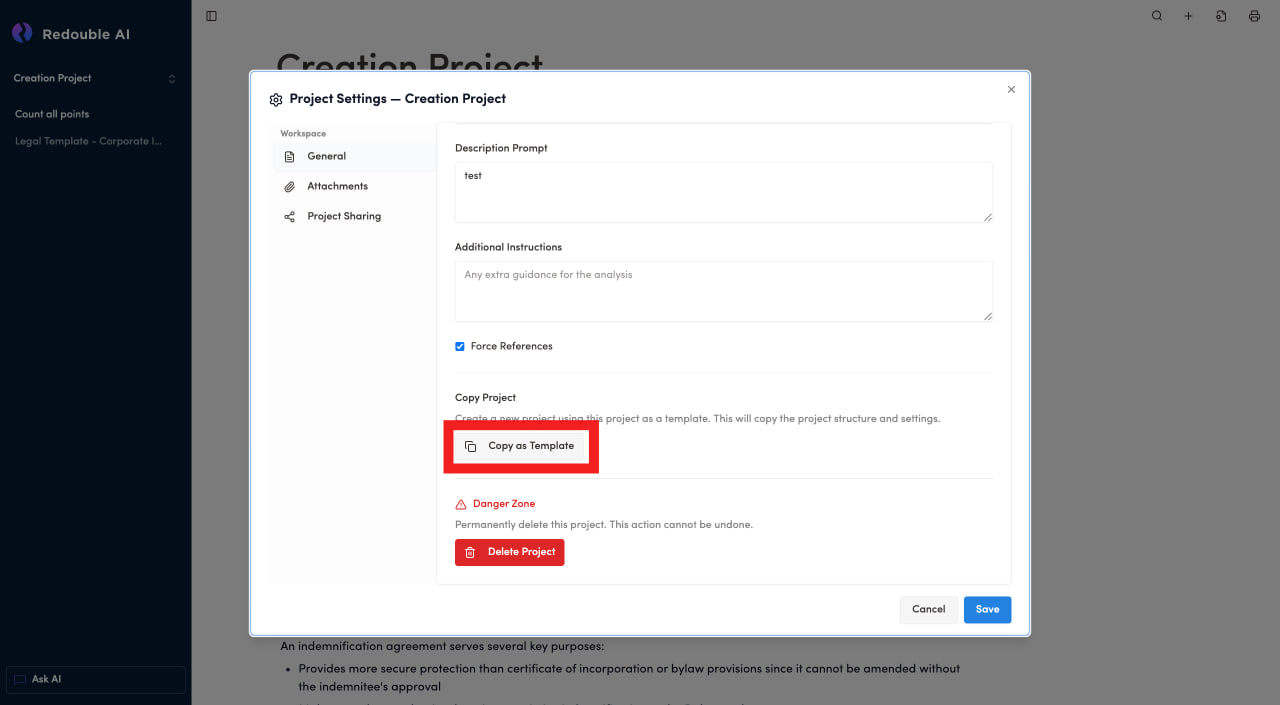
- Click the "Copy as Template" button
- Confirm that you want to copy the project in the popup
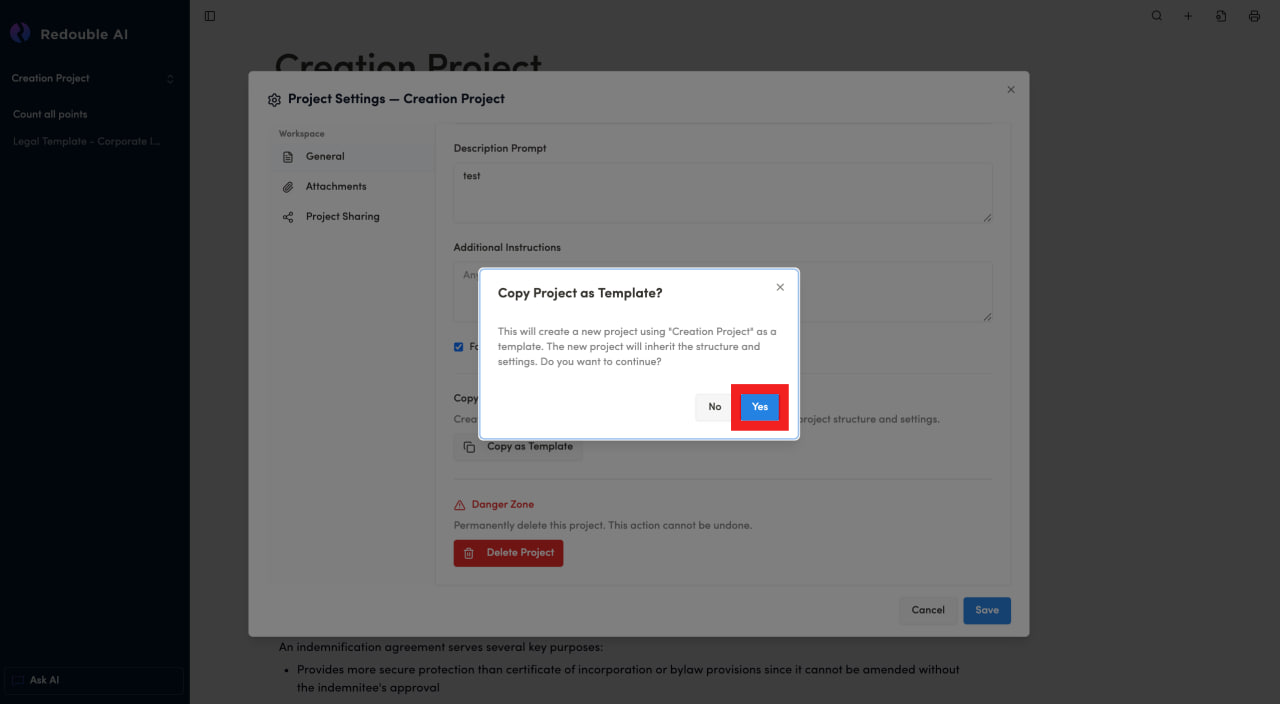
Result: The copy of the project will appear at the bottom of the dropdown list of all projects.
What is being copied
When you copy a project as a template, the following elements are duplicated:
- Ingestion Prompt
- Query Prompt
- Description Prompt
- Additional Instructions
- Force References Setting
- Prompt Templates
What is NOT being copied:
- Documents: Attachments are not copied
- Answers: Existing answers to any questions are not duplicated
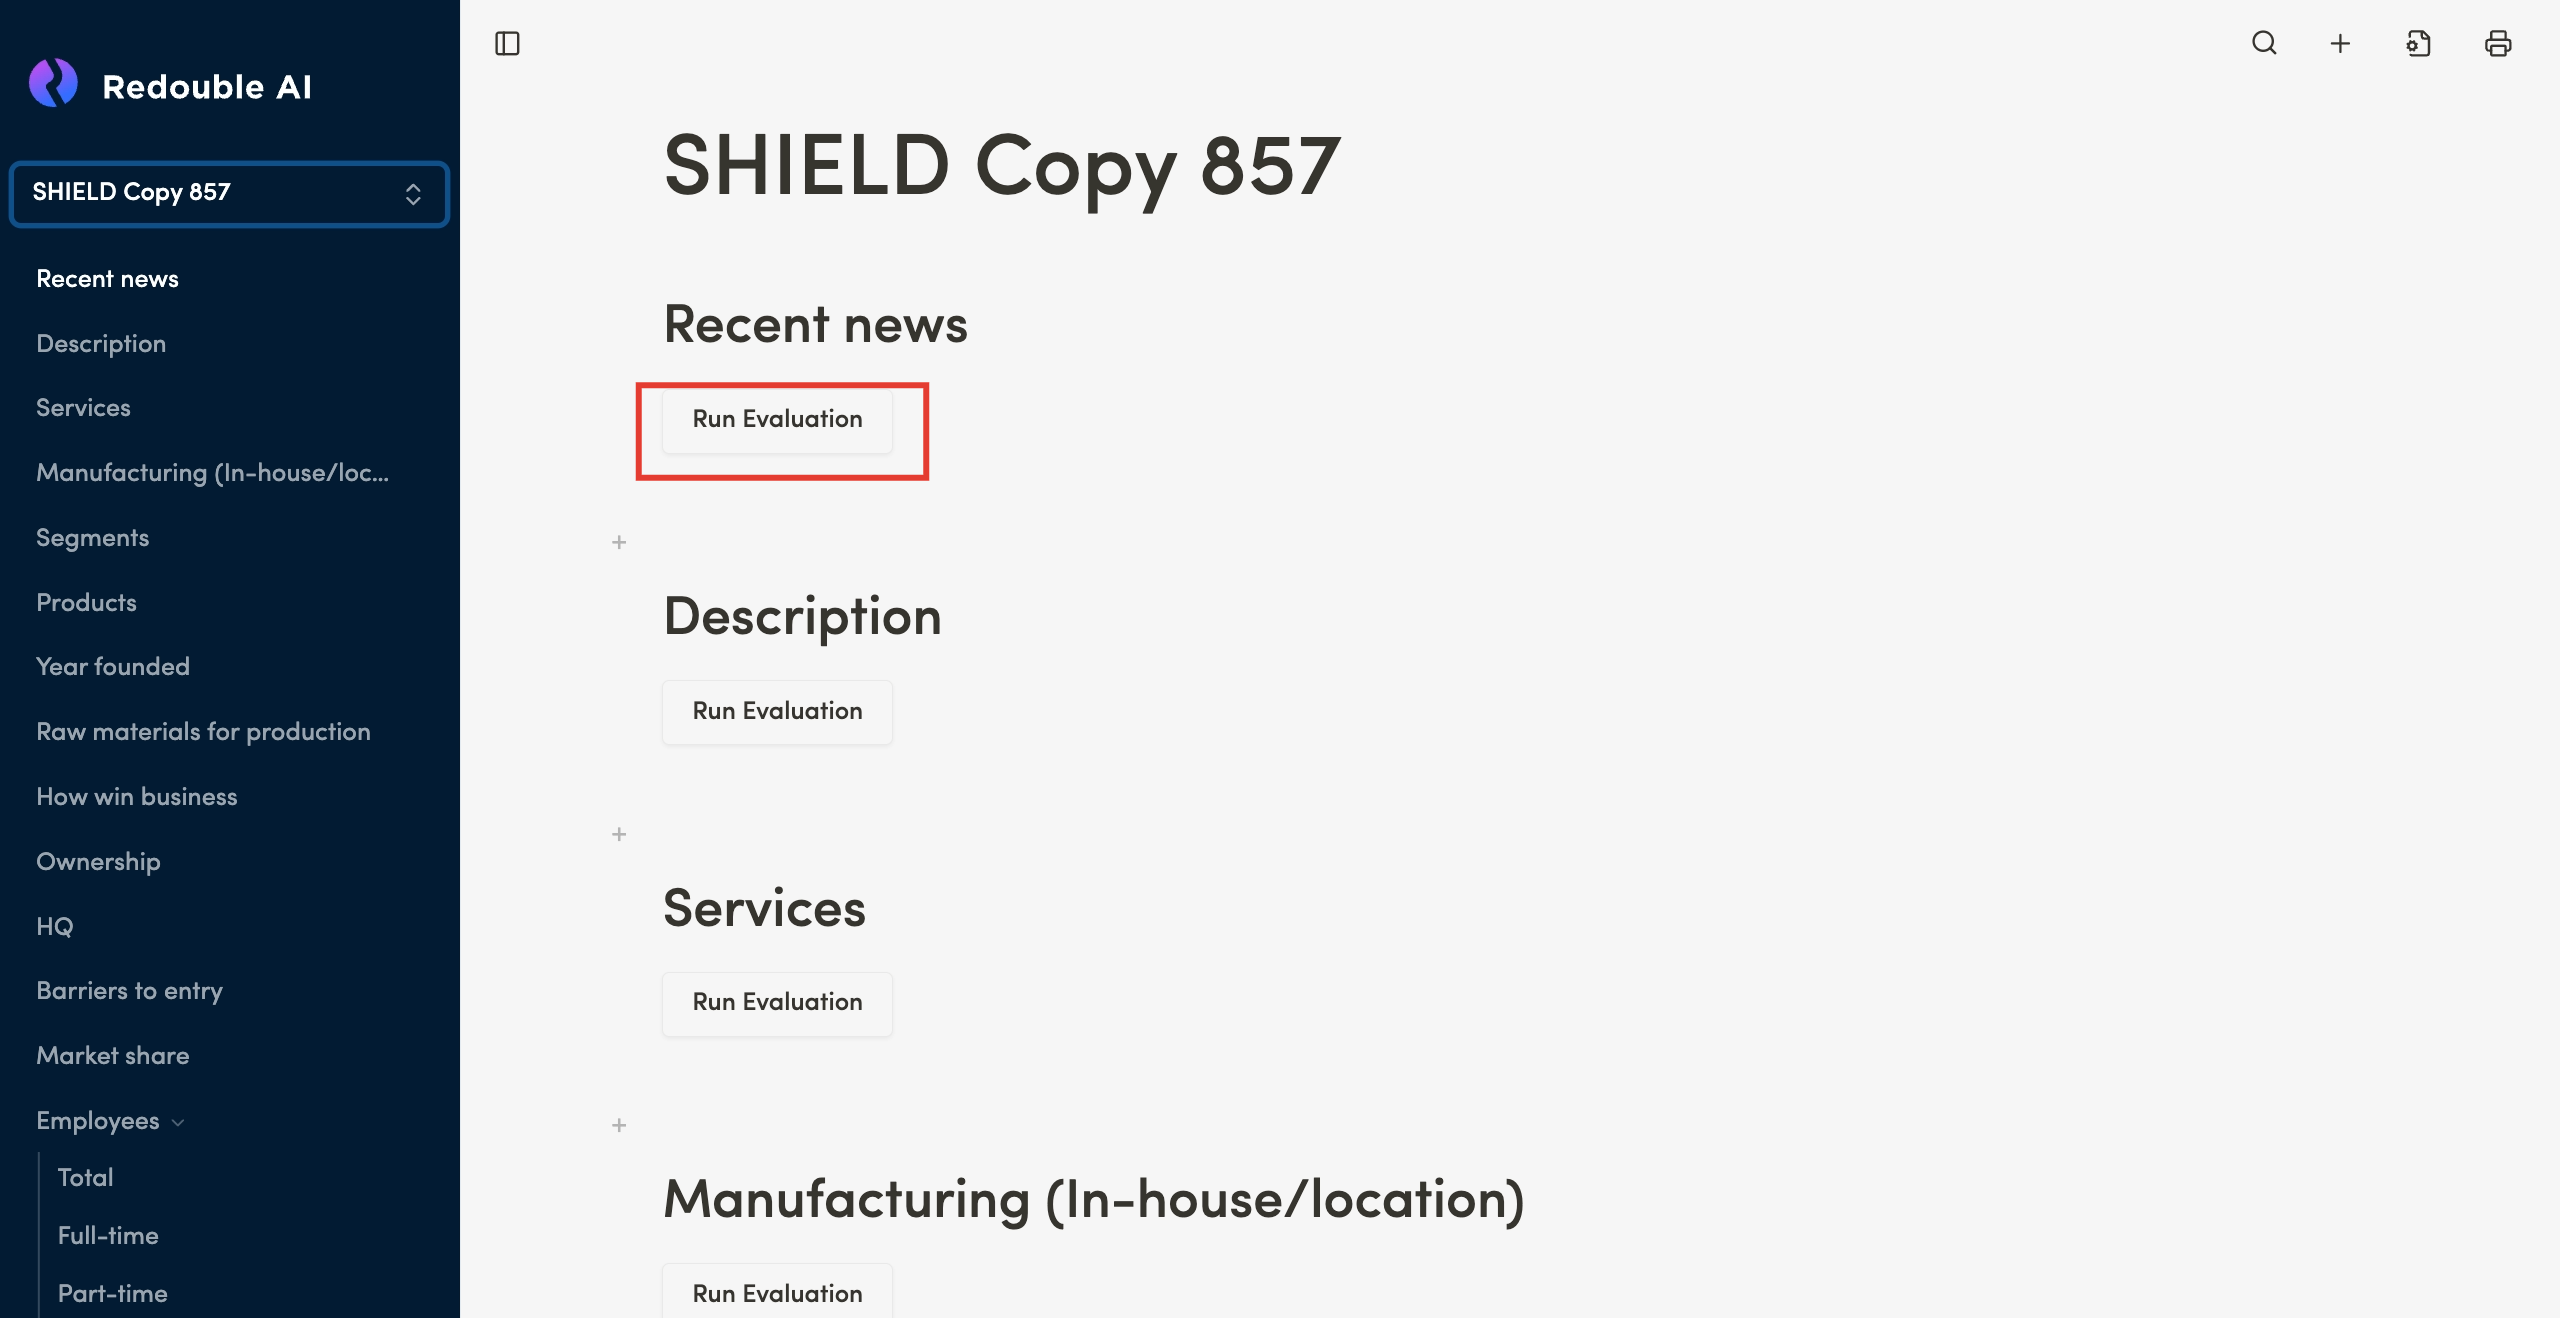
If you want to generate an answer in the copied project, you have to:
- Scroll to the desired question
- Click on the "Run Evaluation" button
1.7 Sharing a project
Steps:
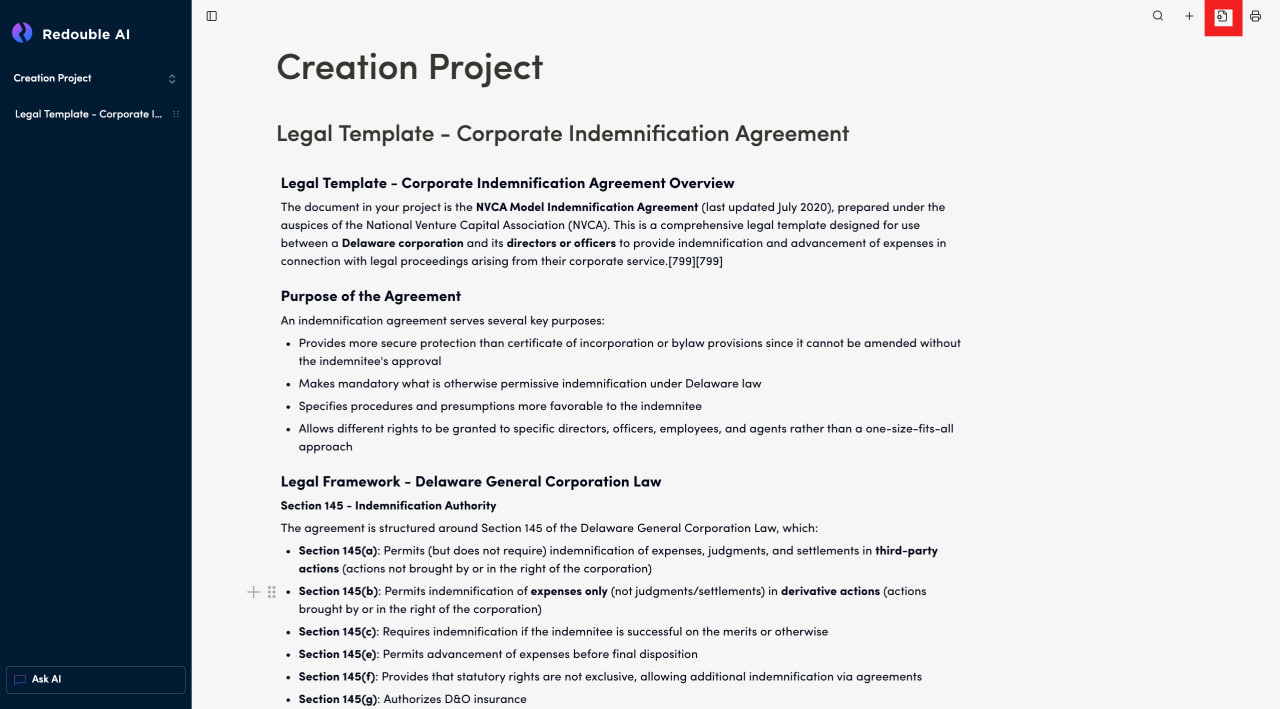
- Click on the "Document Settings" icon in the top toolbar

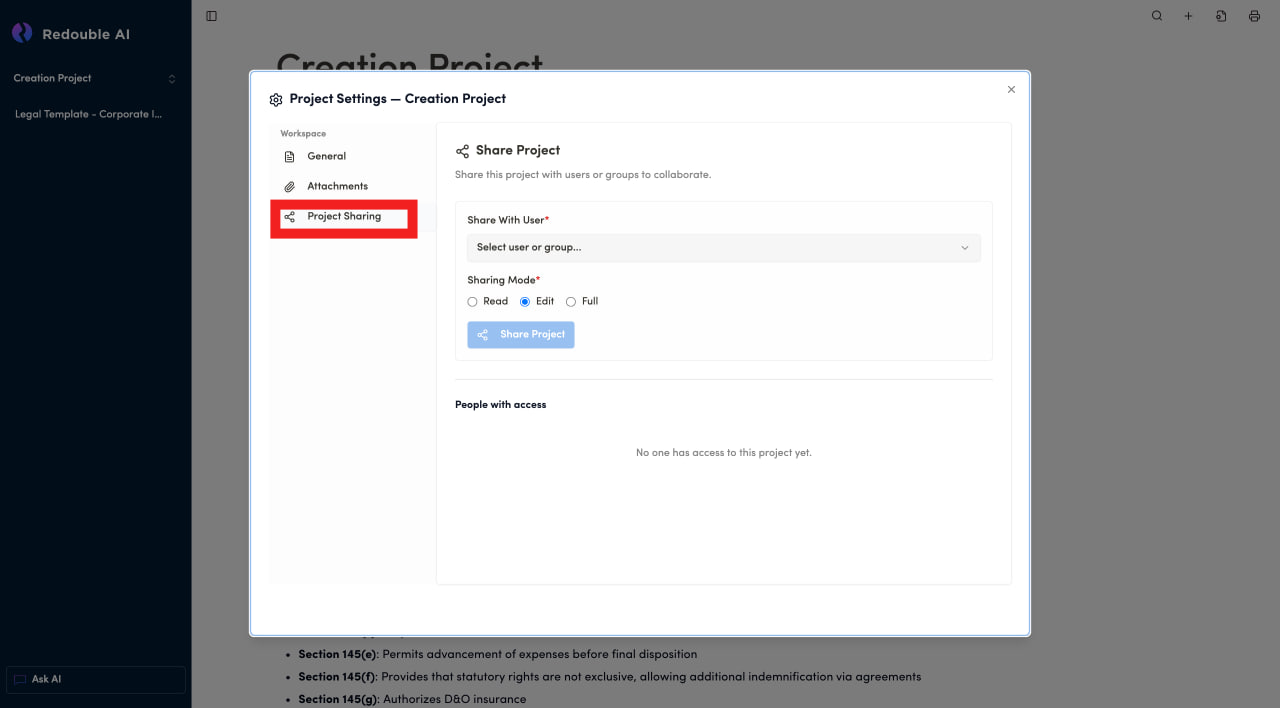
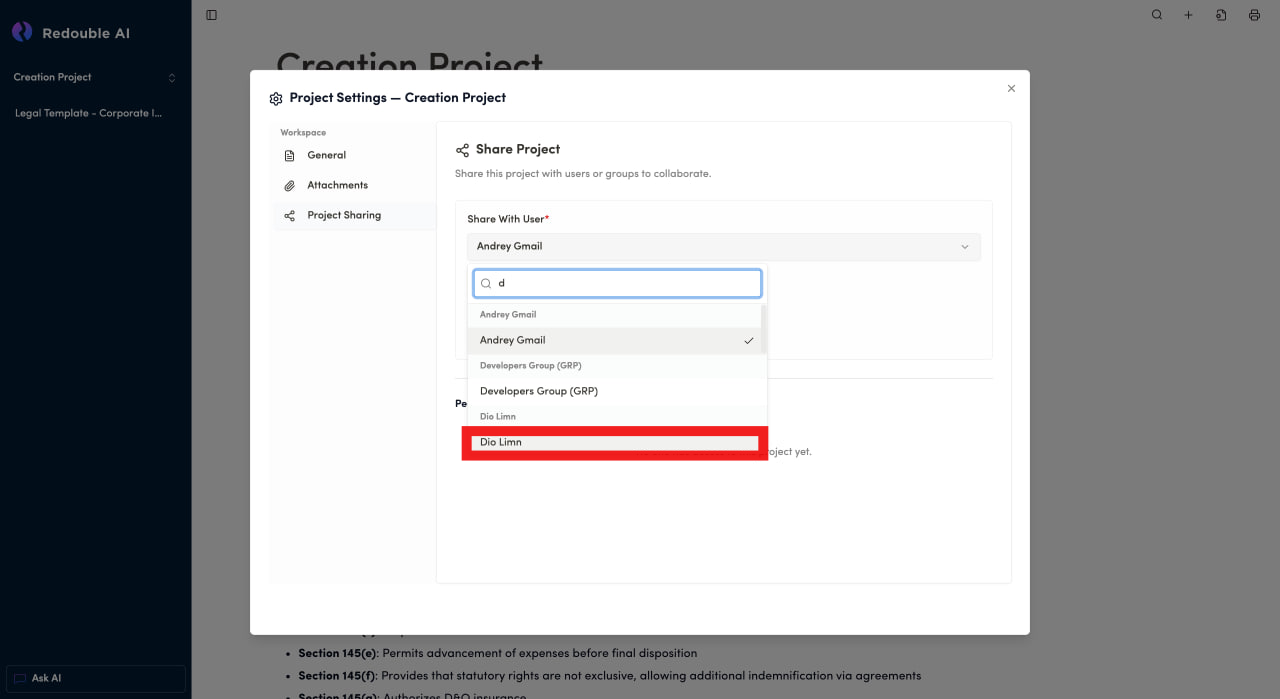
- In the dialog window, select "Project sharing" in the "Workspace" list

- Click on the "Select user or group" dropdown
- Type name of user to share project with
- Select user from the list

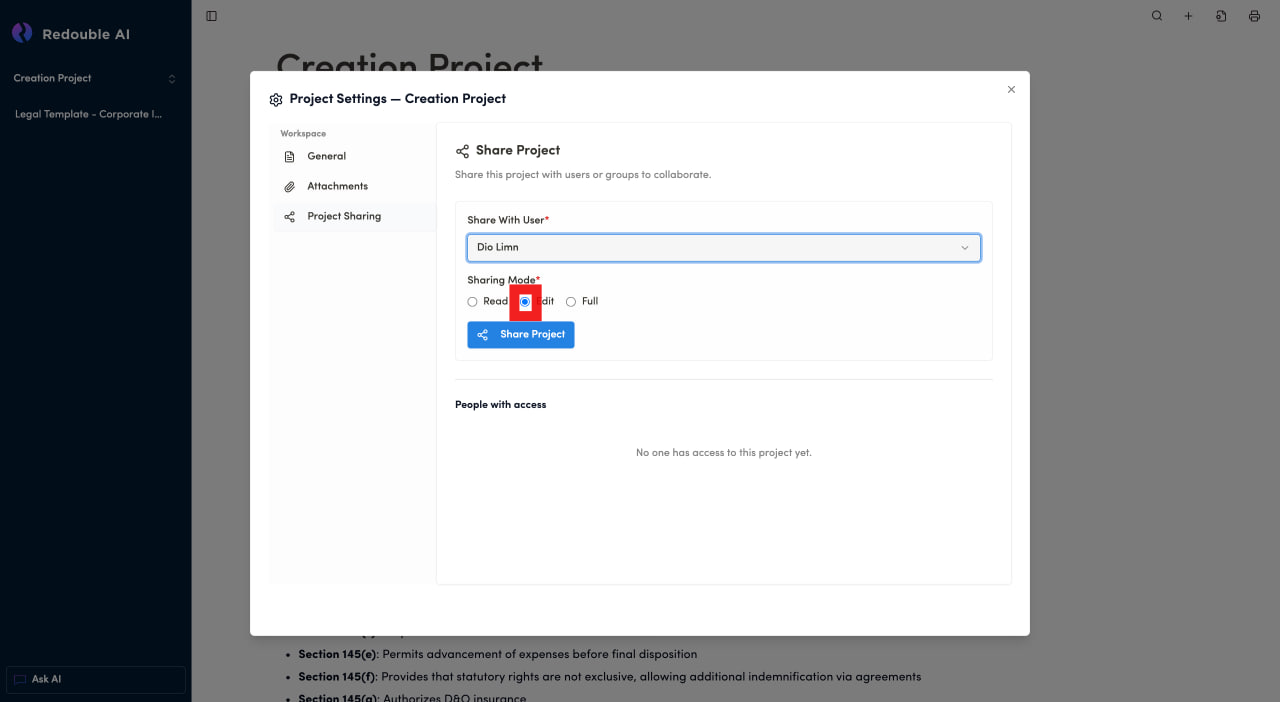
- Select Sharing Mode

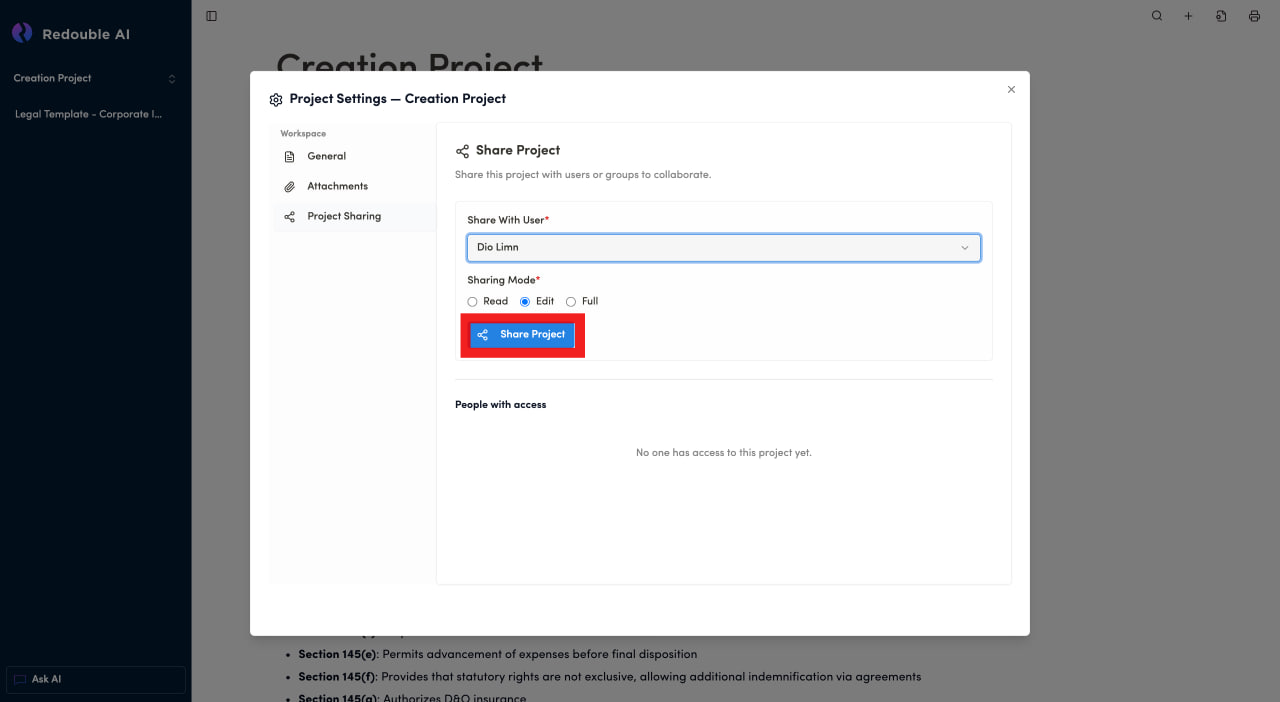
- Click "Share Project"

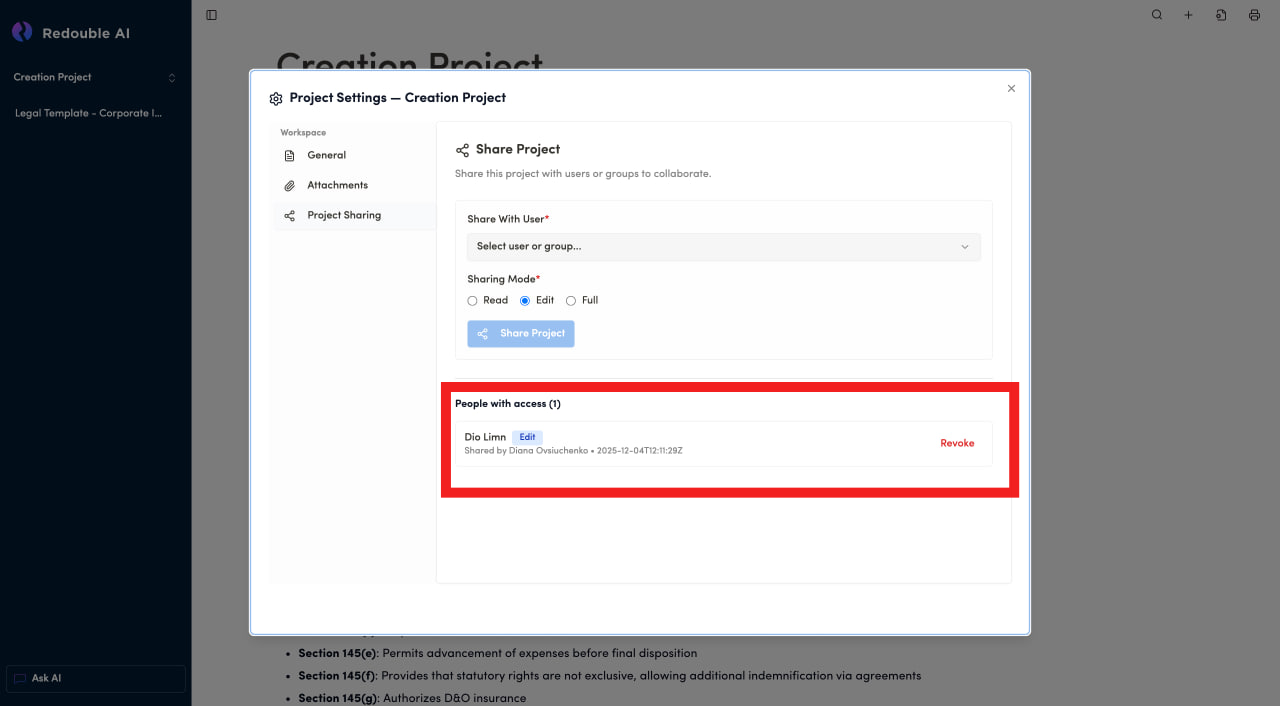
- See the user added to the "People with access" list.

If you want to remove the access to the project, you have to:
- Find the user you want to remove access from in the "People with access" list
- Press "Revoke" button

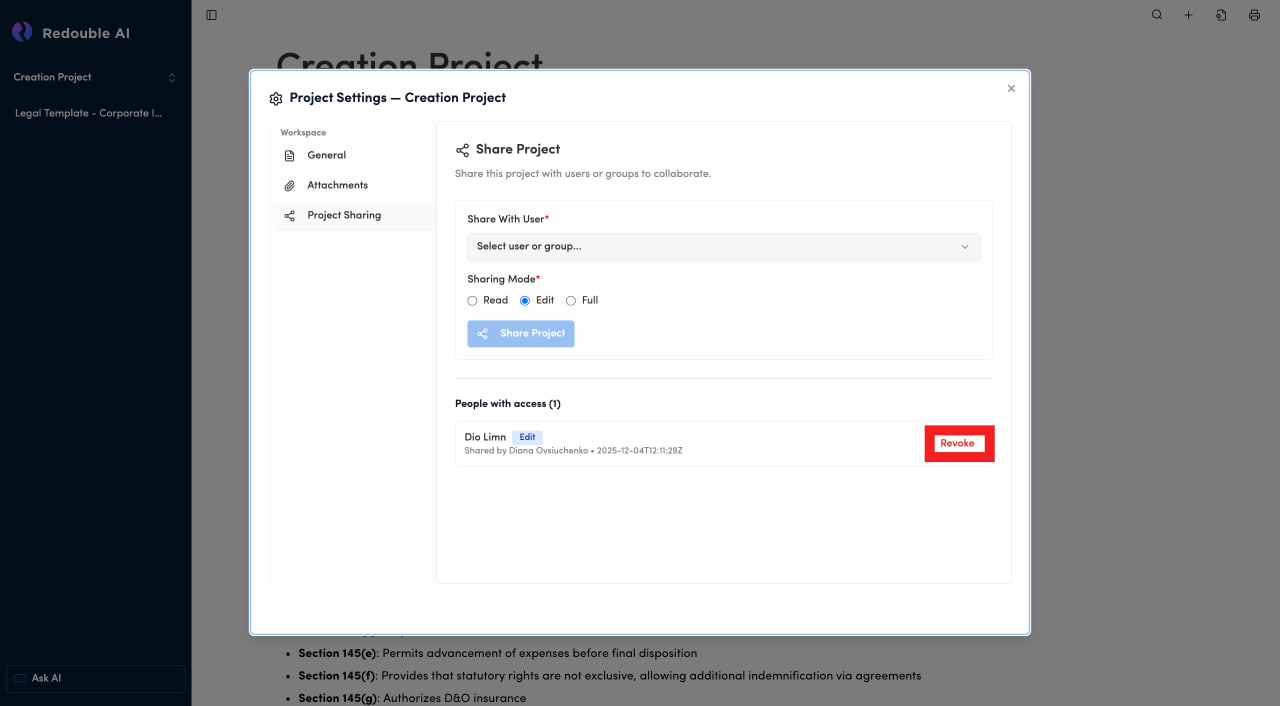
For more detailed information about components on the page, please view 3.3 Project Sharing
2. Questions
2.1 Creating a question
Prerequisites:
- You are logged into the Redouble AI system
- You have a project open
- Documents for analysis are attached to the project
Steps:
- Below the title of your project, press the "+" button to add a question

- In the "Add New Question" dialog box, fill in the following fields:
- Question Title — enter the question name, which must be unique to the project.
- Research Prompt — enter a detailed description of what needs to be found or analyzed in the input documents.

- Click the "Create Question" button or press Enter

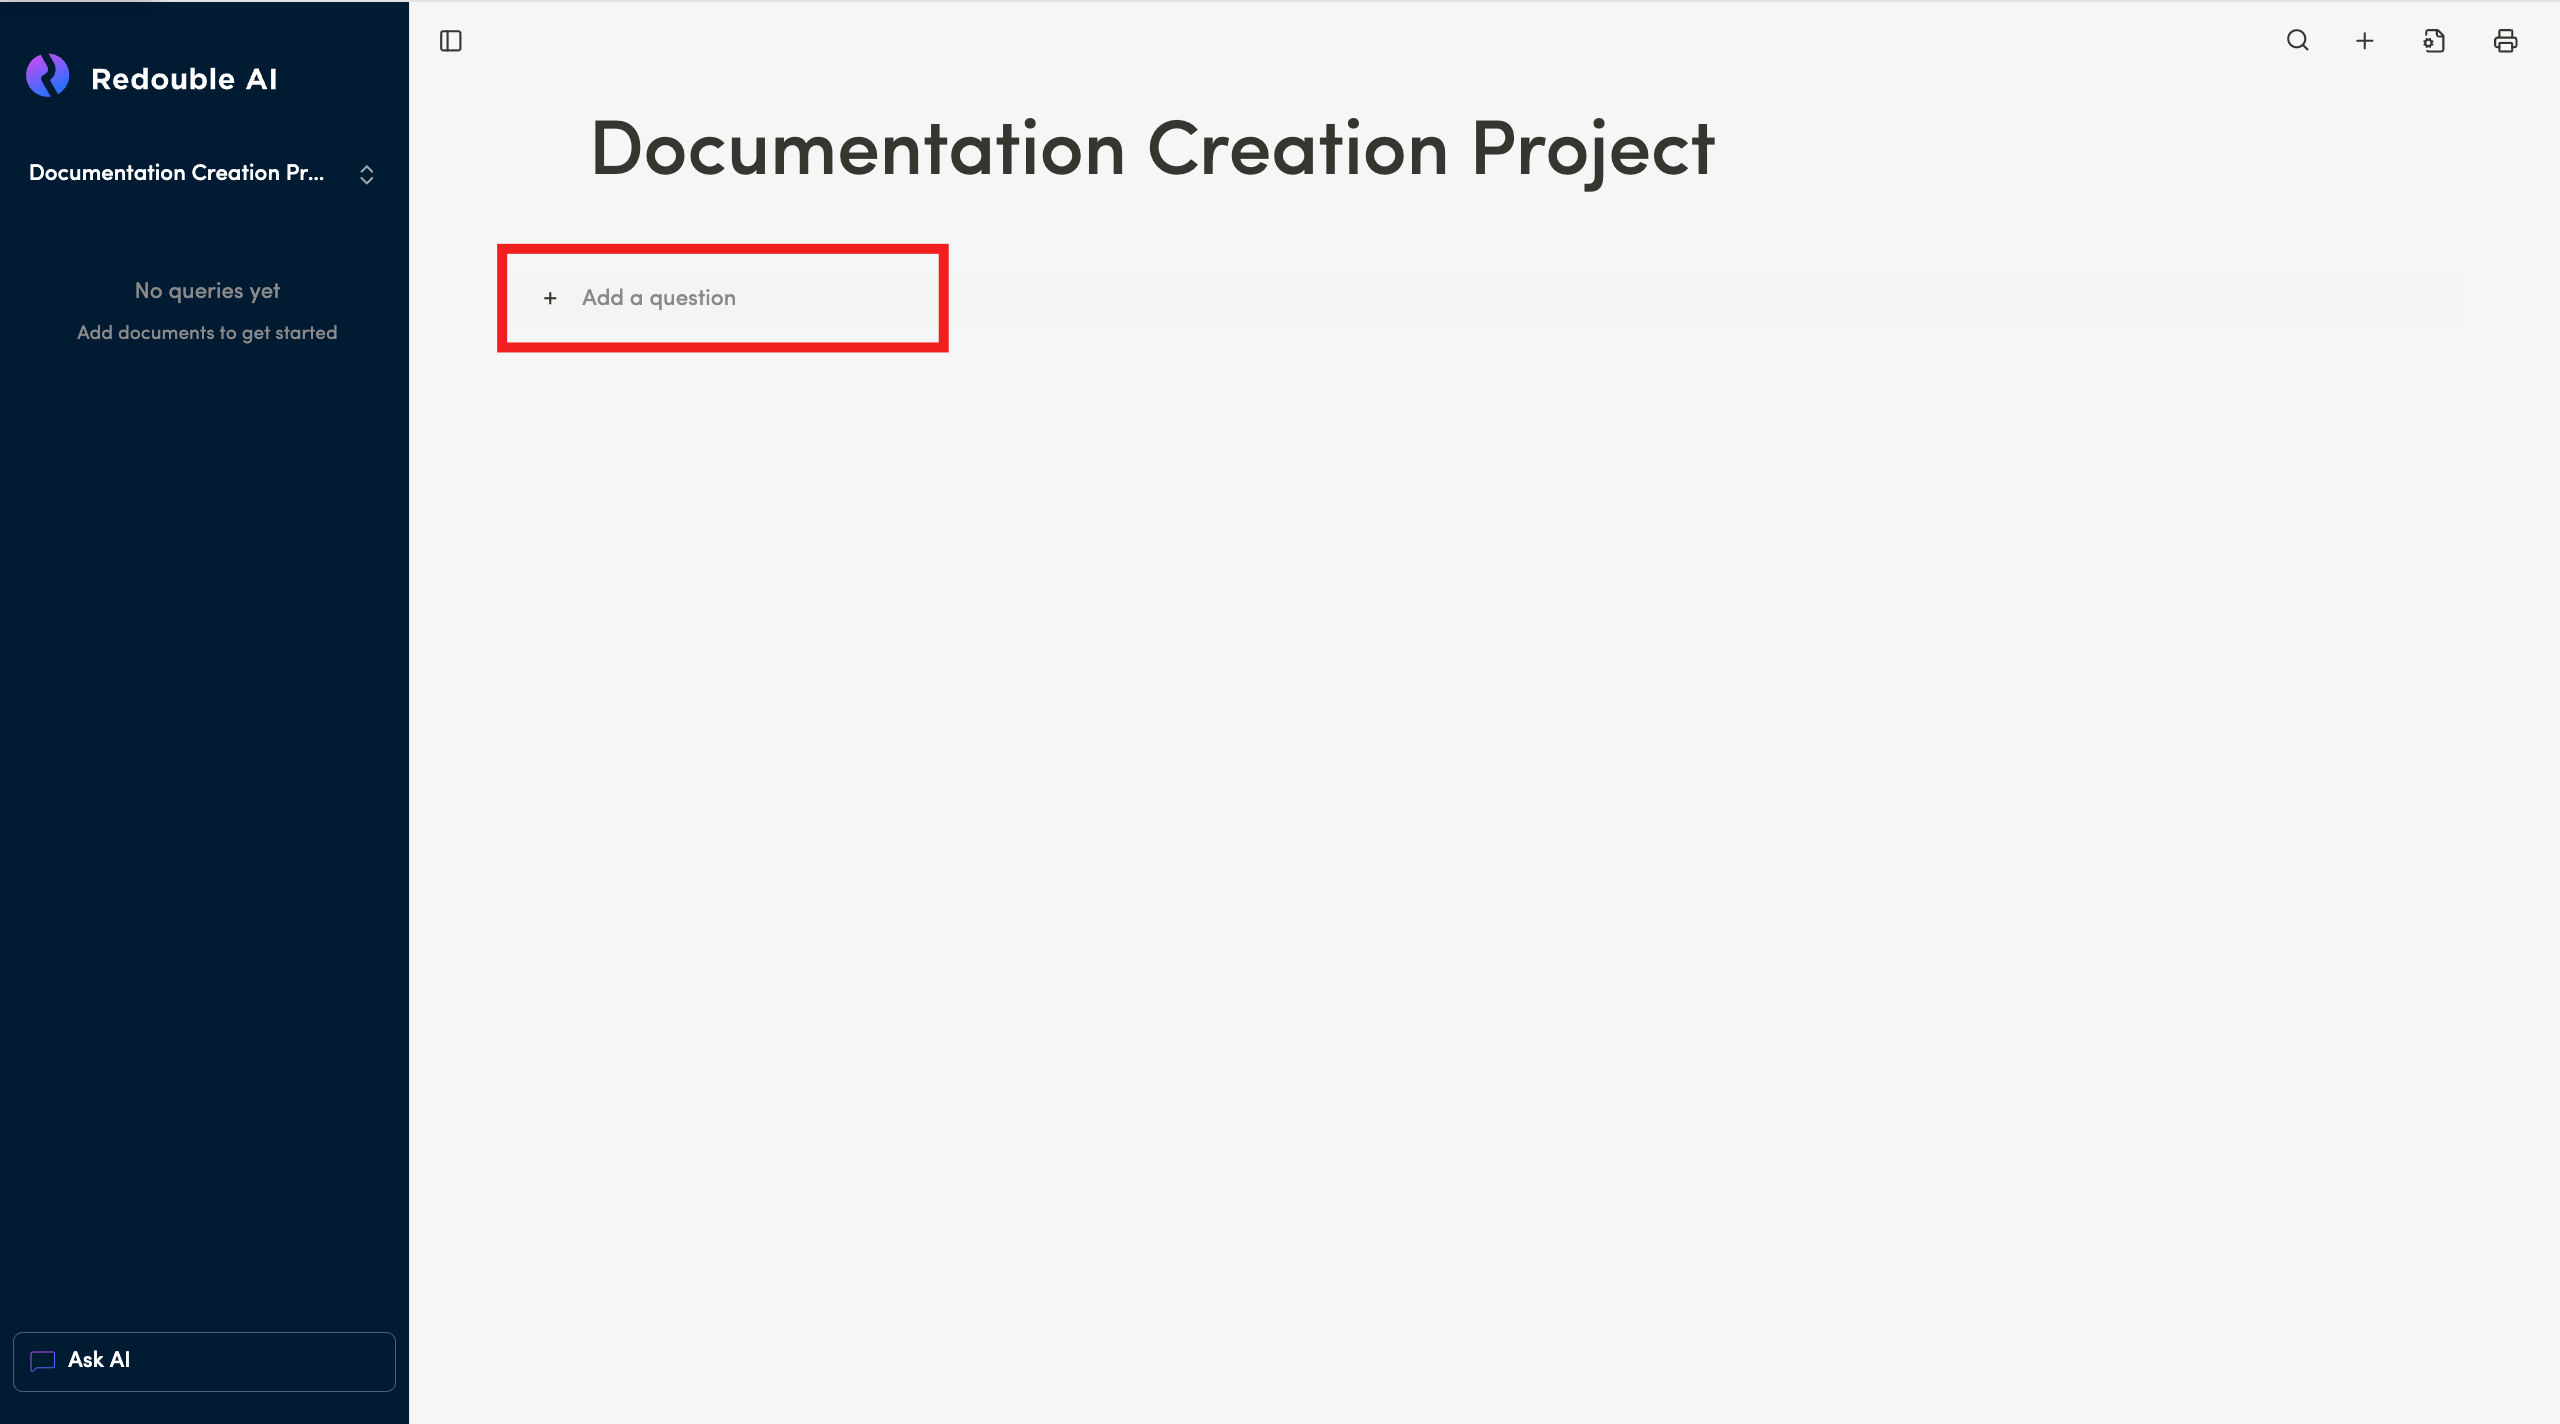
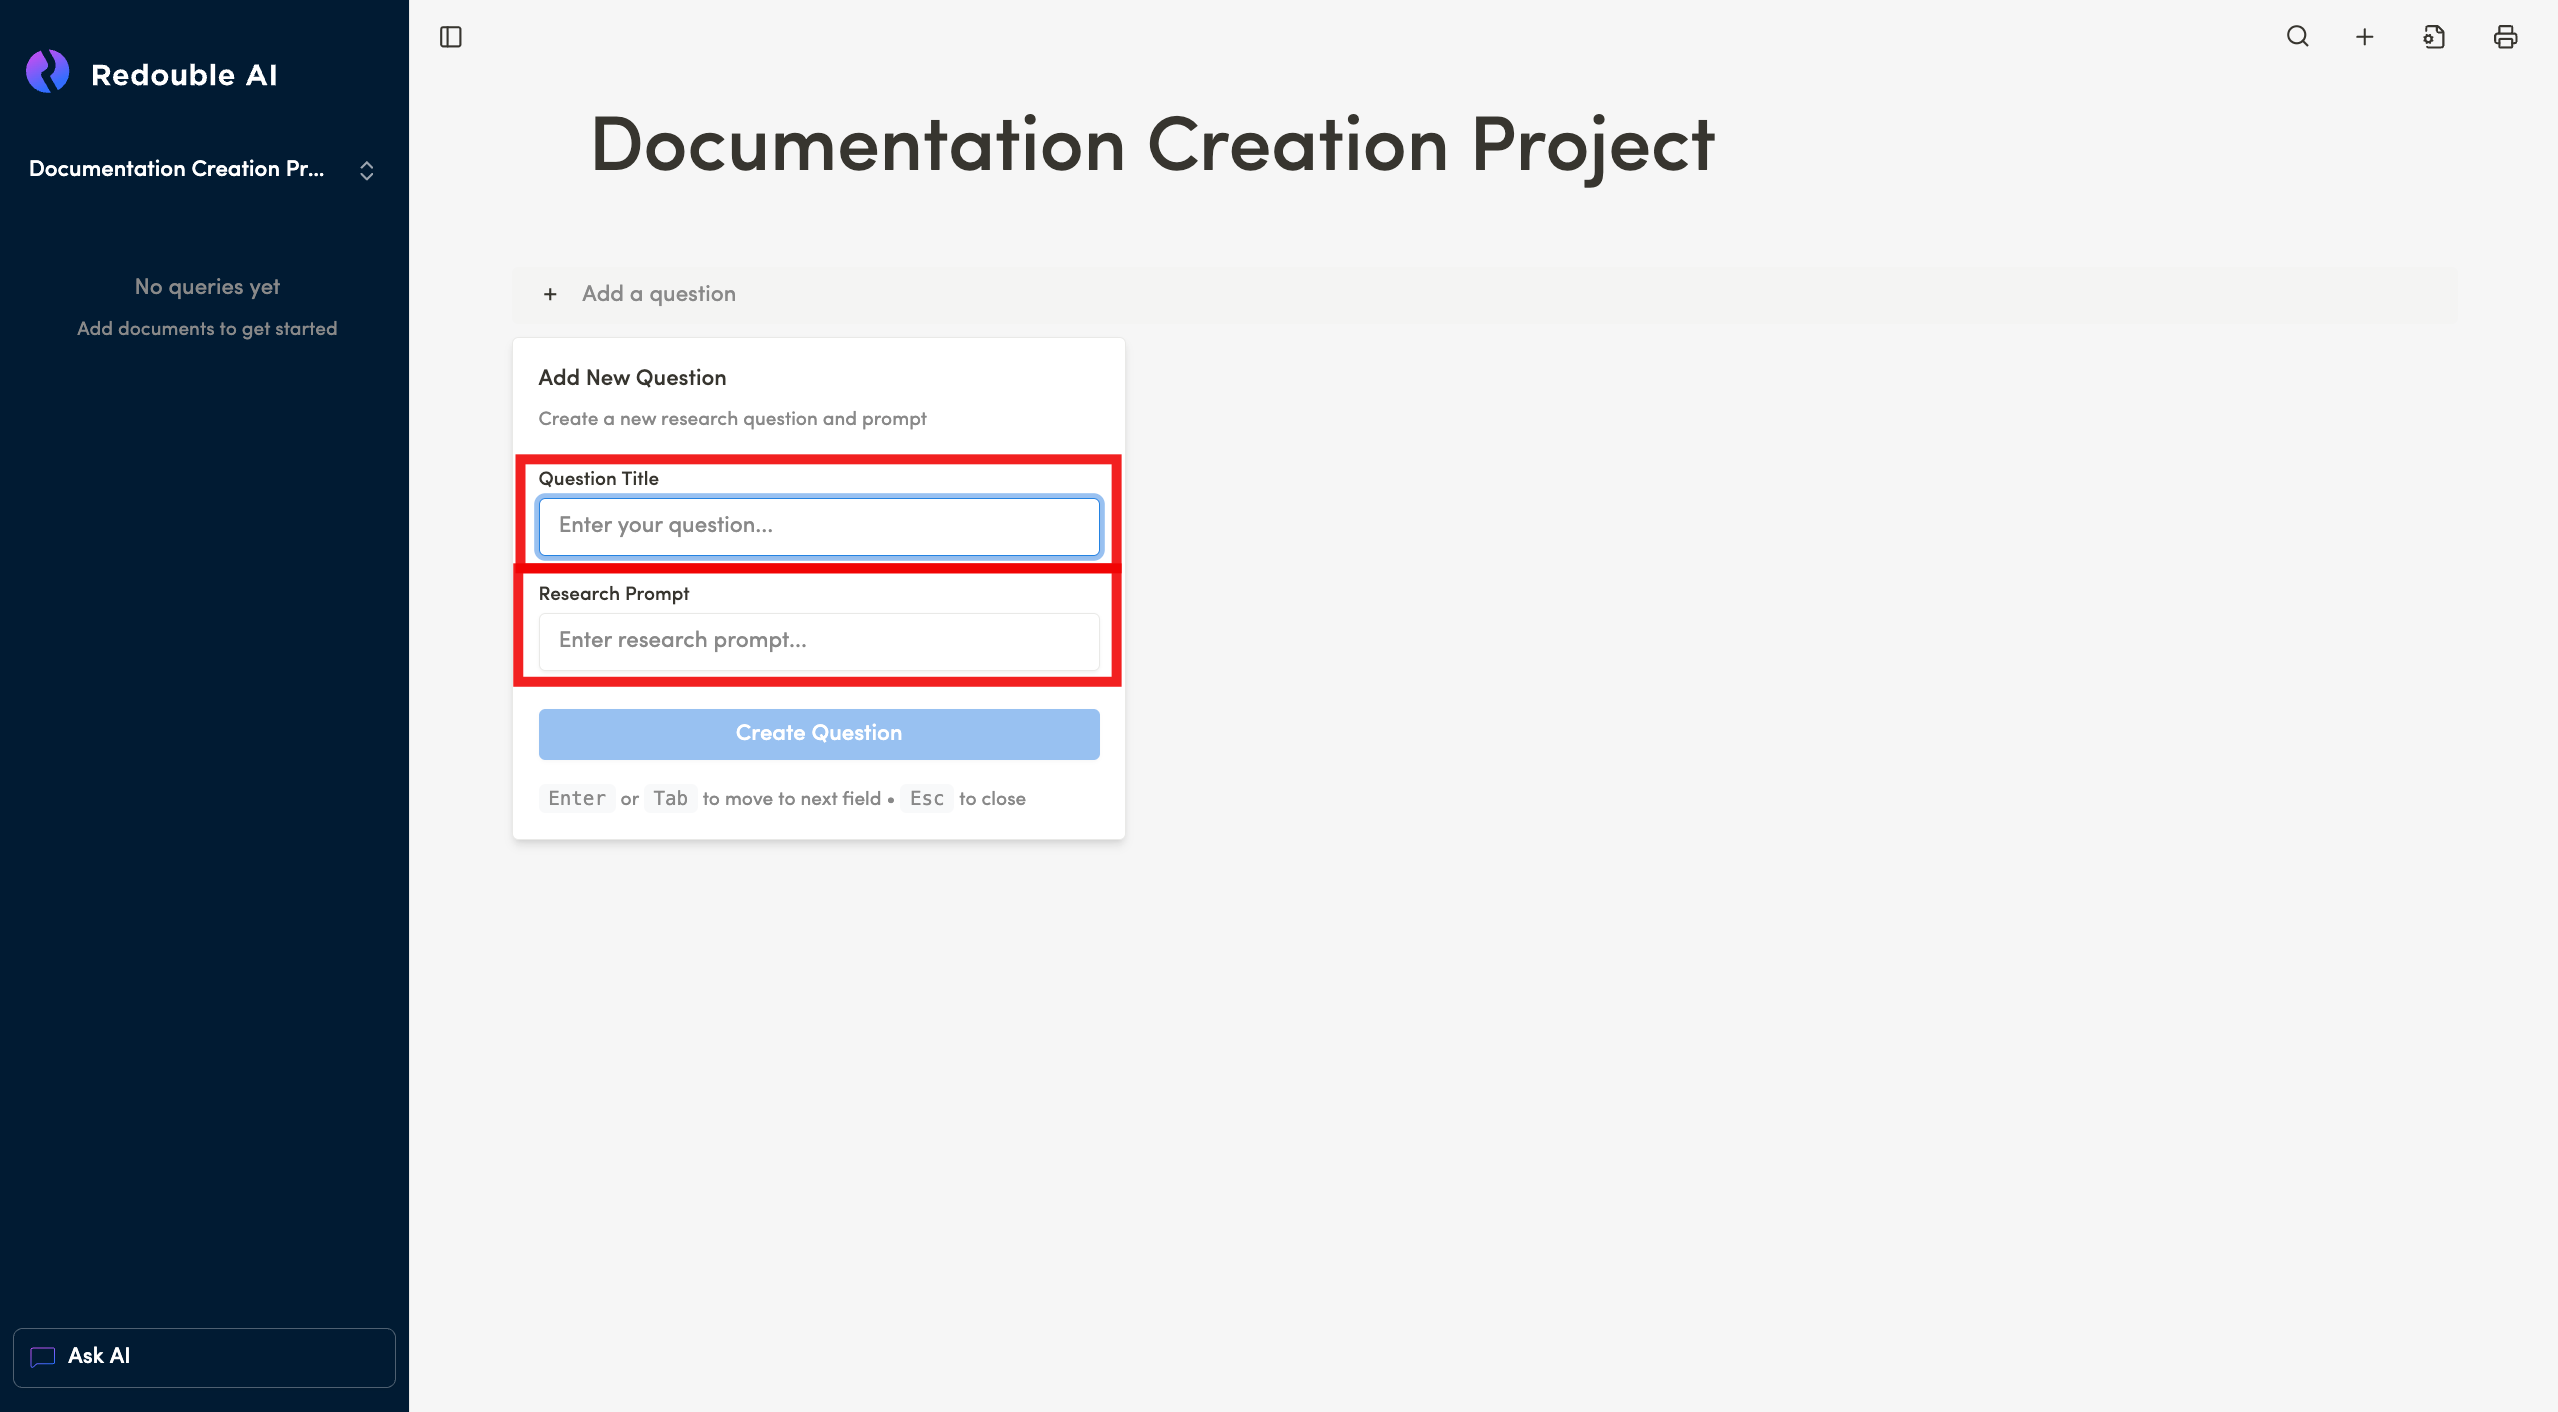
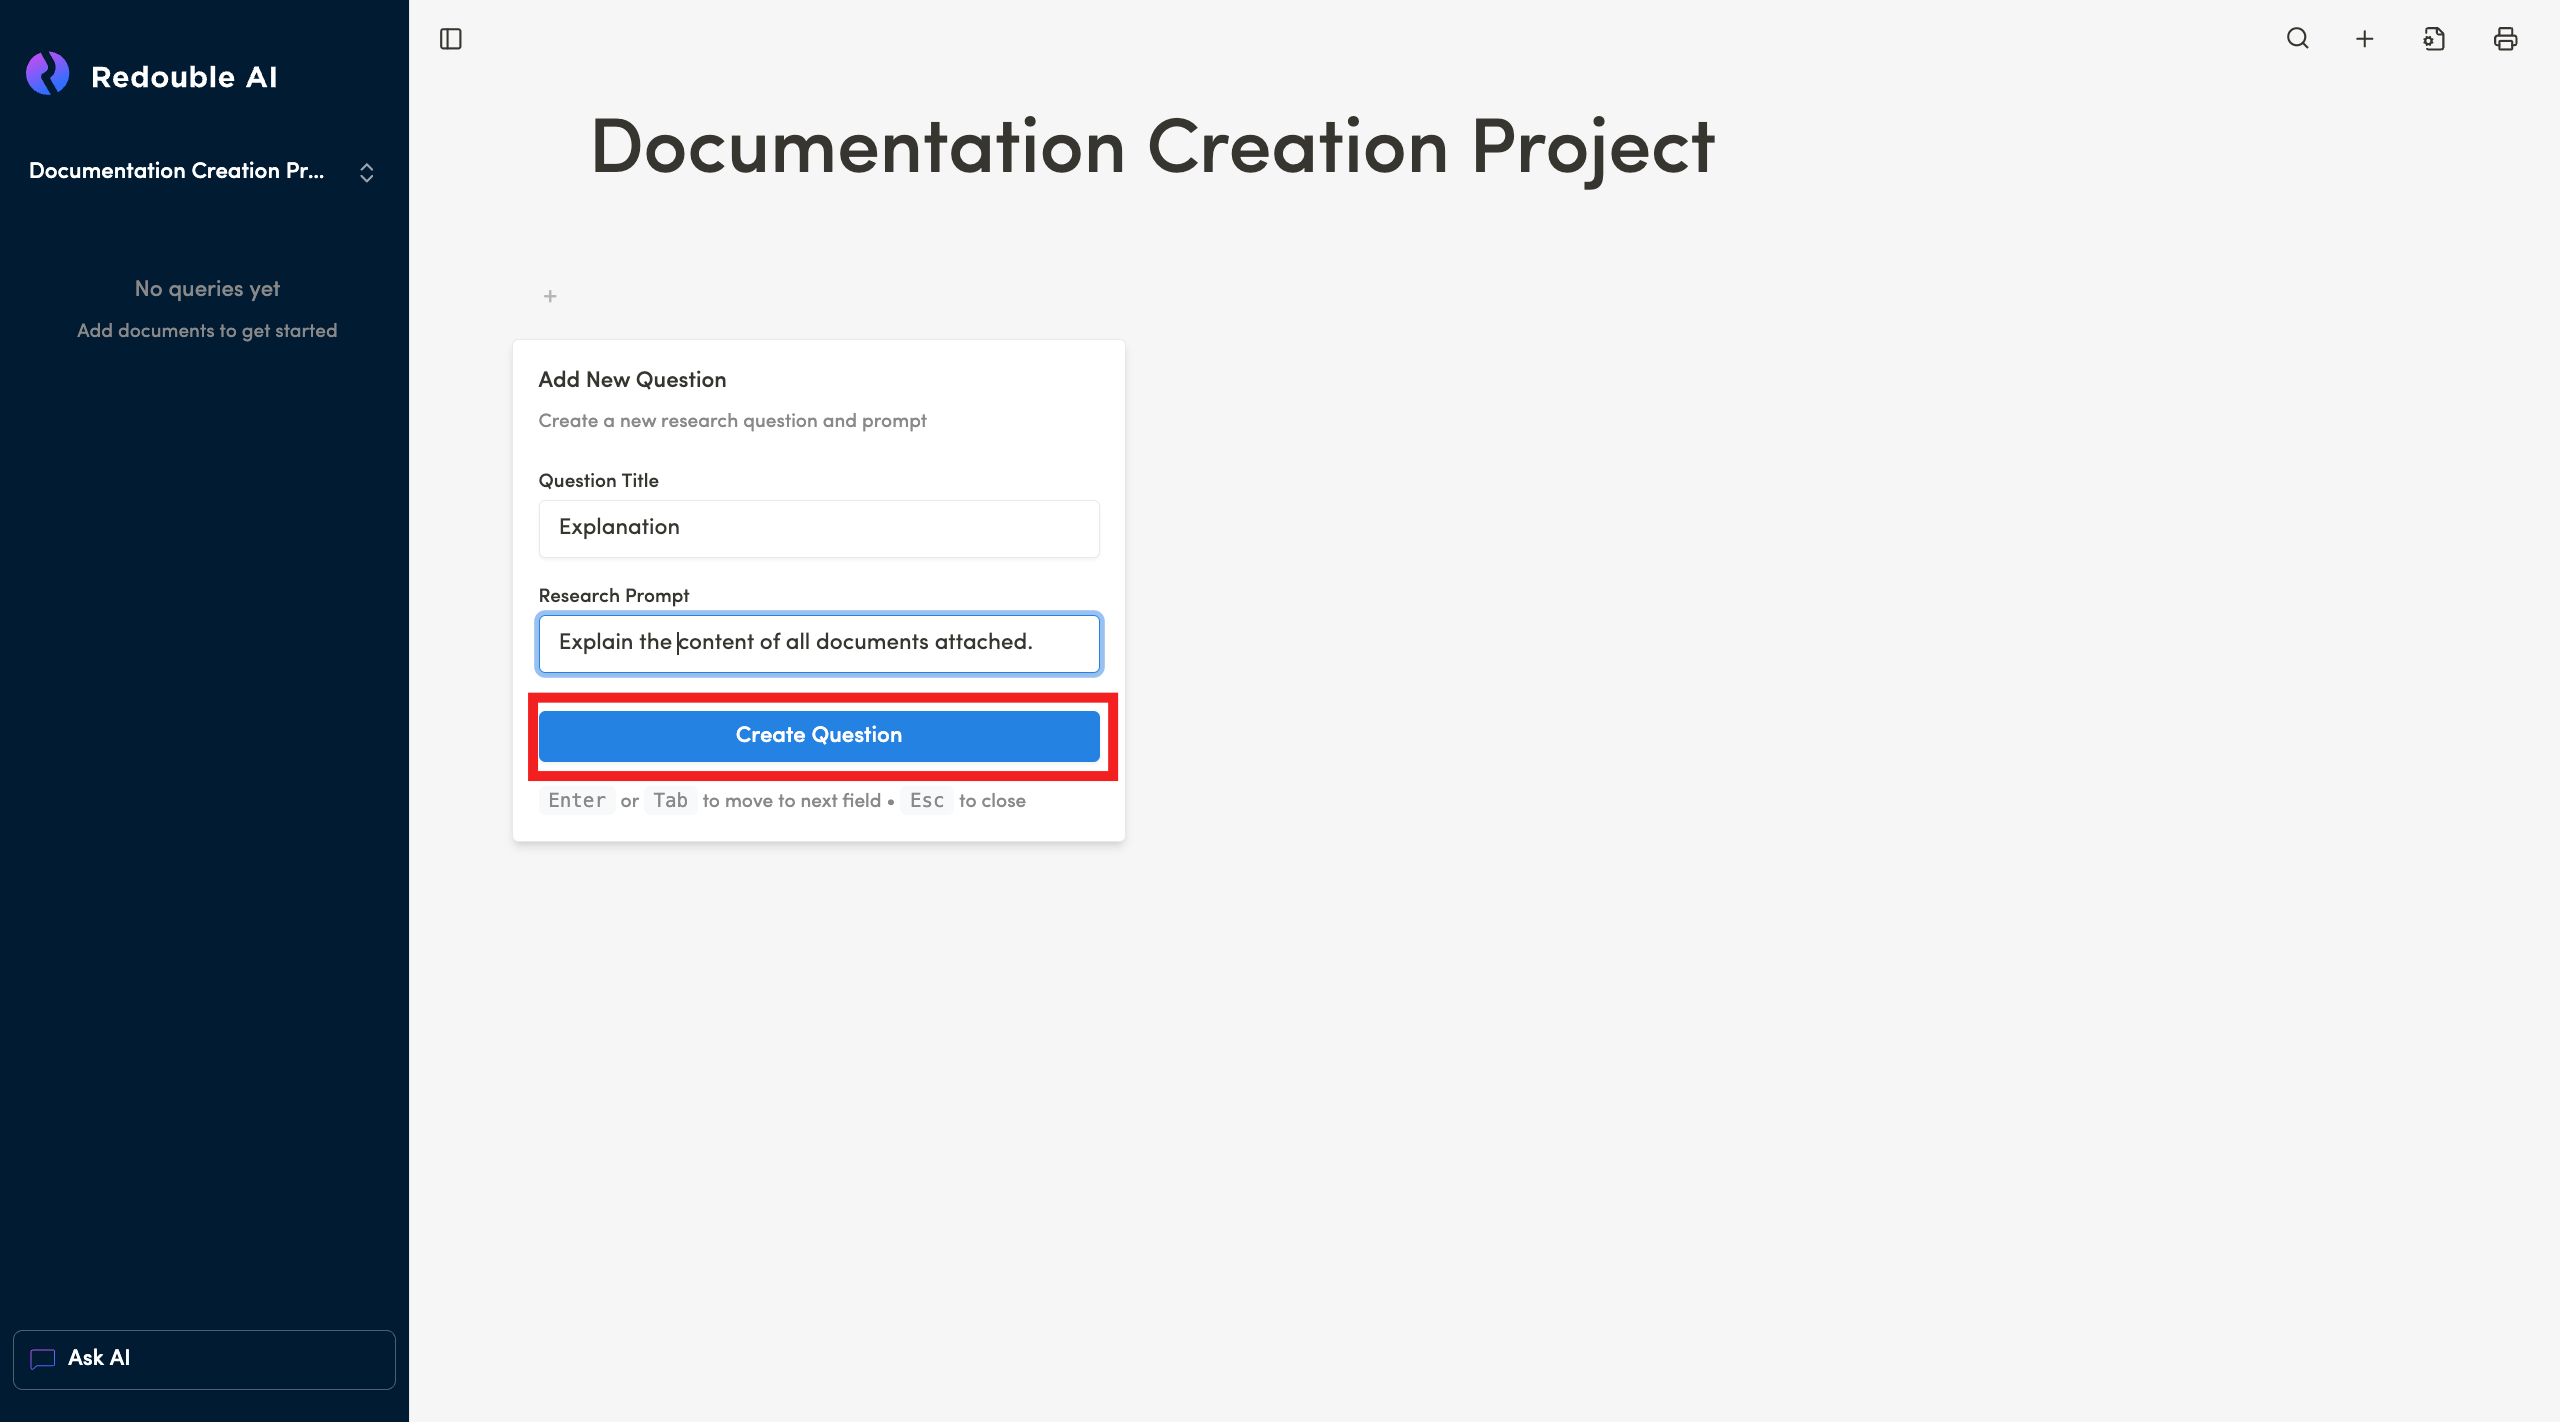
Result: The question is created and appears in the left sidebar. The system automatically starts analyzing the attached documents according to the specified prompt and generates an answer based on the content of the attached files.
2.2 Navigating and editing questions
Prerequisites:
- You are logged into the Redouble AI system
- At least two questions exist in the project in question
Viewing the answer to a question
Steps:
Result: You are viewing the detailed answer to the selected question.
Creating a subquestion
Steps:
Result: You created a subquestion.
Editing AI-generated content
Steps:
- Go to a specific question
- Edit existing paragraphs by adding/ deleting text by hand.
- You also can press "+" or type "/" to:
- Add subheadings
- Add media content (video, picture, audio, file)
- Add basic blocks (quote, toggle list, numbered list, bullet list, check list, paragraph, code block)
- Add advanced elements (table)
- Add other elements (emojis)
- You can reposition paragraphs by dragging them with the drag handle ("⠿")
- To delete a paragraph, click on the drag handle and select "Delete"
Result: You have successfully edited the answer to a question.
2.3 Question options
Prerequisites:
- You are logged into the Redouble AI system
- You have a project open with at least one question
- Click the three-dot "Document options" button on the left side of the heading/ question you would like to work on
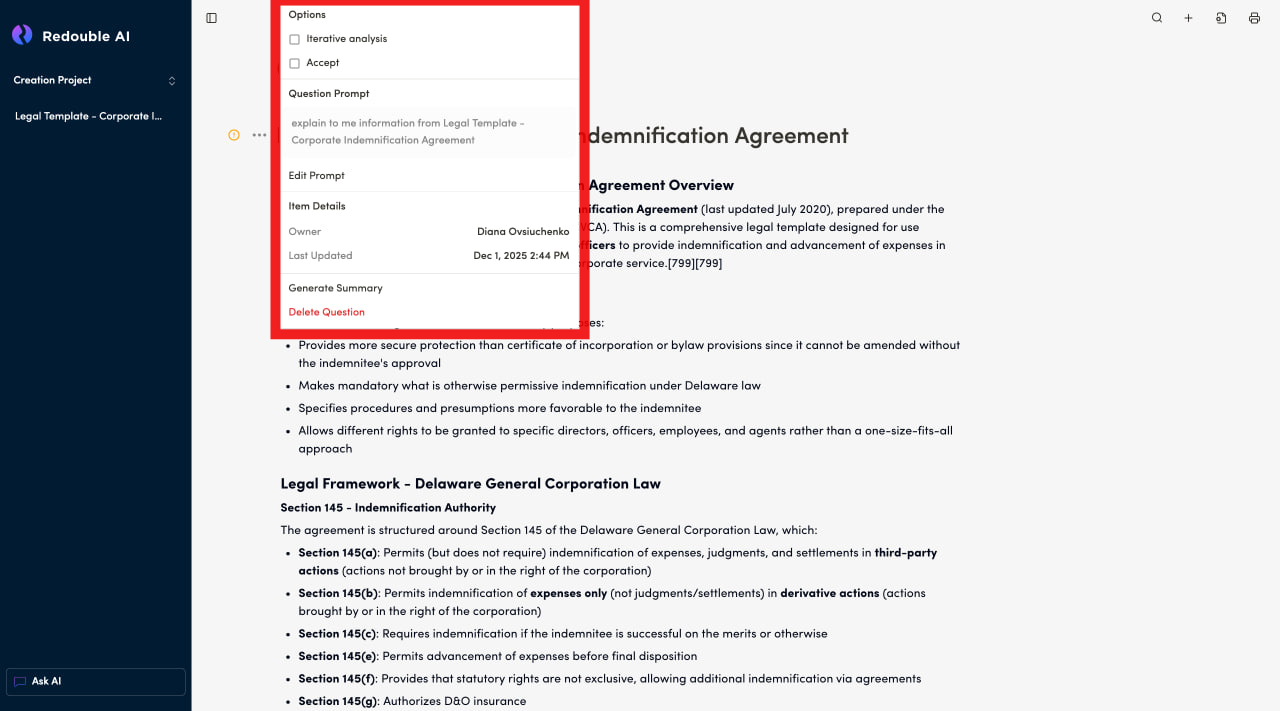
Iterative analysis
- Type: Checkbox
- Purpose: Enables step-by-step document analysis for deeper research
- Default: Disabled
Accept
- Type: Checkbox
- Purpose: Automatically accepts the generated answer without manual confirmation
- Default: Disabled
Prompt display
- Shows the current research prompt text displayed in a gray text block
- Example: "find the sections in documents that mention healthcare and explain them one by one"
Edit Prompt button
- Allows you to modify the prompt text
- When the prompt is changed, the next regeneration will use the new text
- Click to open the prompt editor
Steps to edit:
- Click "Edit Prompt"
- Make necessary changes to the text
- Save the changes
- The updated prompt will be used to generate future answers
Owner
- Displays the name of the user who created the question
- Example: Dr. John Smith
- Purpose: Track question authorship for collaboration and accountability
Last updated
- Shows the date and time of the last update
- Format: MM/DD/YYYY (e.g., 10/14/2025 for October 14th, 2025)
- Updated when:
- An answer is regenerated
- A prompt is edited
- Any options are changed
- The answer is manually edited
Generate summary
How it works:
- Click "Generate Summary"
- The system analyzes the full answer
- The system extracts key points and main conclusions
- And presents a concise summary
2.4 Deleting a question
Prerequisites:
- You are logged into the Redouble AI system
- You have a project open with at least one question
- You have the permission to delete questions
Steps:
- View the question you would like to delete
- Click the "Document options" button to the left of the question title

- In the context menu, click on "Delete Question"

- Confirm that you would like to proceed with deleting the question in the dialog box

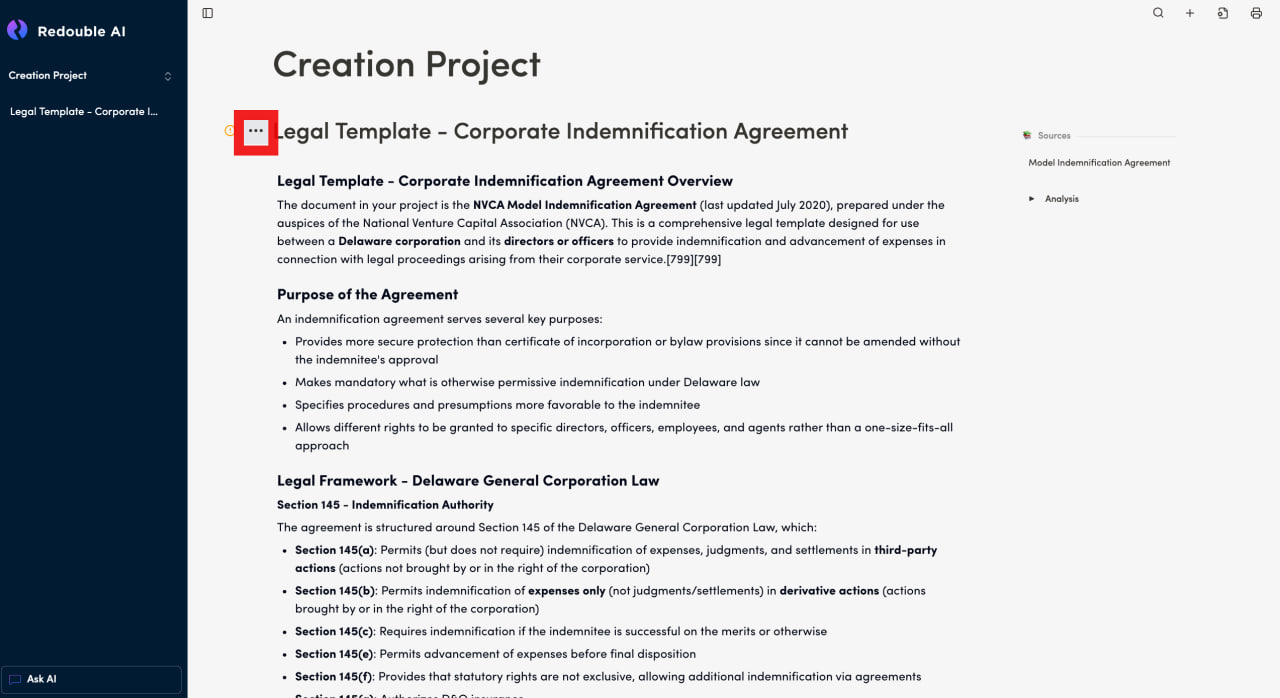
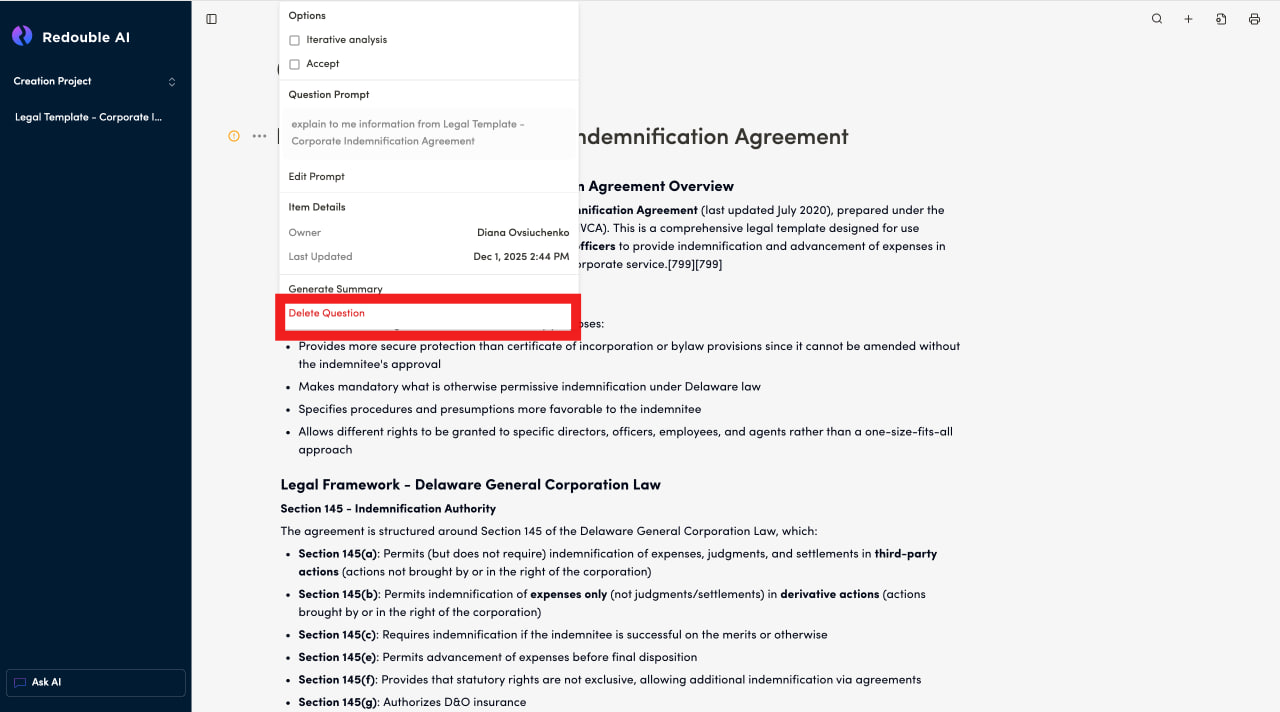
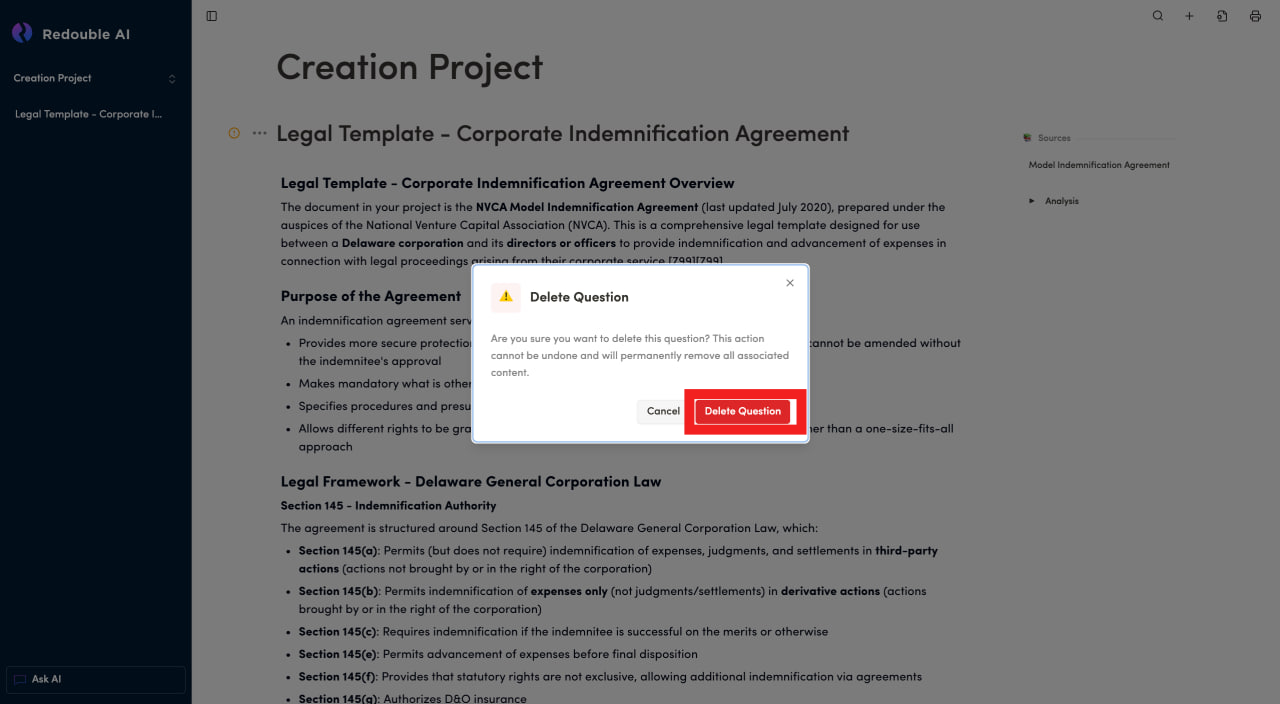
Result: The question is deleted from the project and is no longer displayed in the project dropdown list.
3. Settings
3.1 General
Preconditions:
- You are logged into the Redouble AI system
- You have at least one project
- Click on the "Document settings" icon and select "General" in the "Workspace" list
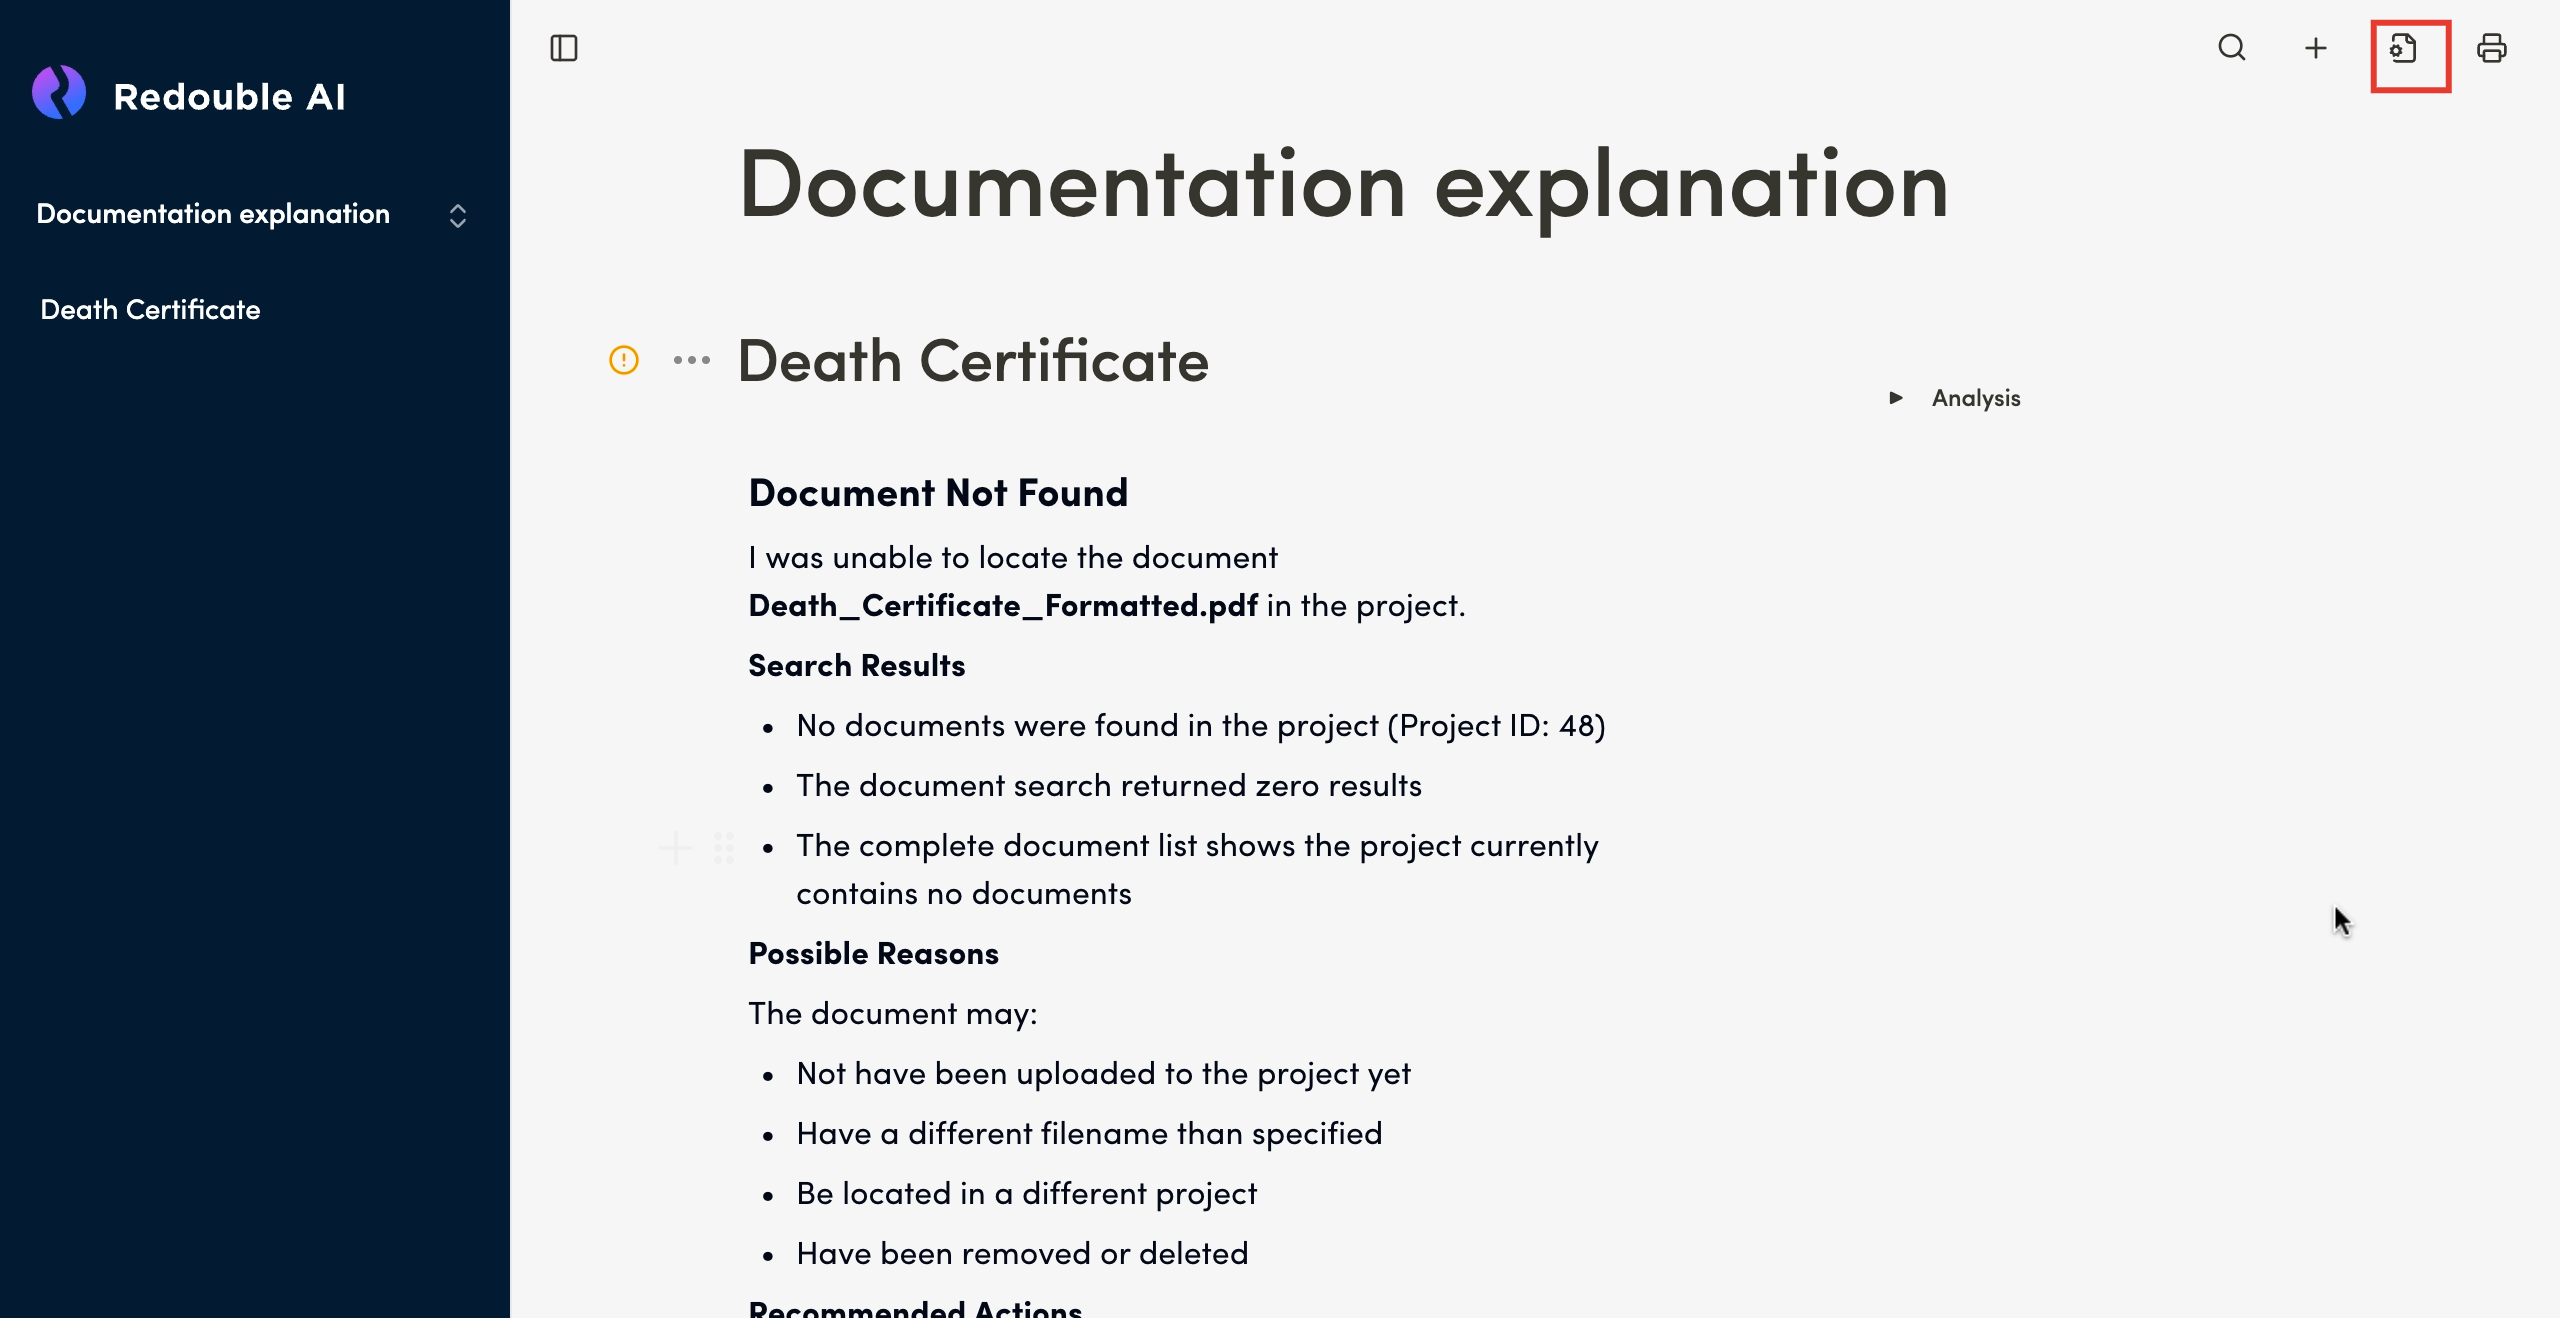
Name
Field Type: Text input
Purpose: Sets the project name for identification and organization
The project name helps you identify and organize multiple projects within your workspace. Choose a unique descriptive name that reflects the project's content or purpose.
Status
Field Type: Text input
Options: Open/Closed
Purpose: Indicates the state of the project
- Open: The project is actively being worked on and available for document uploads and queries
- Closed: The project has been completed or archived (read-only state)
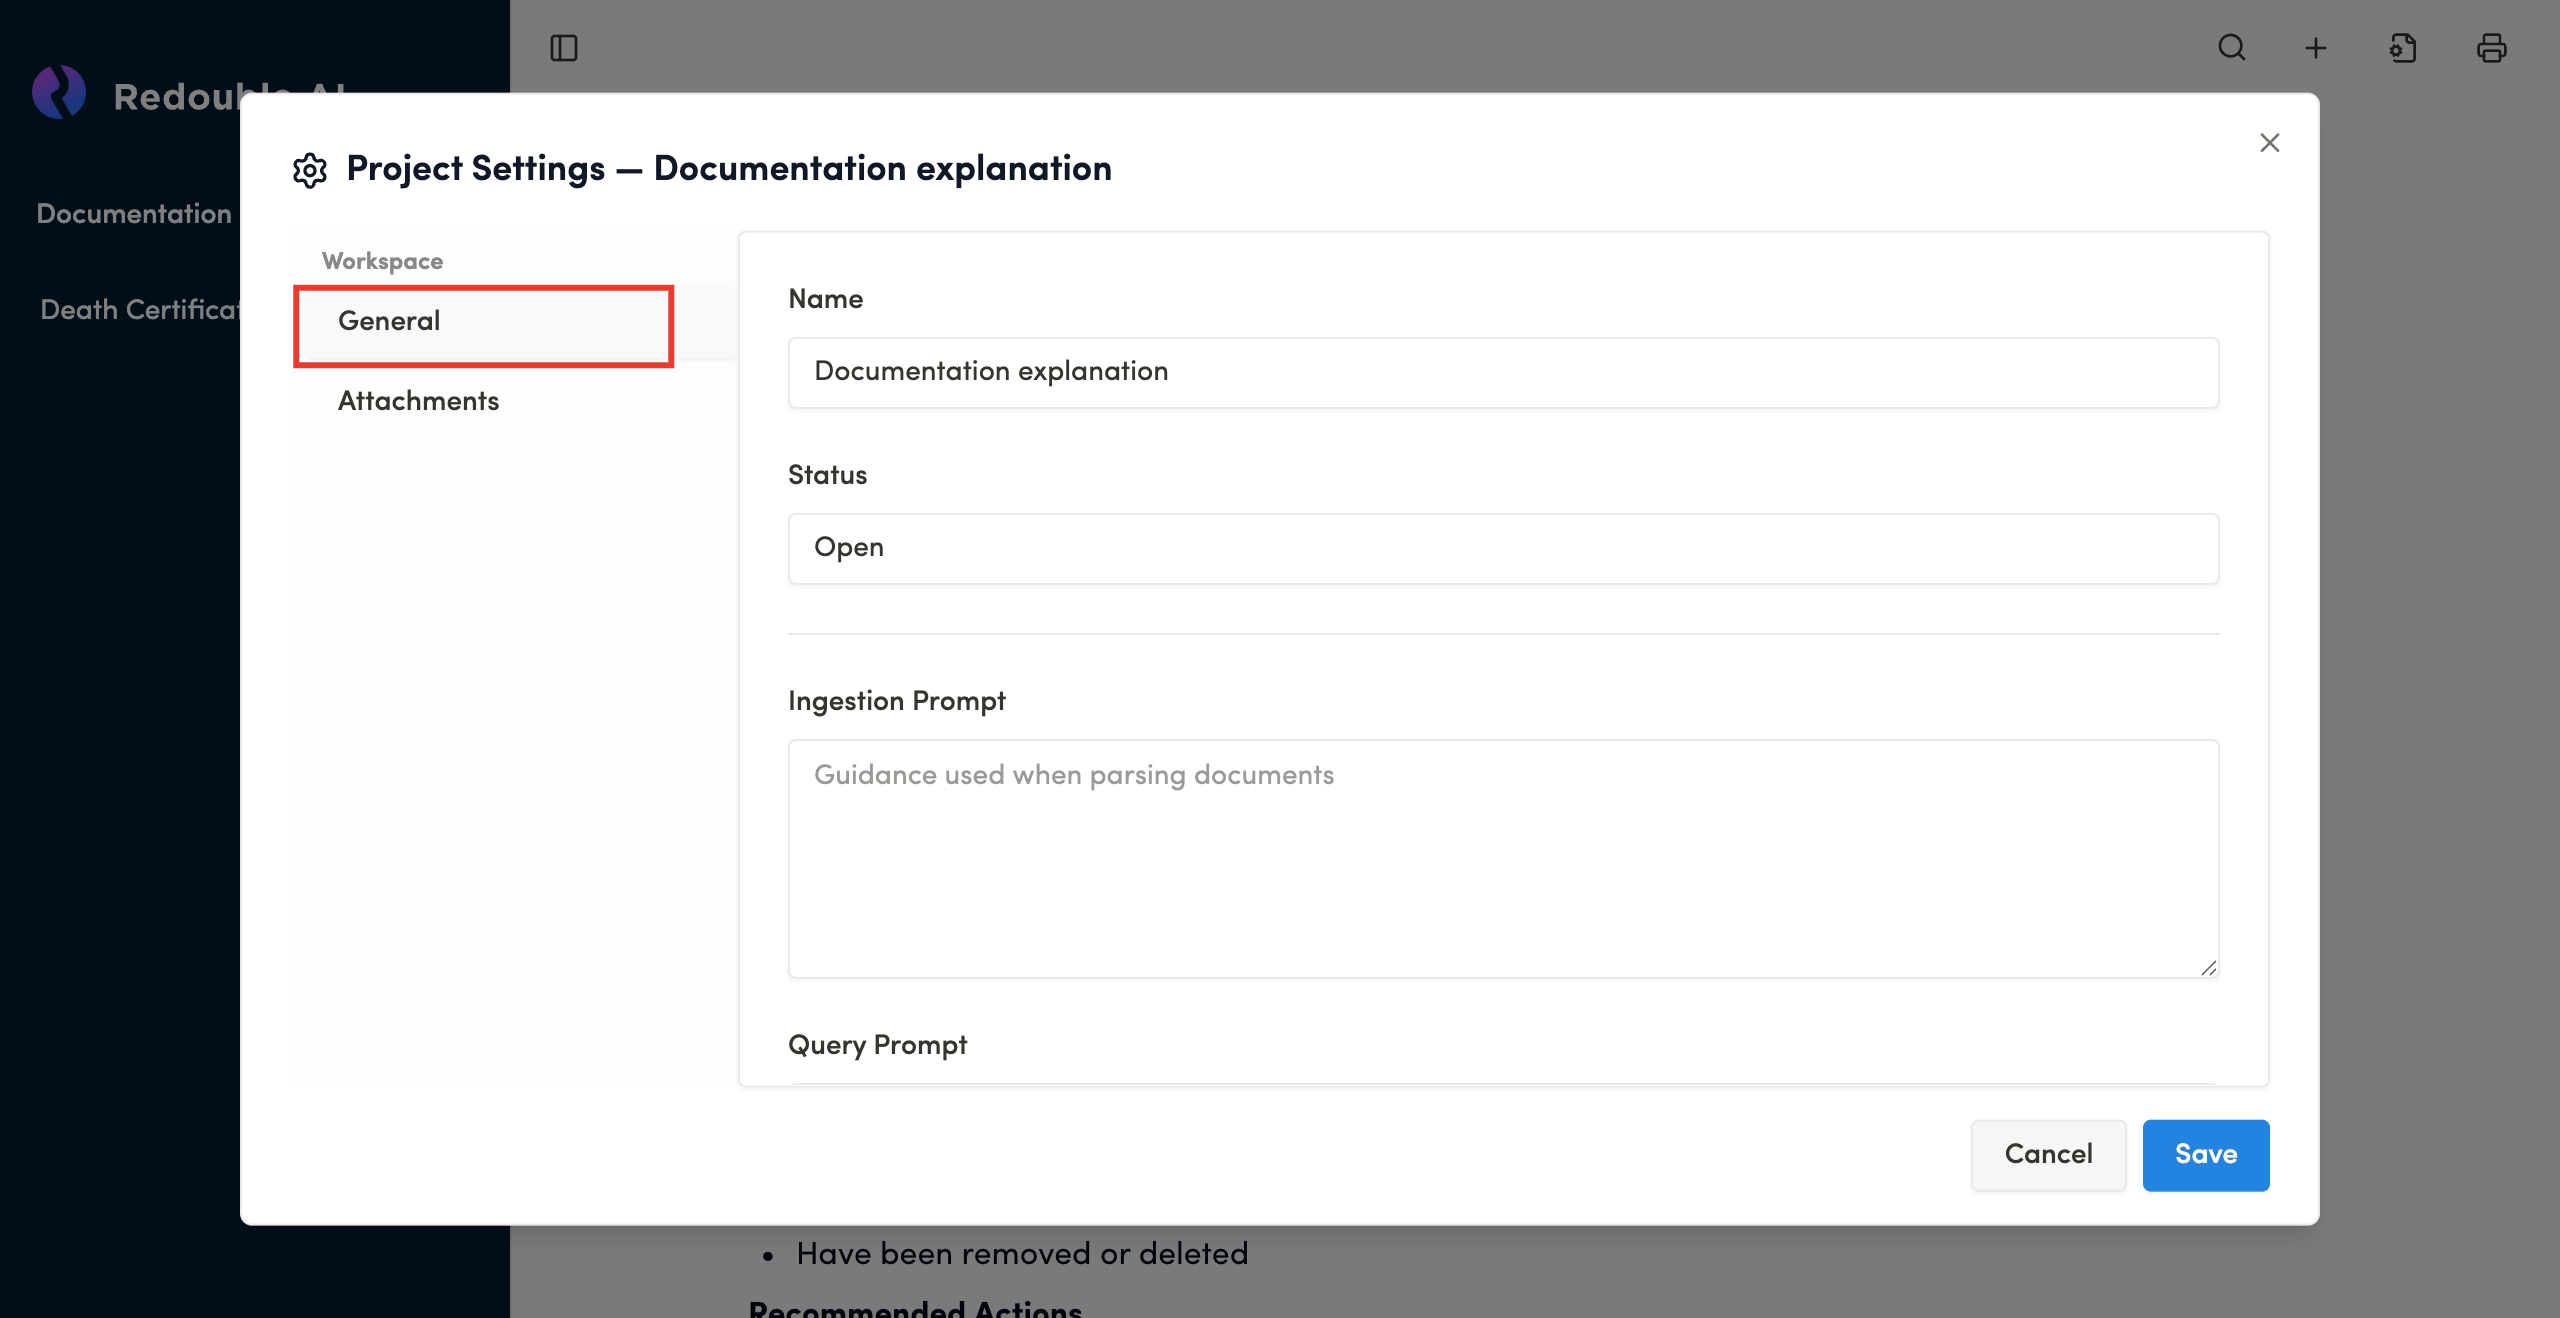
Ingestion Prompt
Field Type: Multi-line text area
Purpose: Provides guidance to the AI when initially parsing and analyzing uploaded documents.
Query Prompt
Field Type: Multi-line text area
Purpose: Guides the AI when generating responses to specific questions or creating document summaries.
Description Prompt
Field Type: Multi-line text area
Purpose: Defines the high-level role and overall instructions for the entire project.
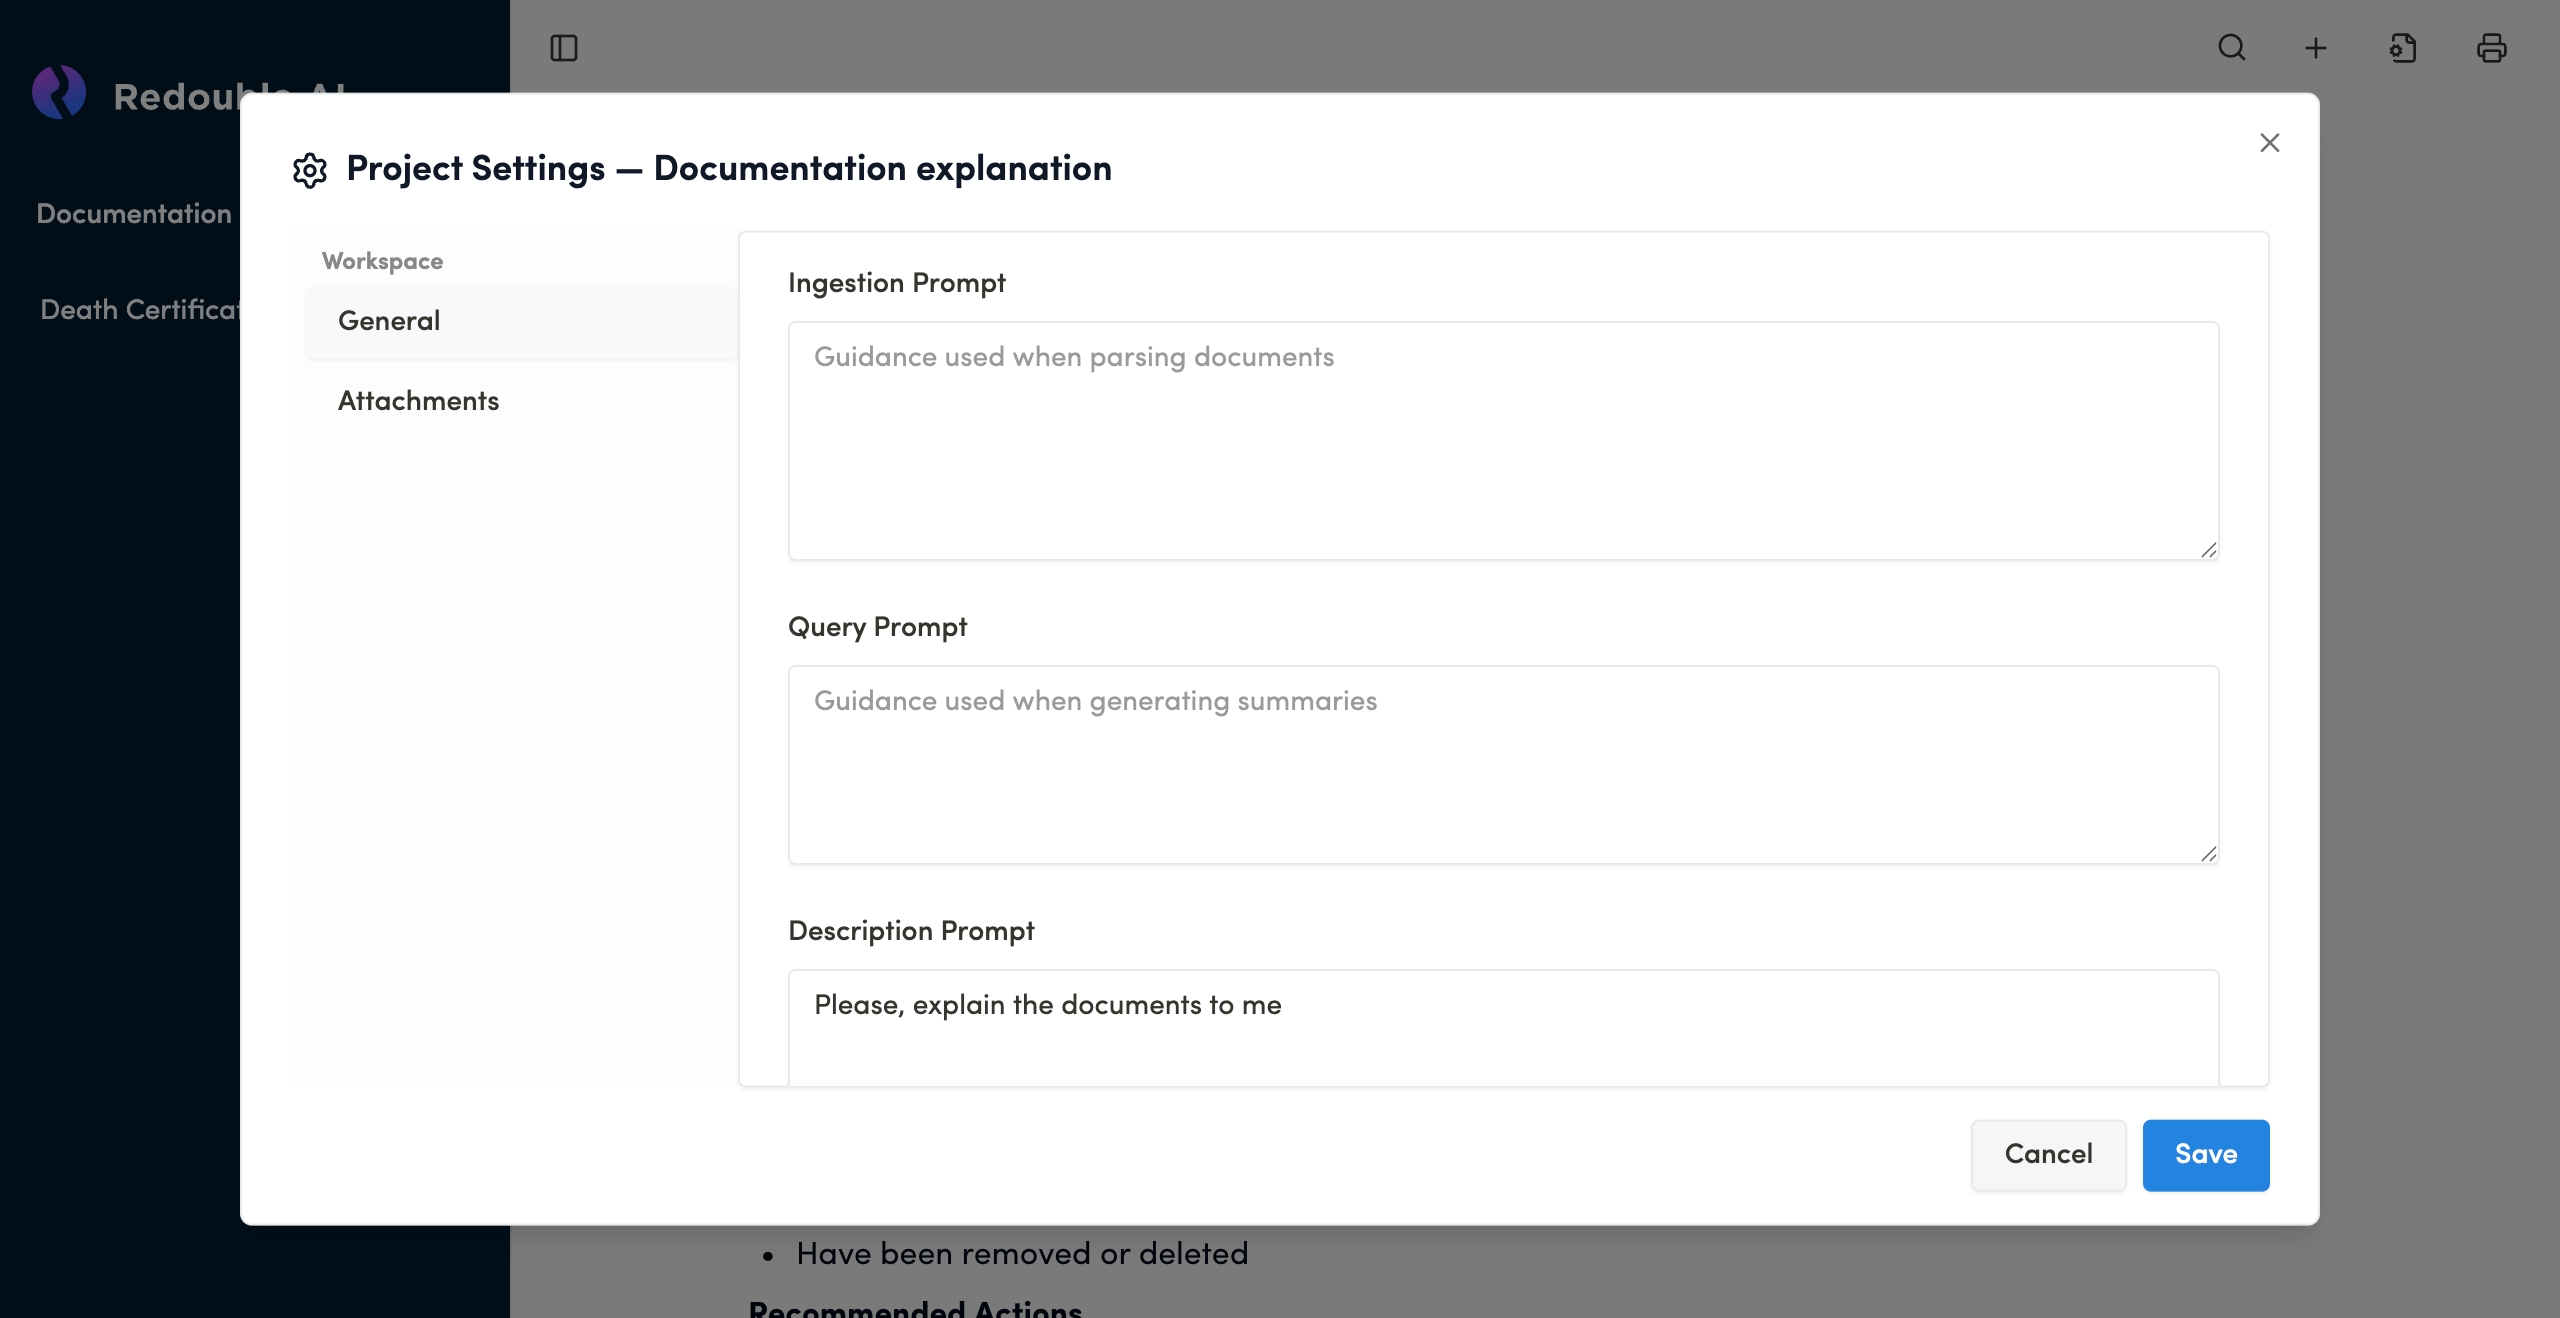
Additional instructions
Field Type: Multi-line text area
Purpose: Provides guidance for specific analysis requirements or edge cases.
Force references
Field Type: Checkbox
Default State: Checked
Purpose: Ensures that all AI-generated responses rely on input document previously uploaded into the project.
Copying a project
For more detailed information view 1.6 Copy Project
Deleting a project
For more detailed information view 1.5 Deleting the project
3.2 Attachments
The Attachments tab manages all documents available for AI analysis within a given project. You can also use this tab to upload new documents.
Preconditions:
- You are logged into the Redouble AI system
- You have at least one project
- Click on the "Document settings" icon and select "Attachments" in the "Workspace" list
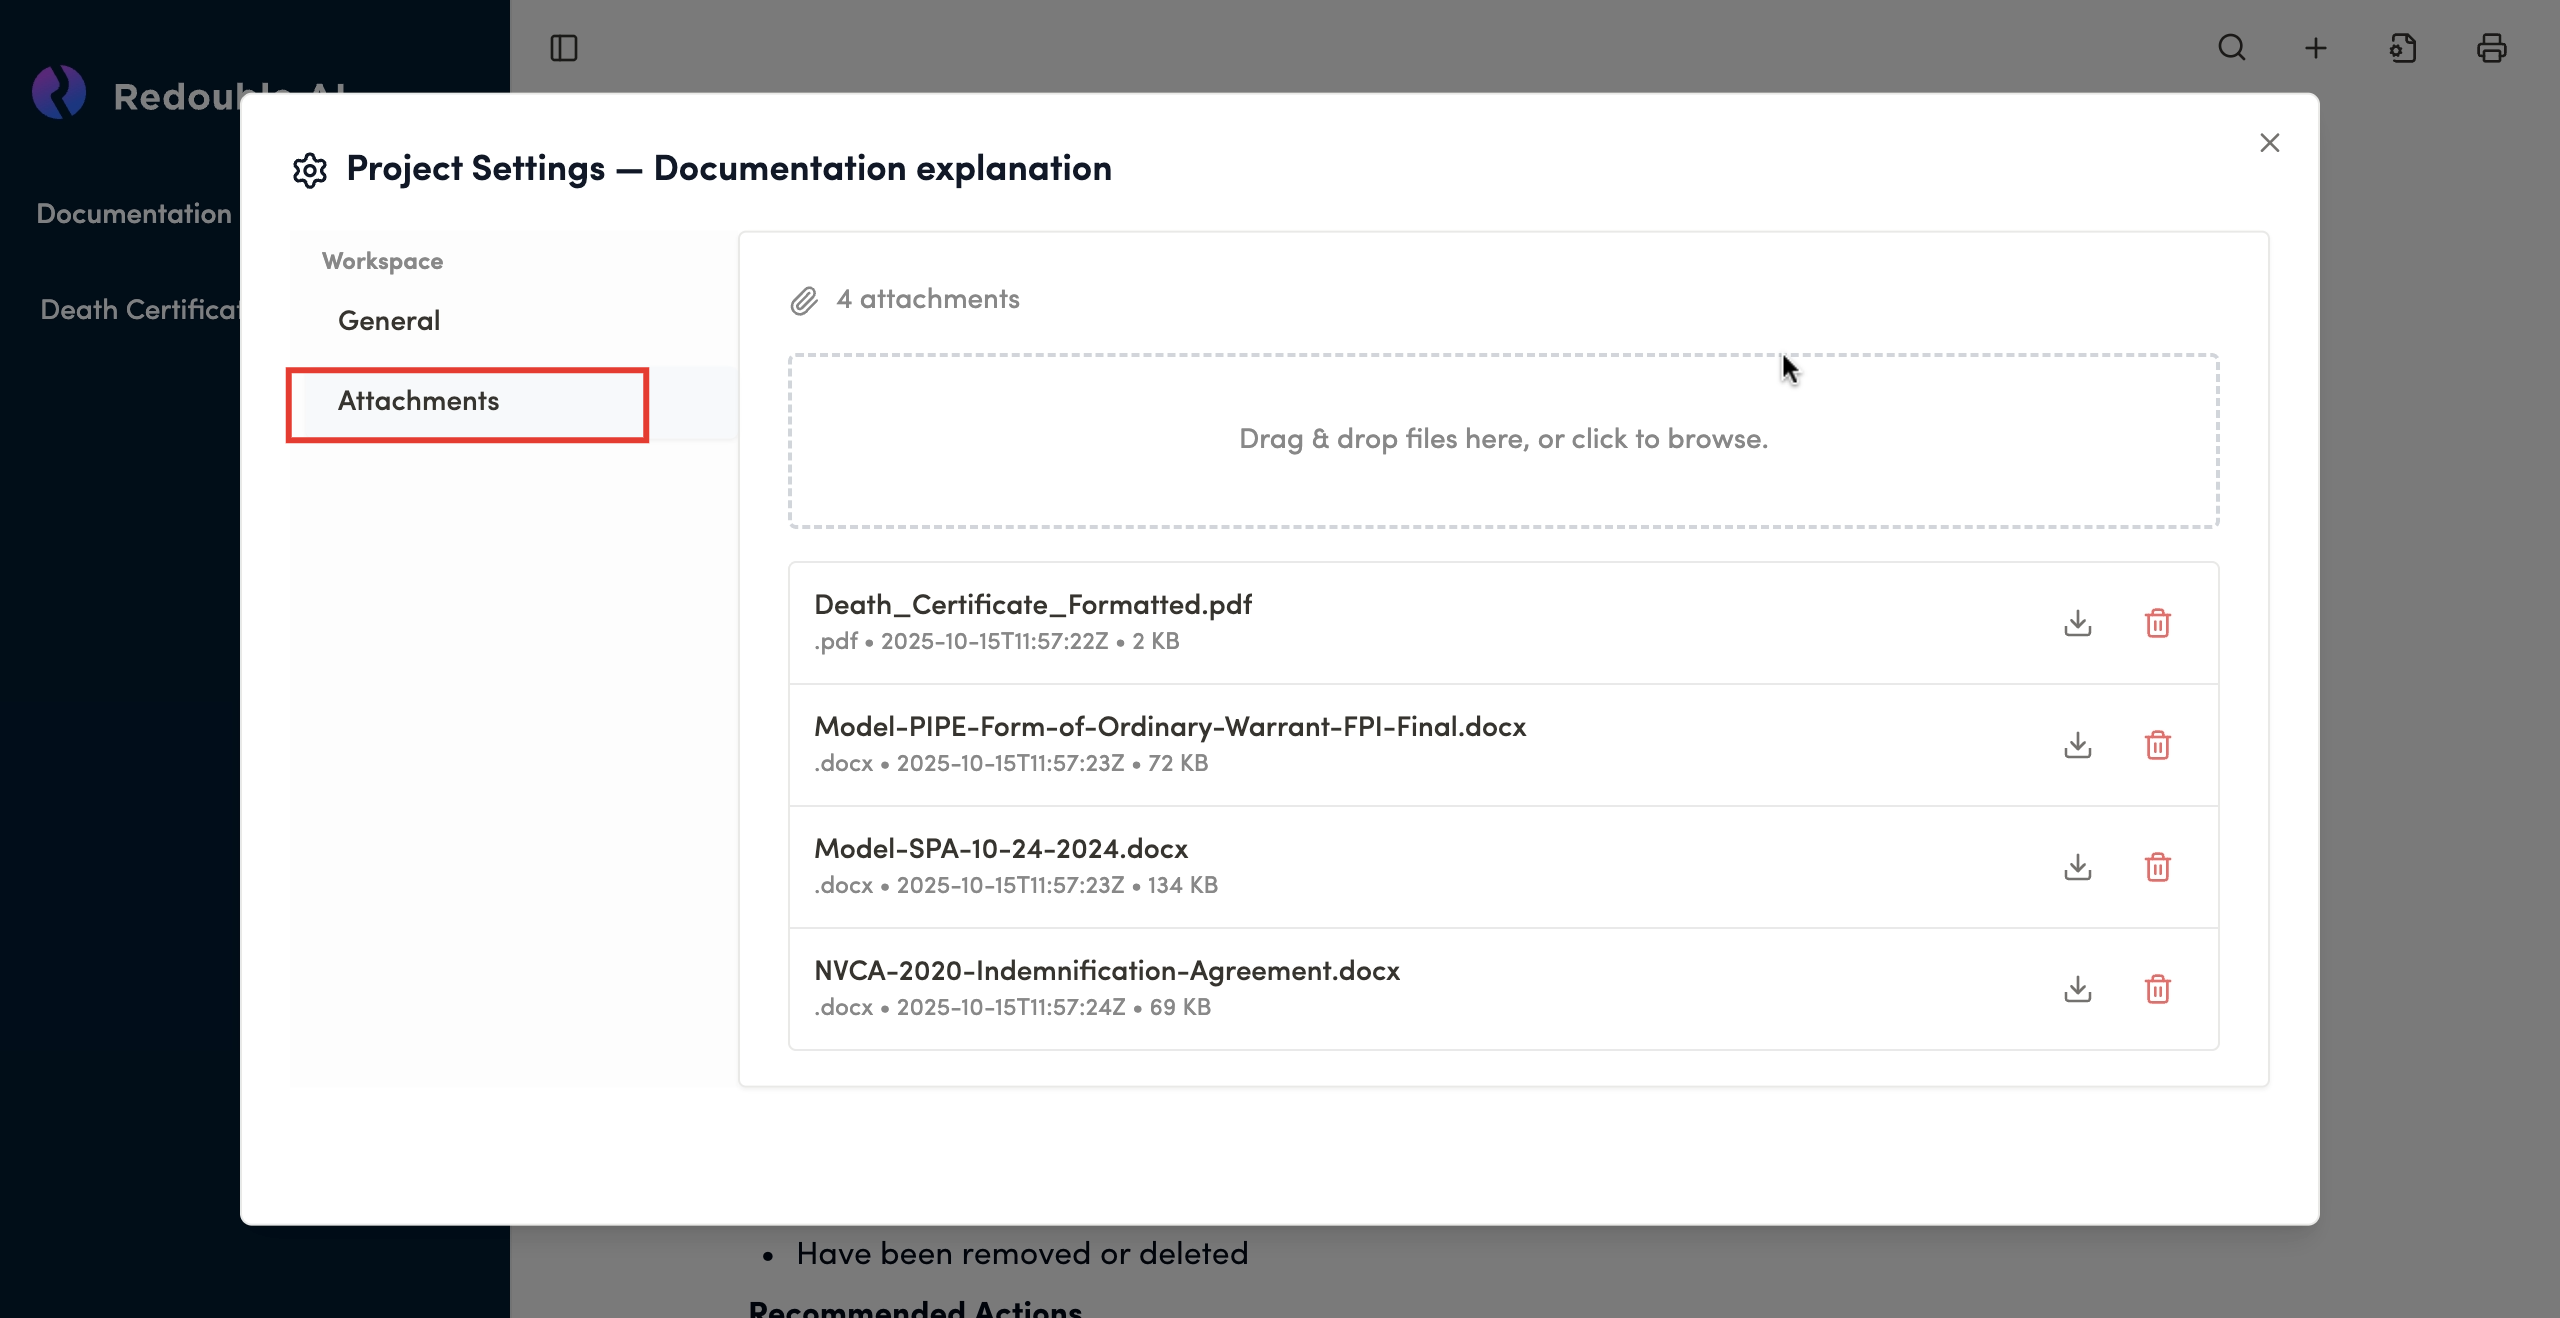
Upload interface
Feature: Drag-and-drop file upload area
Alternative: Click to browse your file system
Visual indicator: Displays the total attachment count
The system supports the upload of a broad range of file types/ extensions. For example:
- Text files (.docx, .rtf., etc.)
- Tabular data files (.xlsx, .csv, etc.)
- Image files (.jpeg, .png, etc.)
- Other file types (.pdf, .json, etc.)
File size recommendations:
- Individual files: Under 50MB for optimal processing
- Total project size: No hard limit, but larger projects may take longer to process
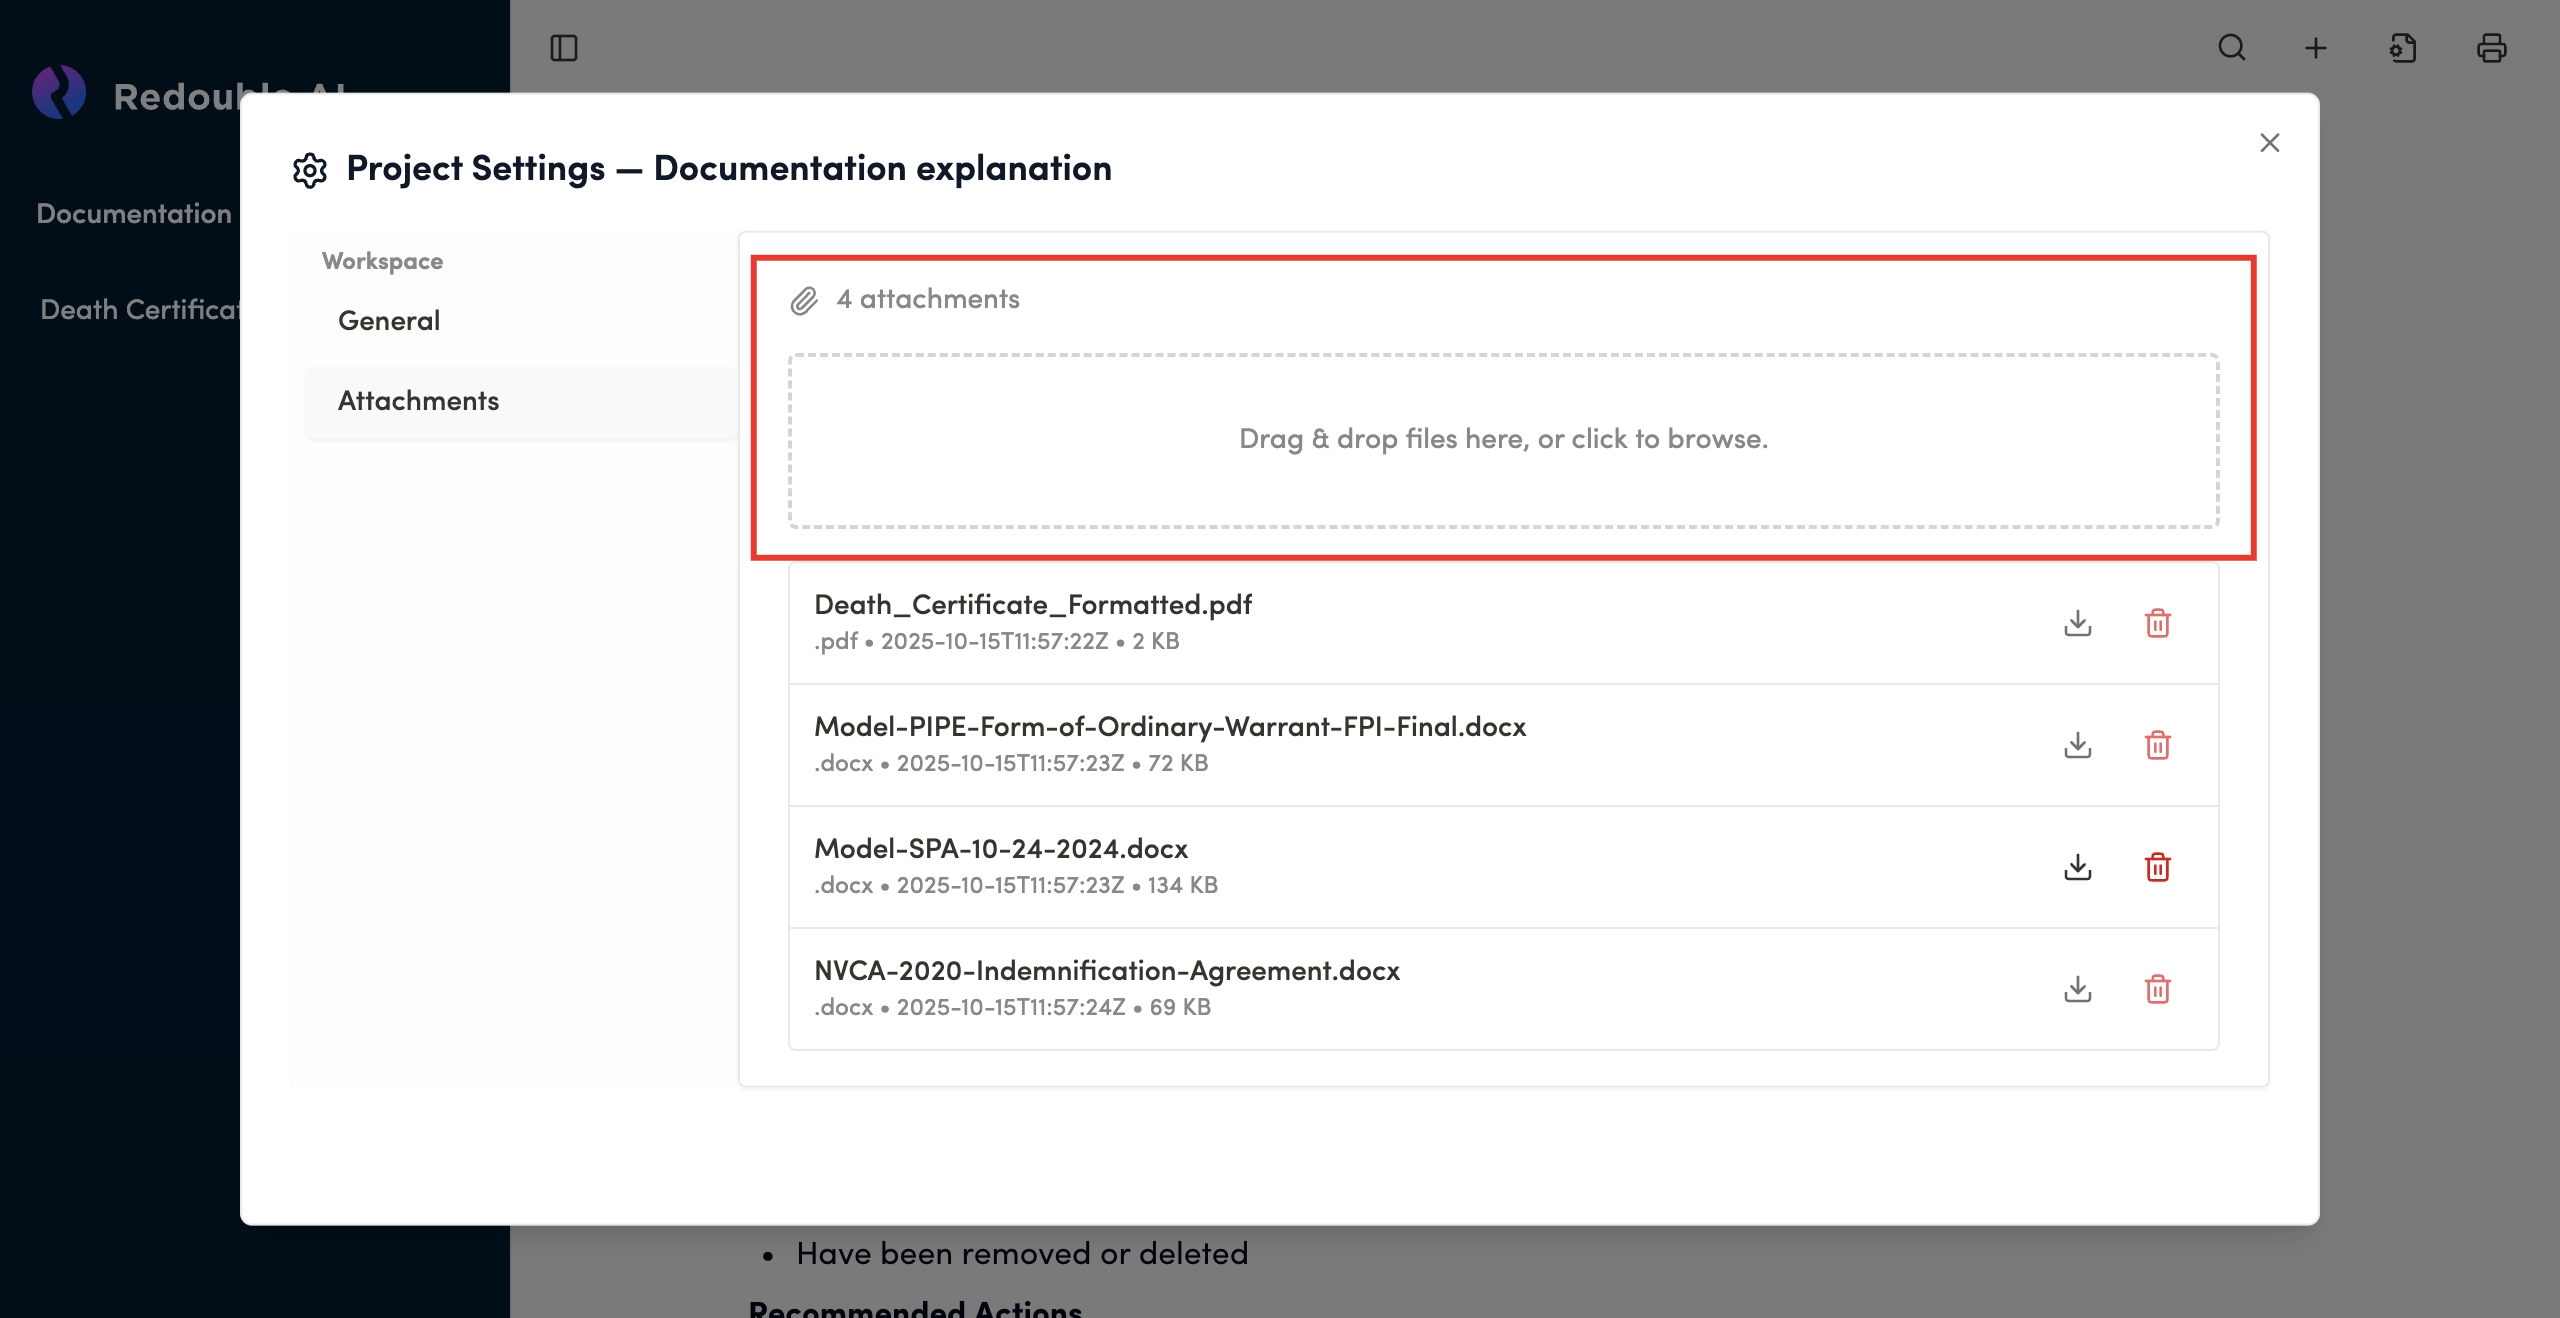
Document list
Each uploaded document is displayed with the following information:
File name: Original filename as uploaded
File type: Extension indicator (.docx, .pdf, etc.)
Upload date: Timestamp of when the file was added
File size: Size in KB or MB
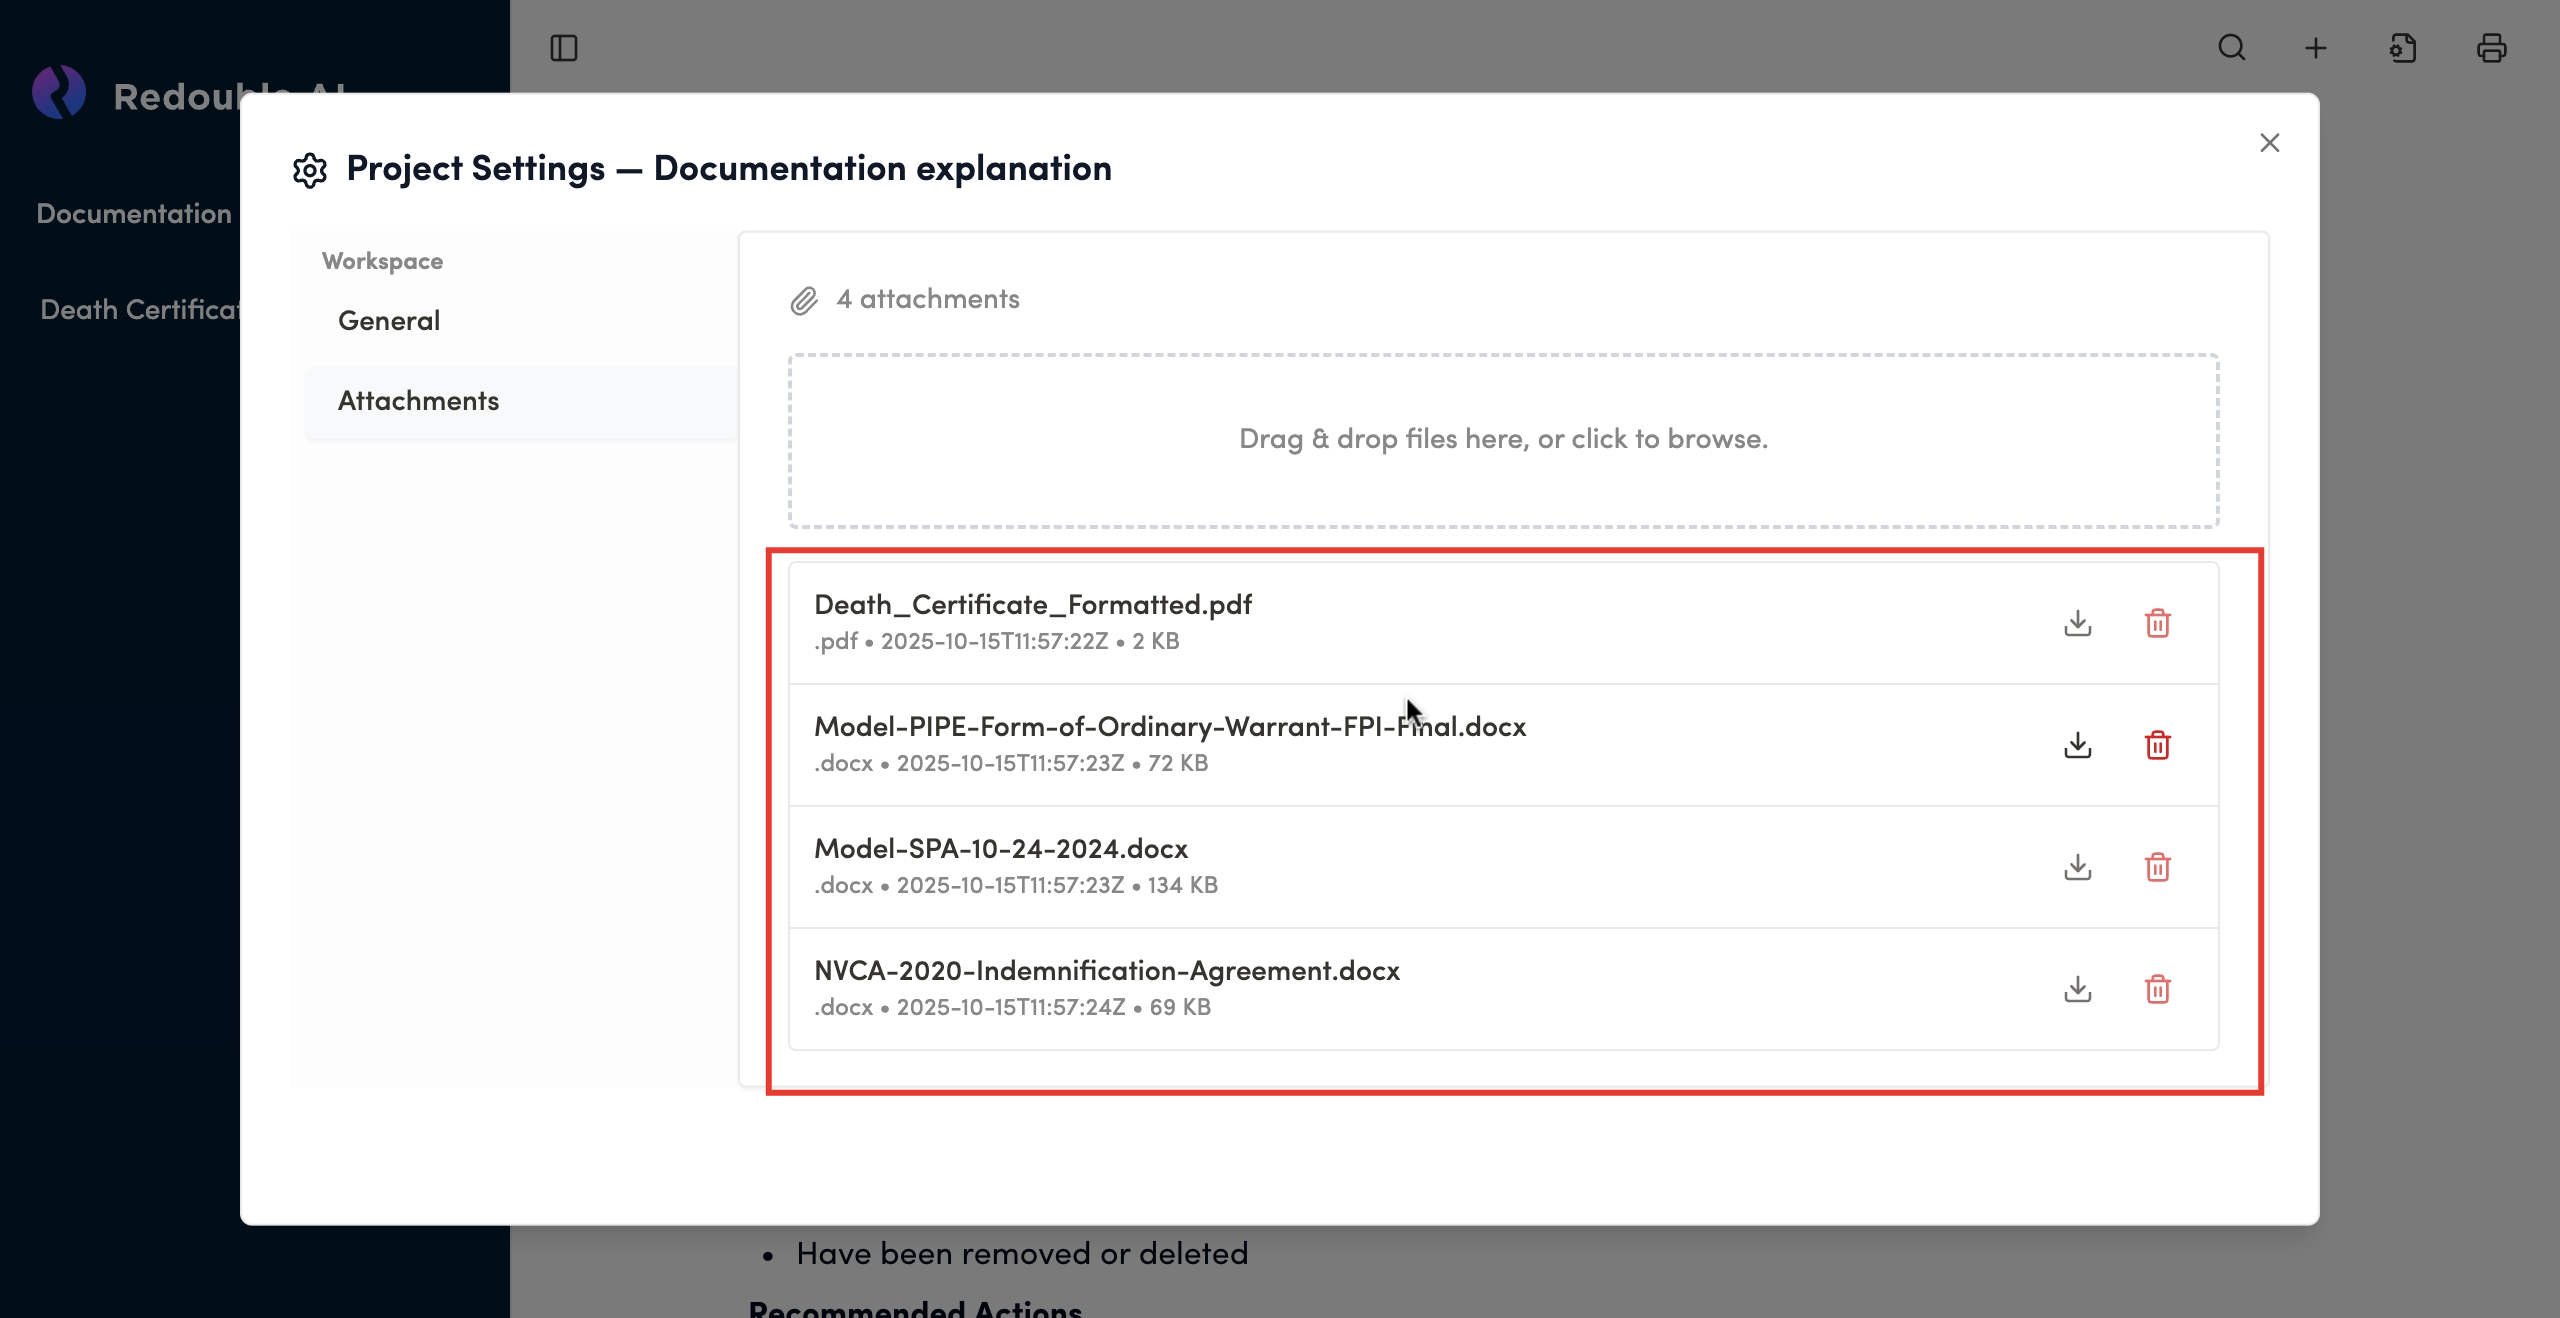
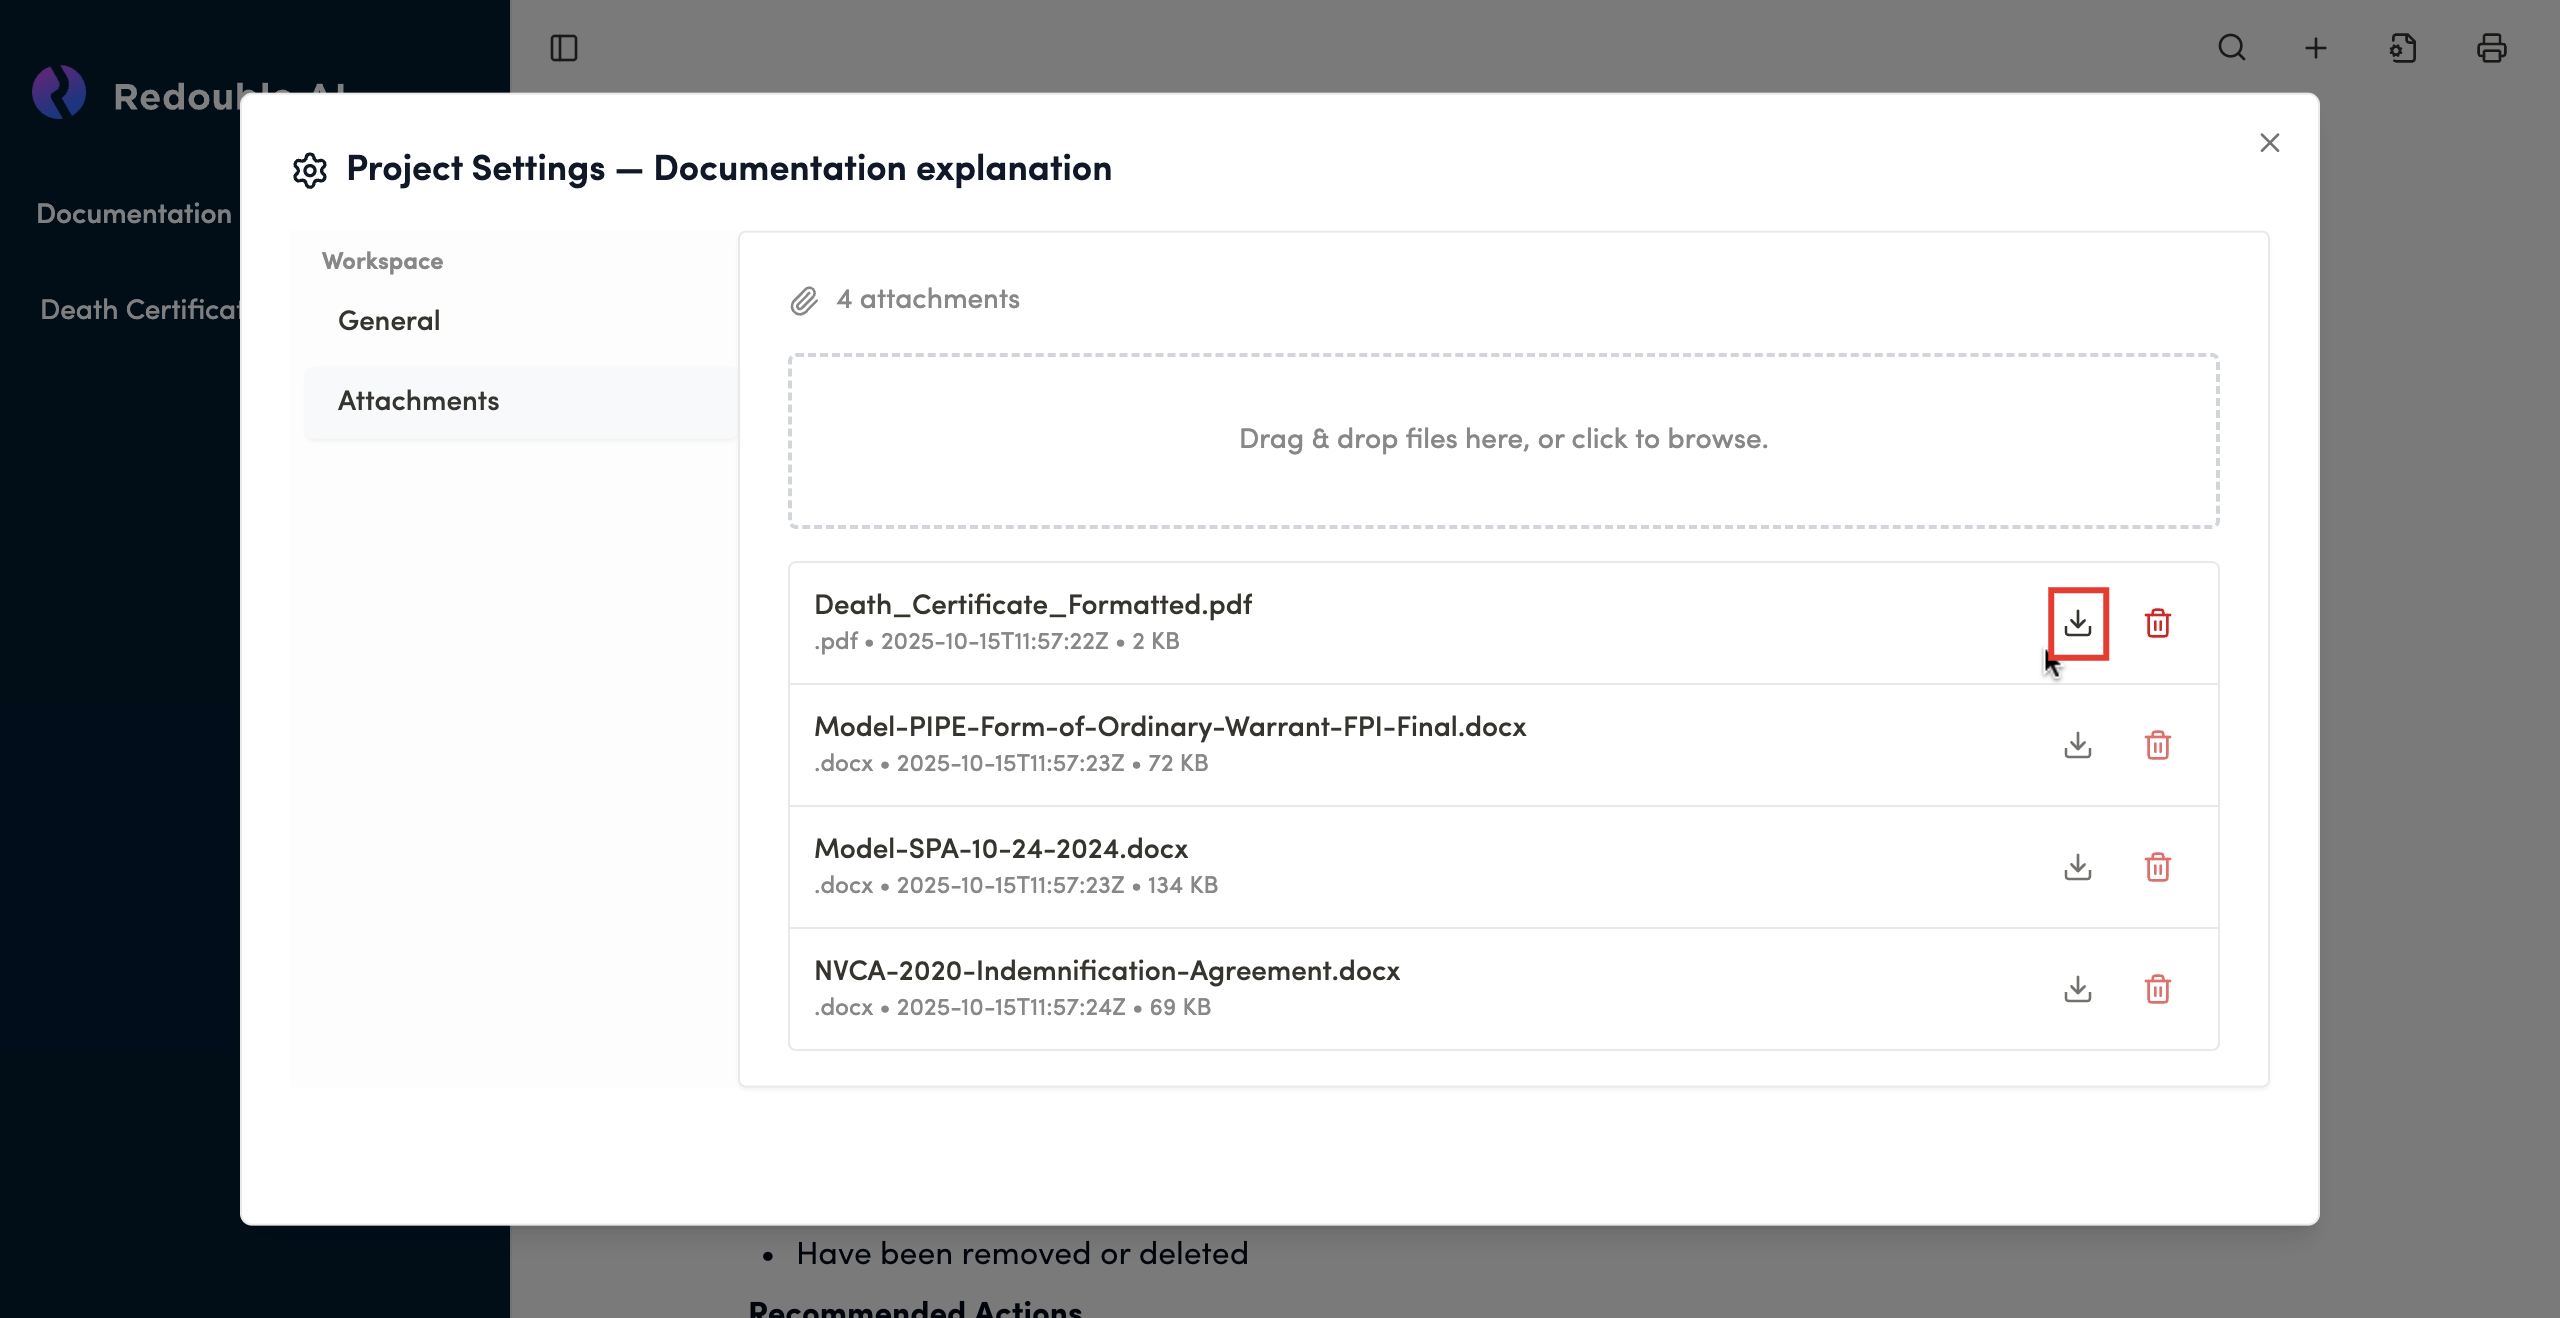
Available actions:
Download button
- Icon: Download arrow
- Function: Downloads a copy of the file to your local system
- Use Case: Retrieve original files for offline review or backup
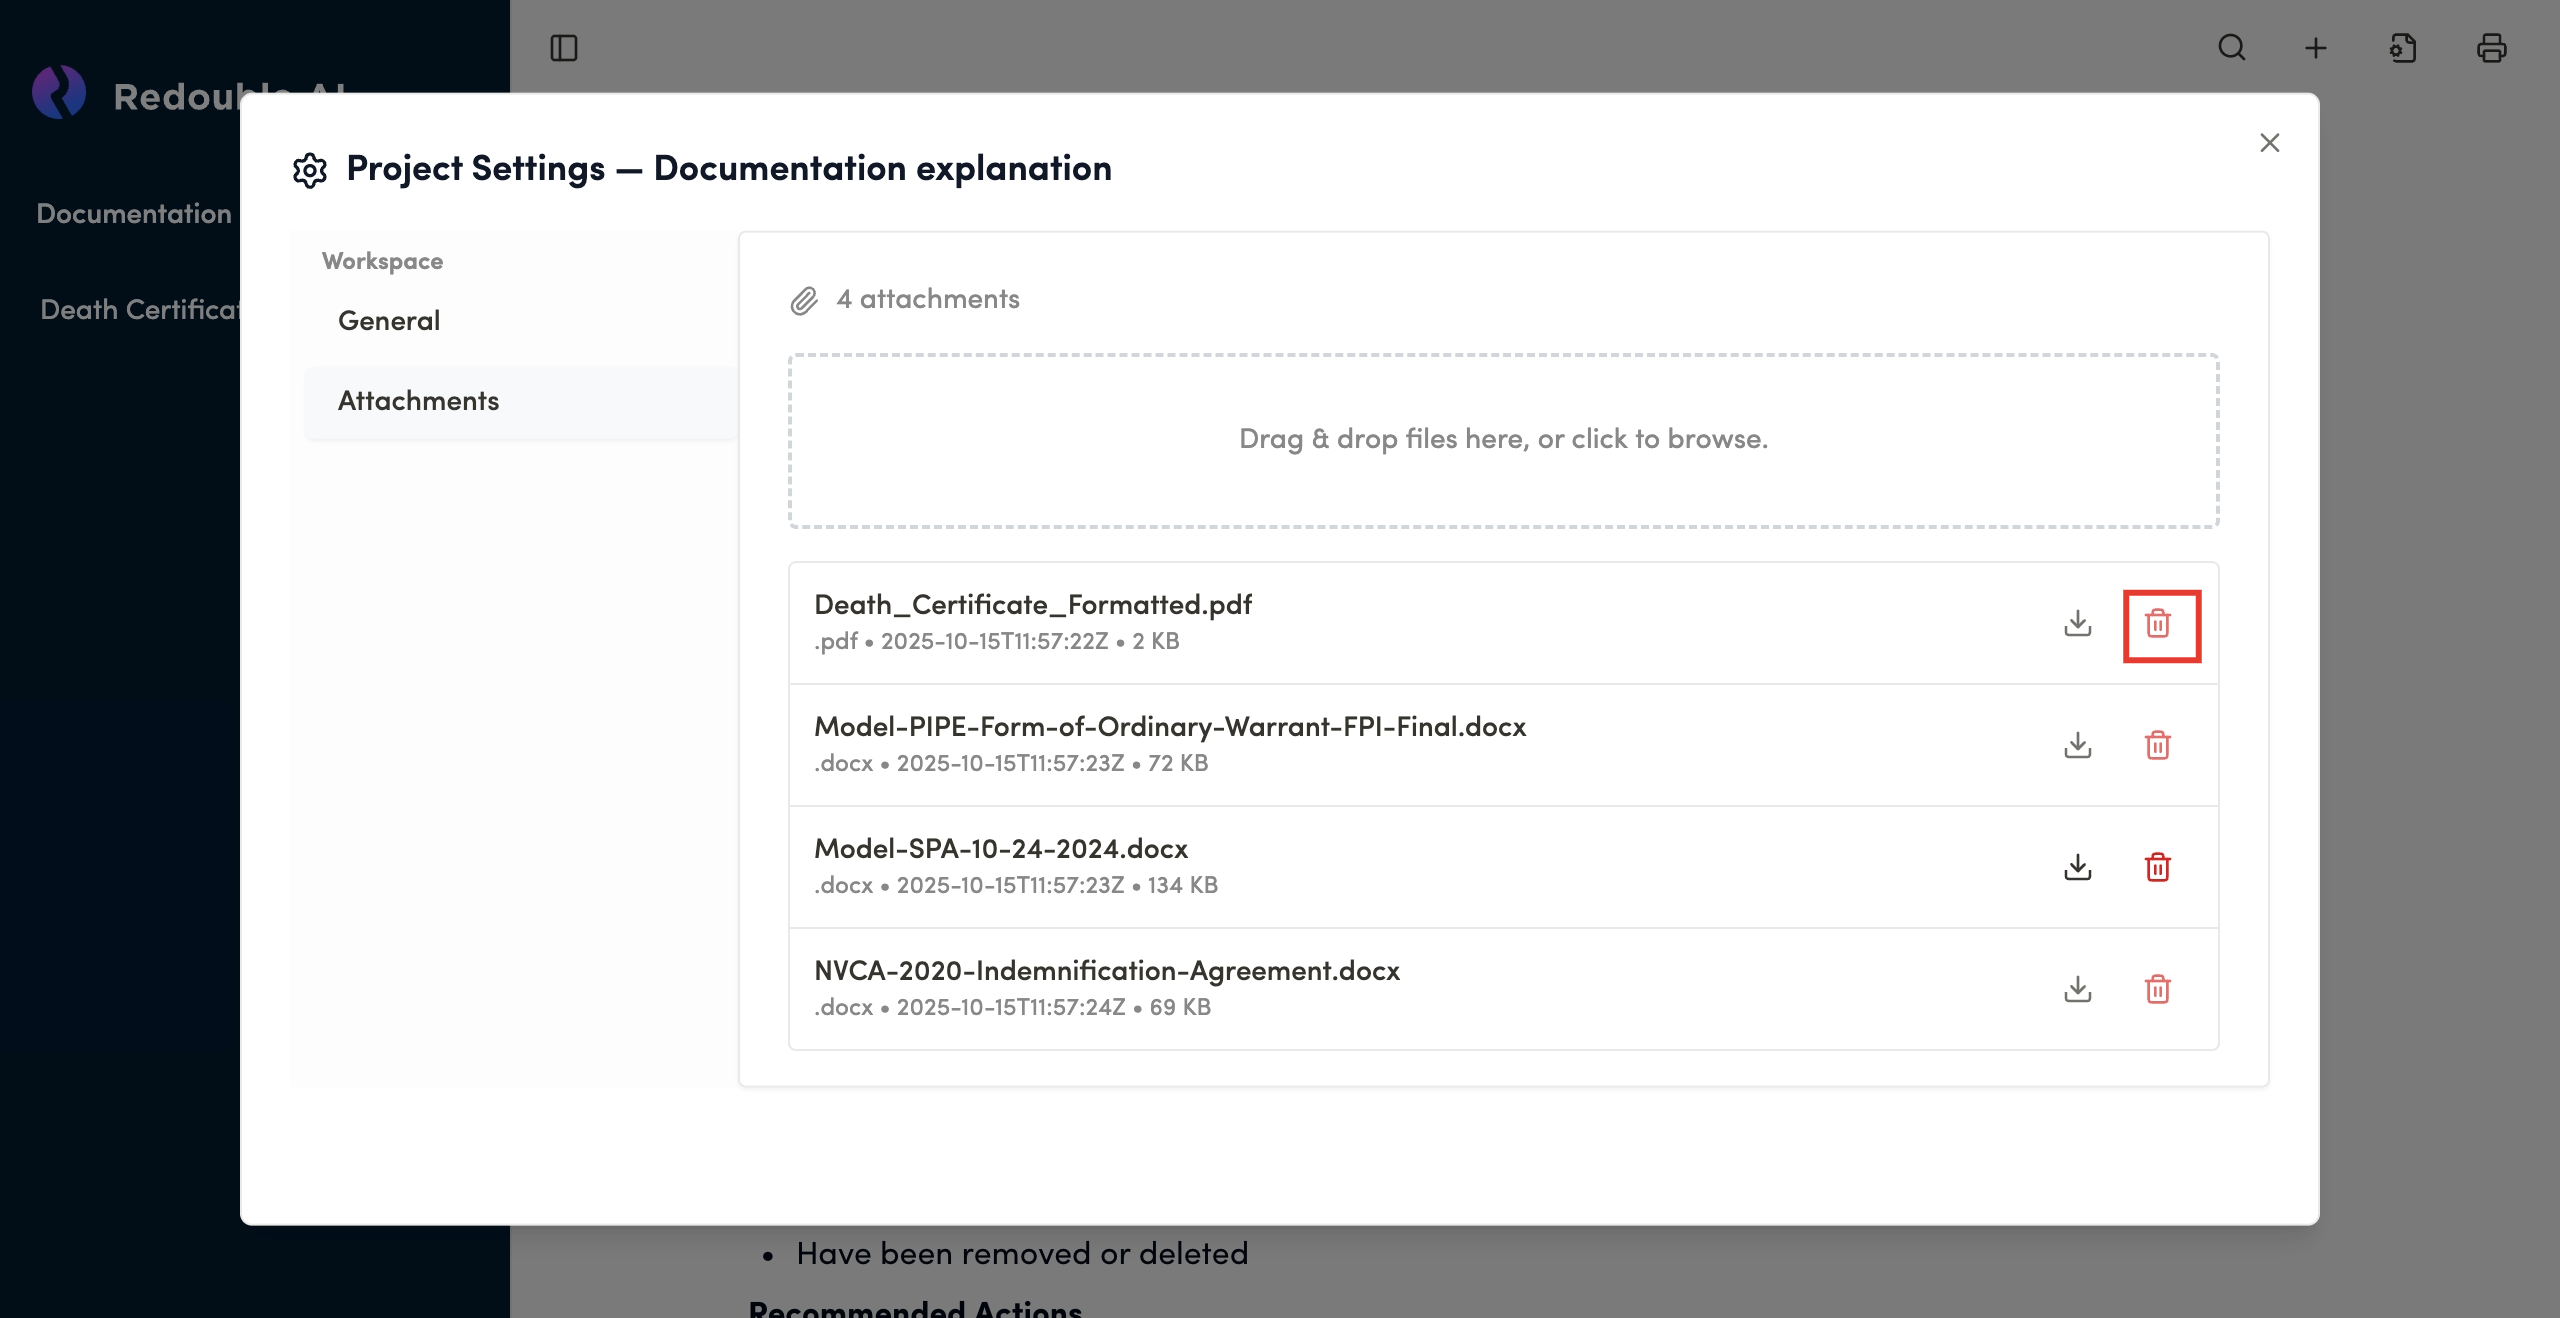
Delete button
- Icon: Trash can
- Function: Permanently removes the file from the project
- Warning: This action cannot be undone and deleted documents will no longer be available in the project
3.3 Project sharing
Preconditions:
- You are logged into the Redouble AI system
- You have at least one project
- Click on the "Document settings" icon and select "Project Sharing" in the "Workspace" list
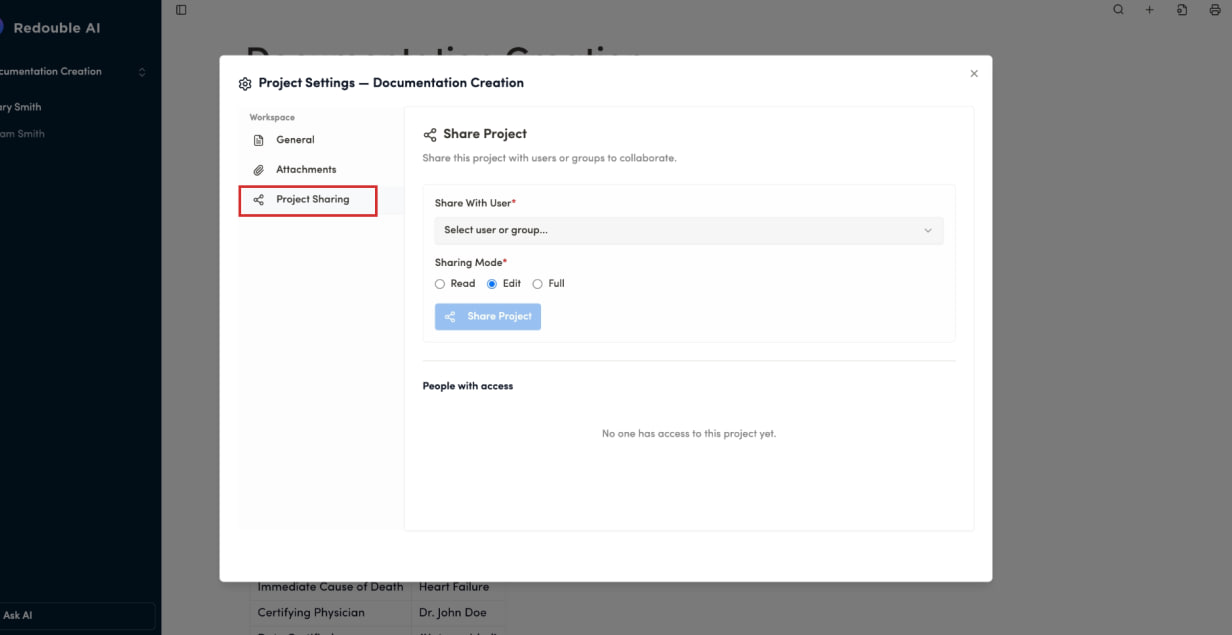
Share With User (Required)
Field Type: Dropdown selector
Purpose: Choose a specific user or group to share project with
Sharing Mode (Required)
Field Type: Horizontal list with access level options
Purpose: Allows to chose the level of access to the project:
- Read - View-only access (can see project and documents but cannot edit)
- Edit - Can view and modify project content (currently selected in your screenshot)
- Full - Complete access including project settings and management
Share Project Button
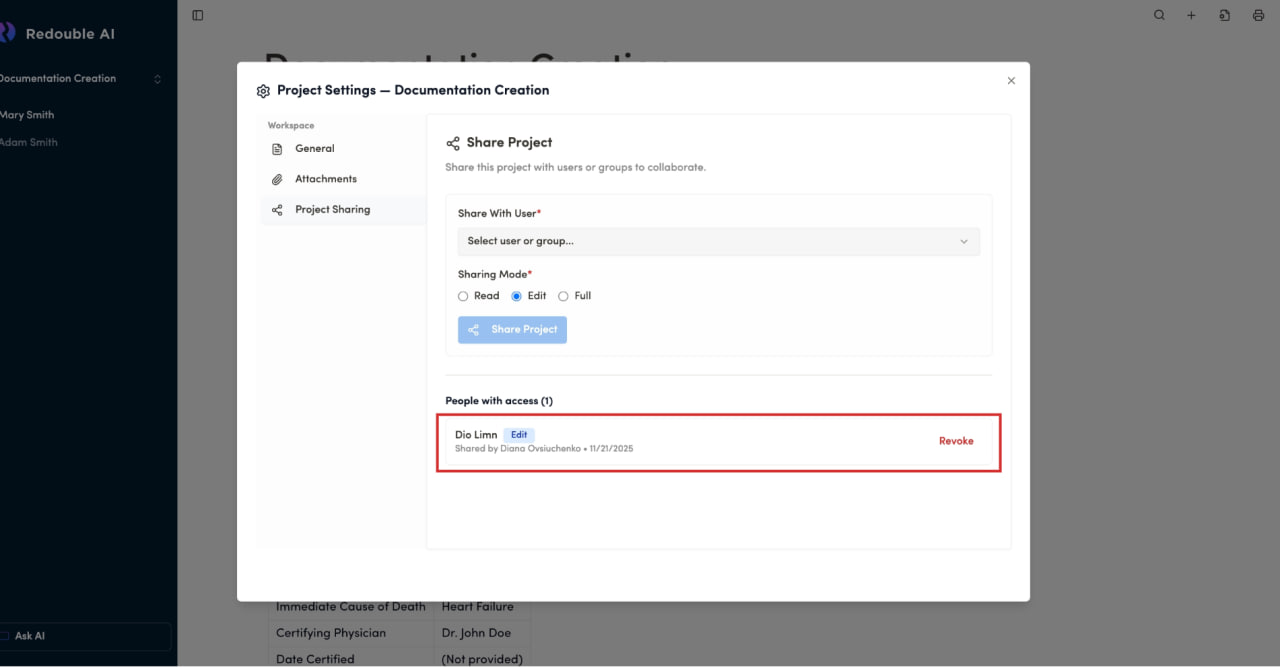
People with access Section
Purpose: Lists all users/groups who currently have access to the project. Shows their permission levels
Default state: "No one has access to this project yet" label
People with access List
Consists of list of users who have access to the project. Each item in the list consists of:
- User name
- Level of access label (Read, Edit, Full)
- Name of user who granted access
- Date when access was granted (MM/DD/YY)
- "Revoke" button
- Counter near the "People With Access" label, that indicates total number of users in the list
4. Additional features
4.1 Question status indicator
Prerequisites:
- You are logged into the Redouble AI system
- At least one question exists in the project
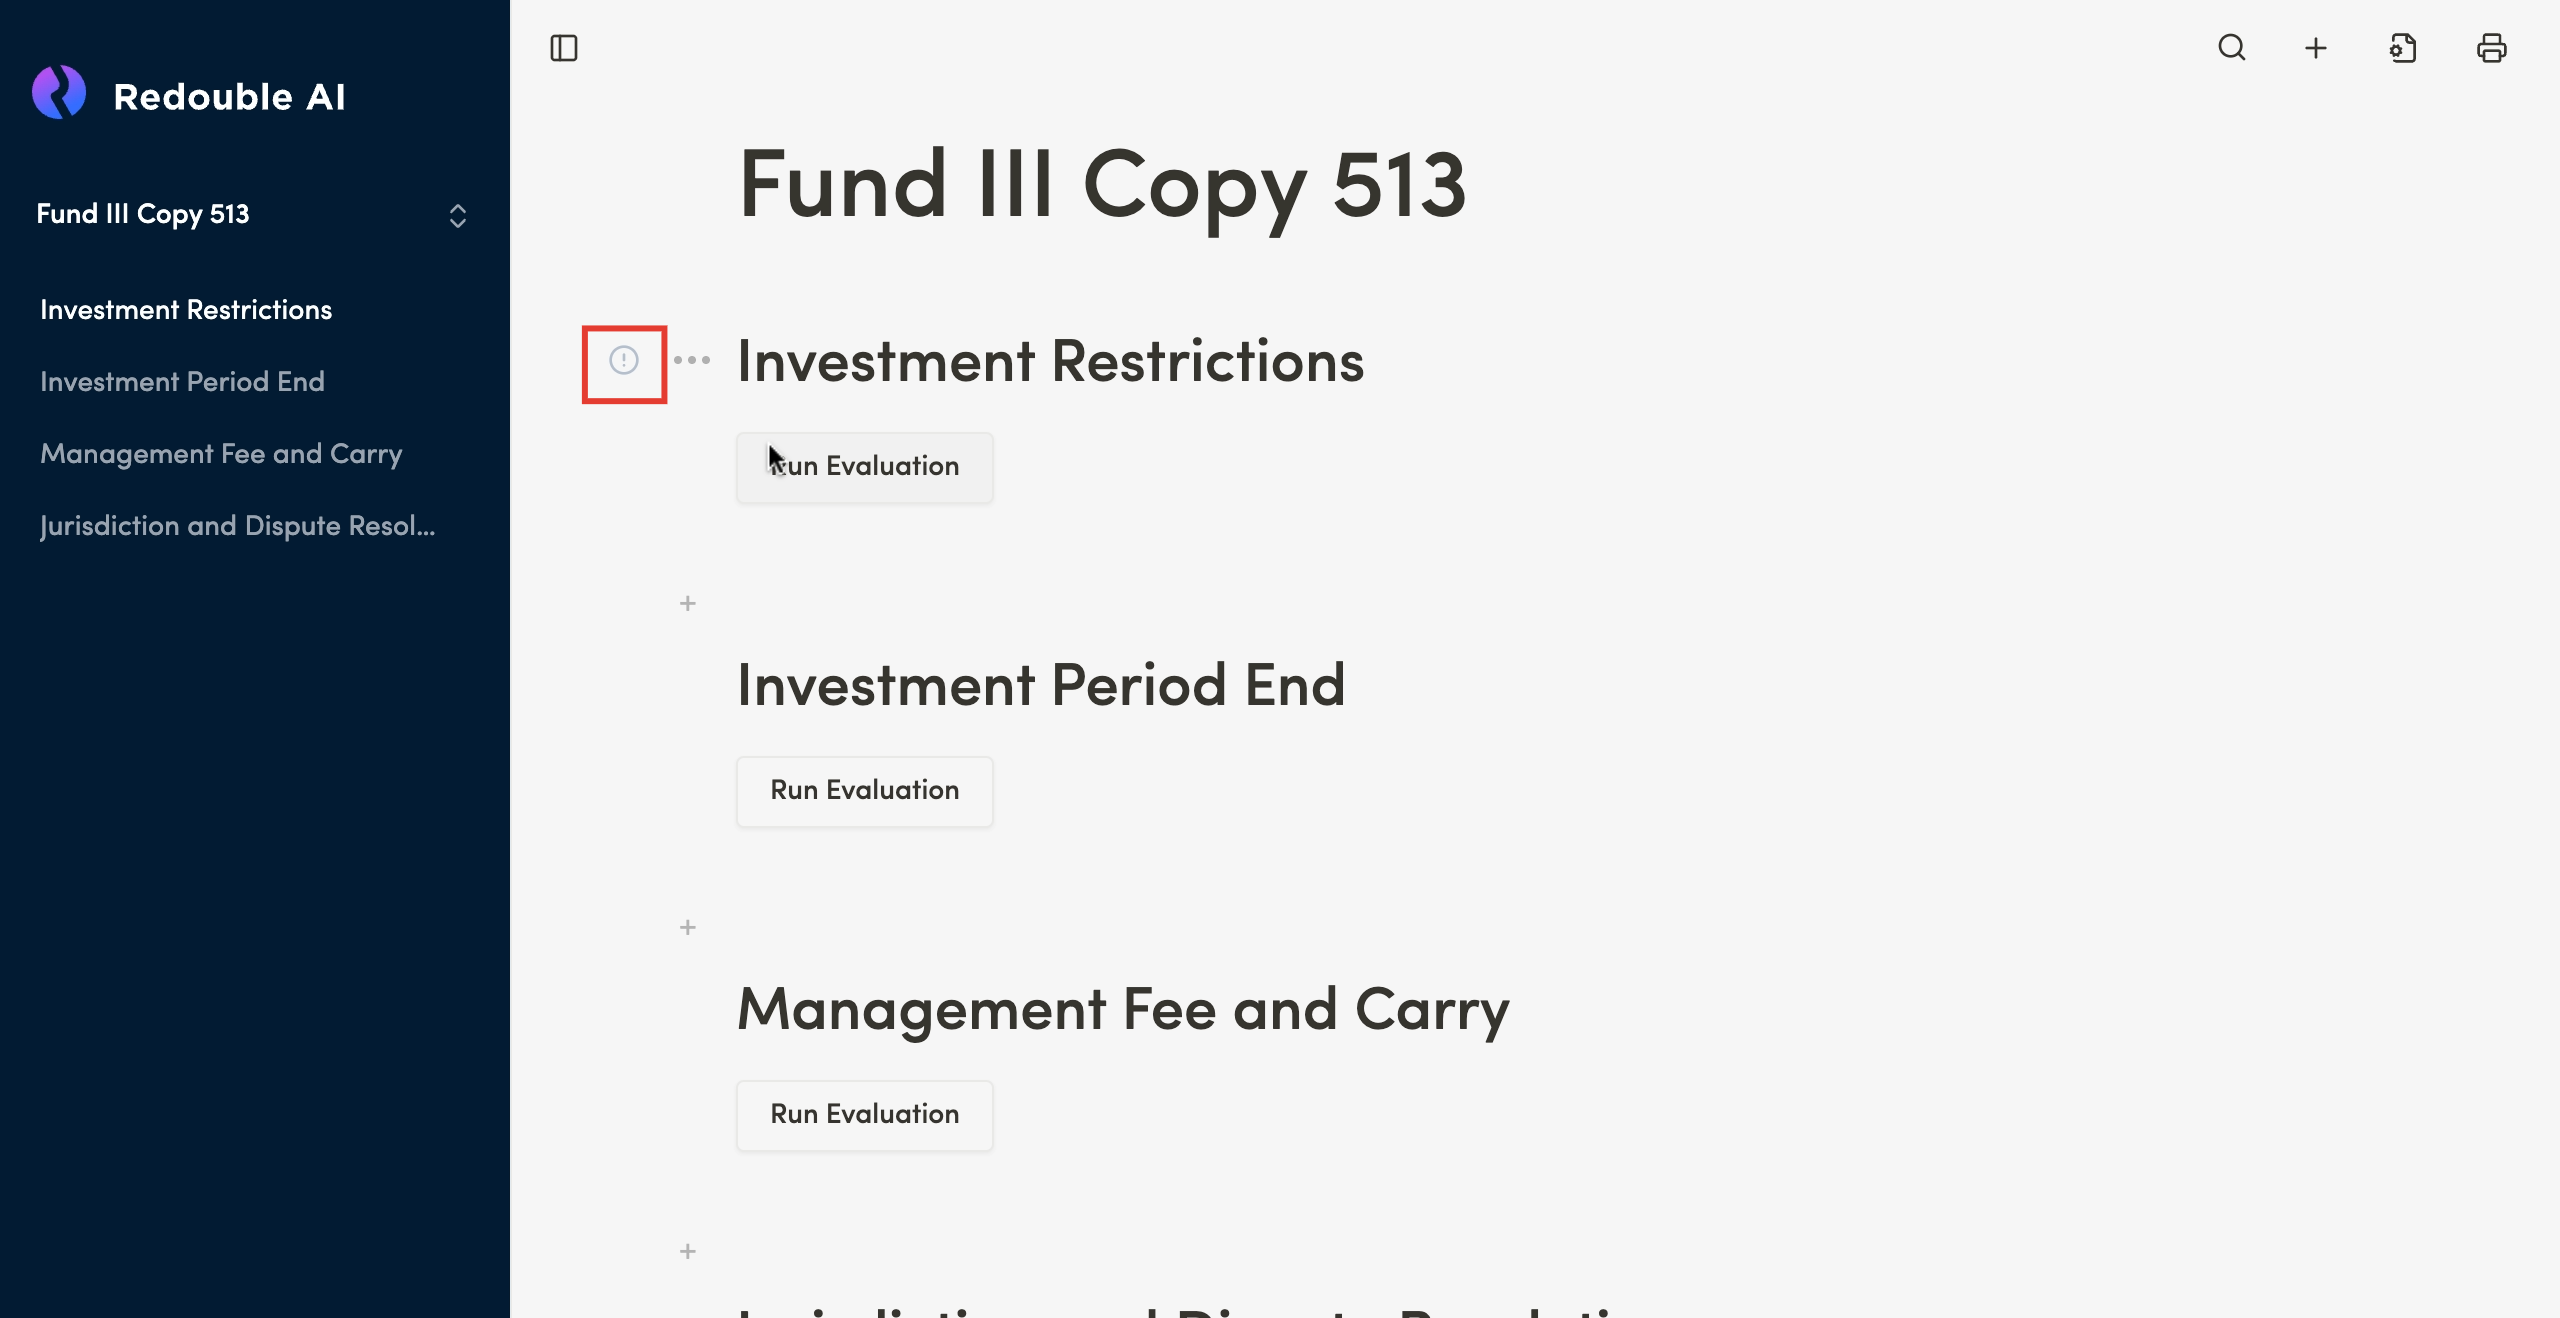
Not Generated
Purpose: This indicator appears when a user creates a question.
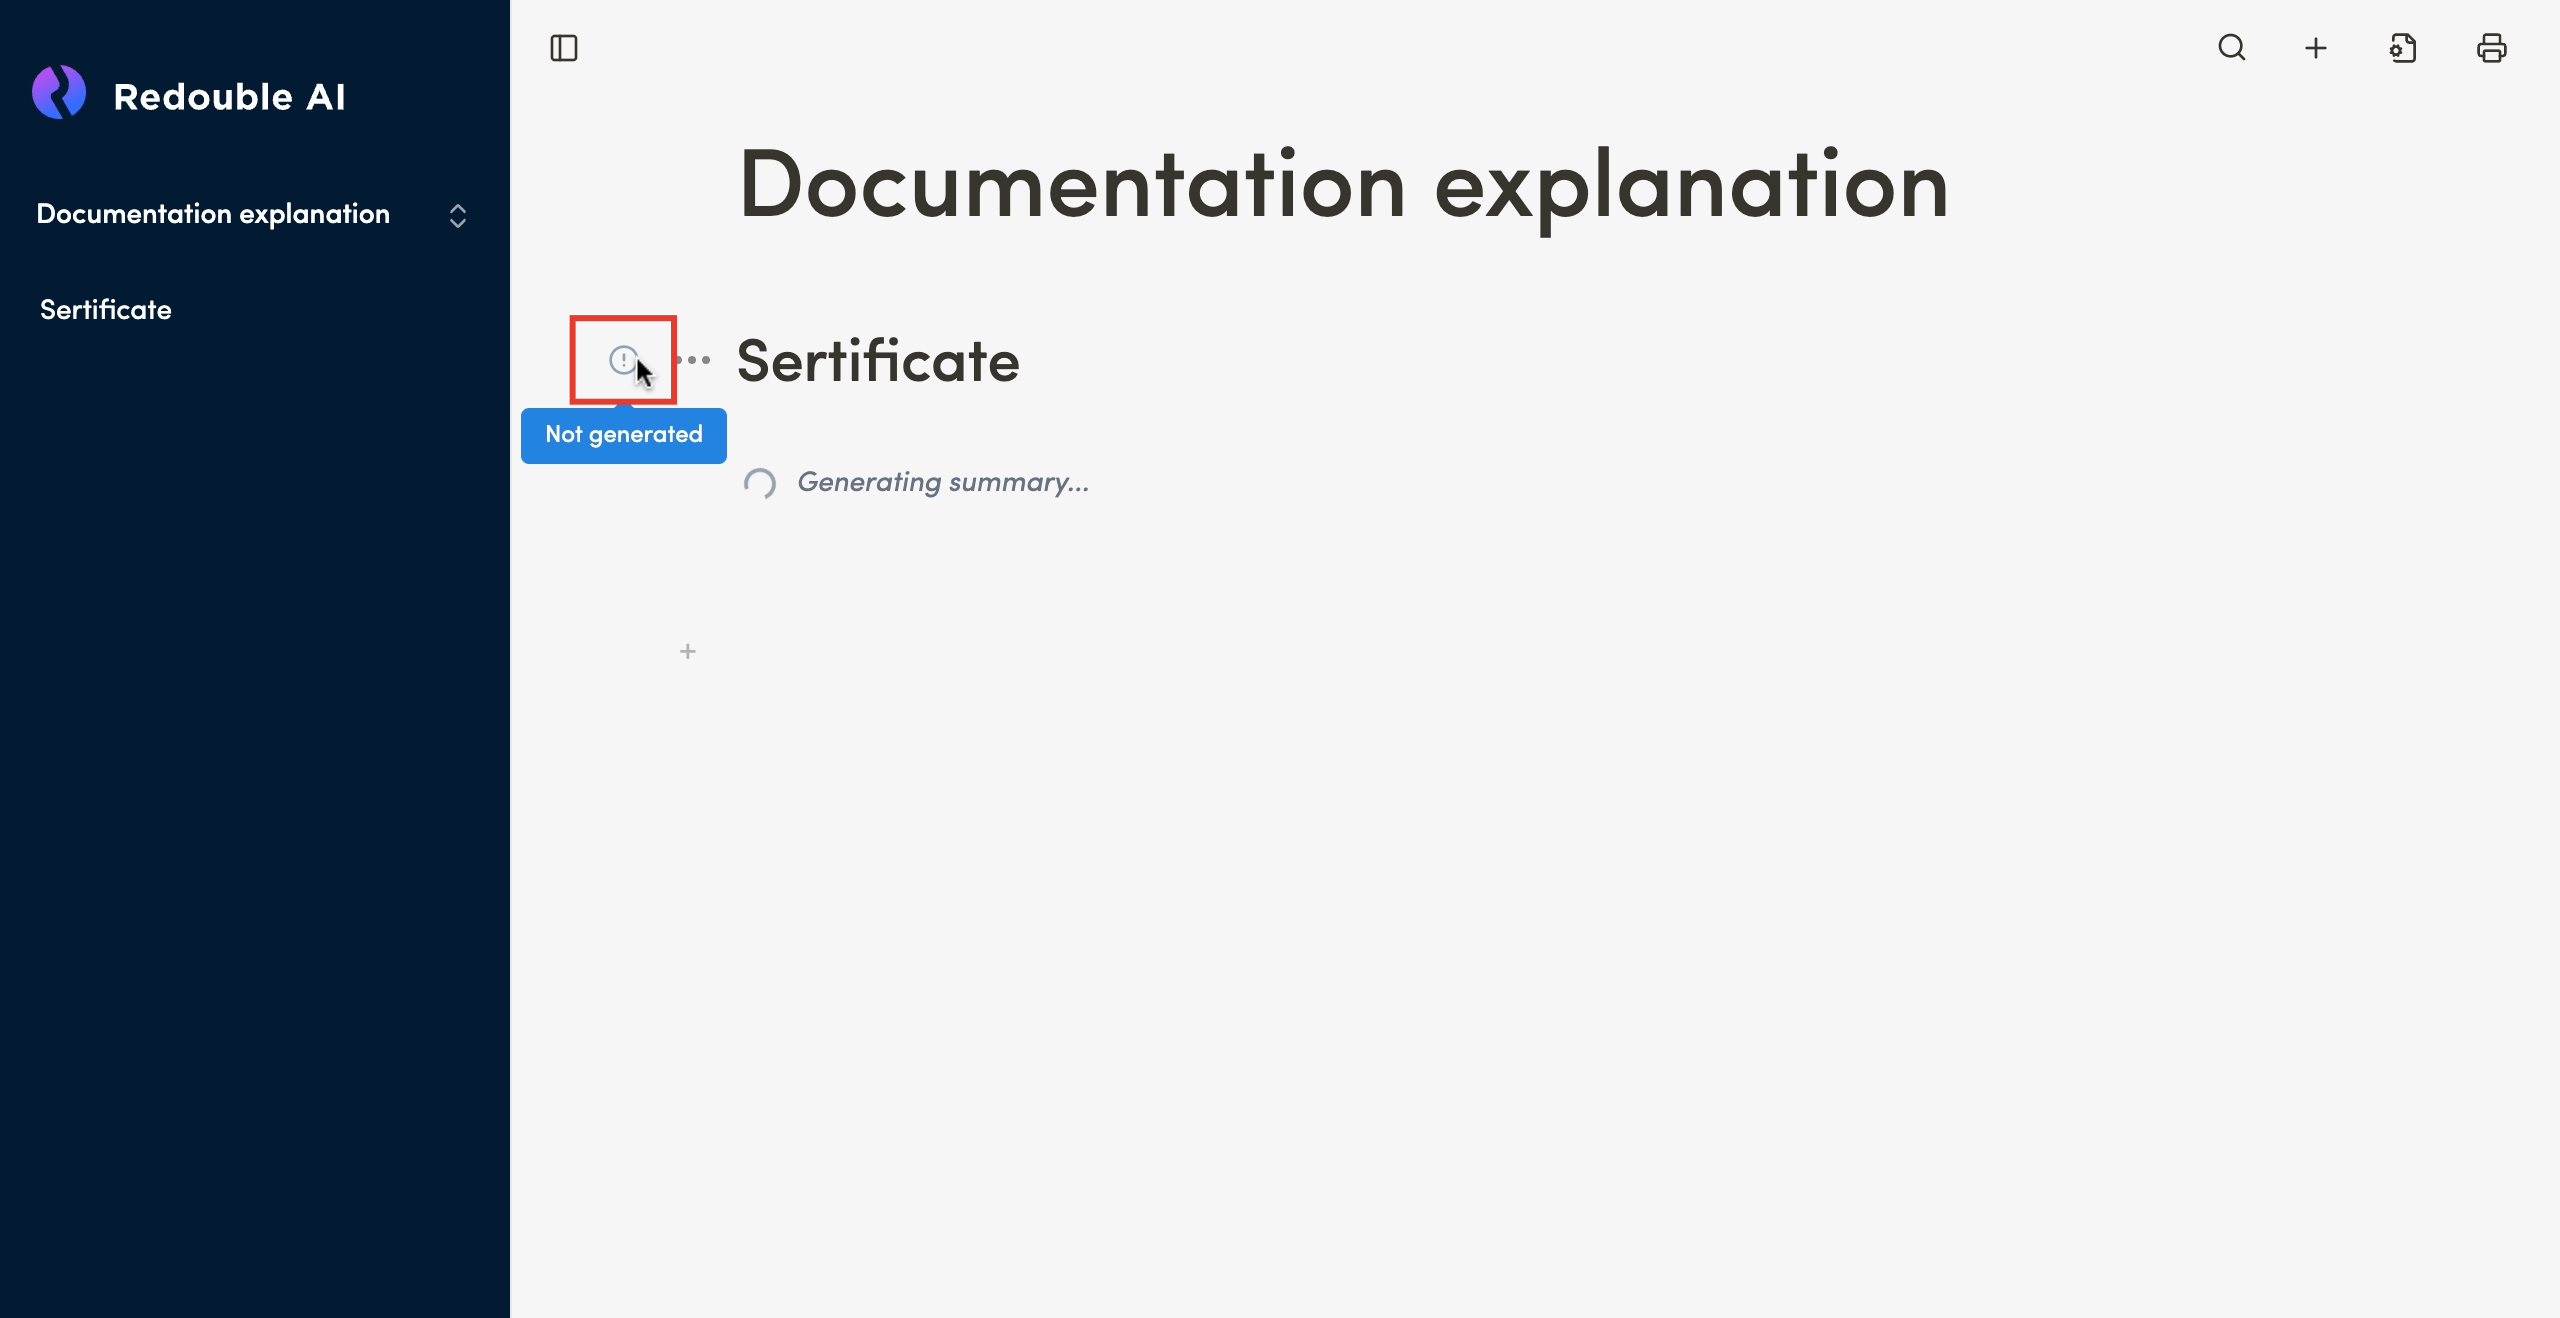
This indicator also appears on questions from a copied project.
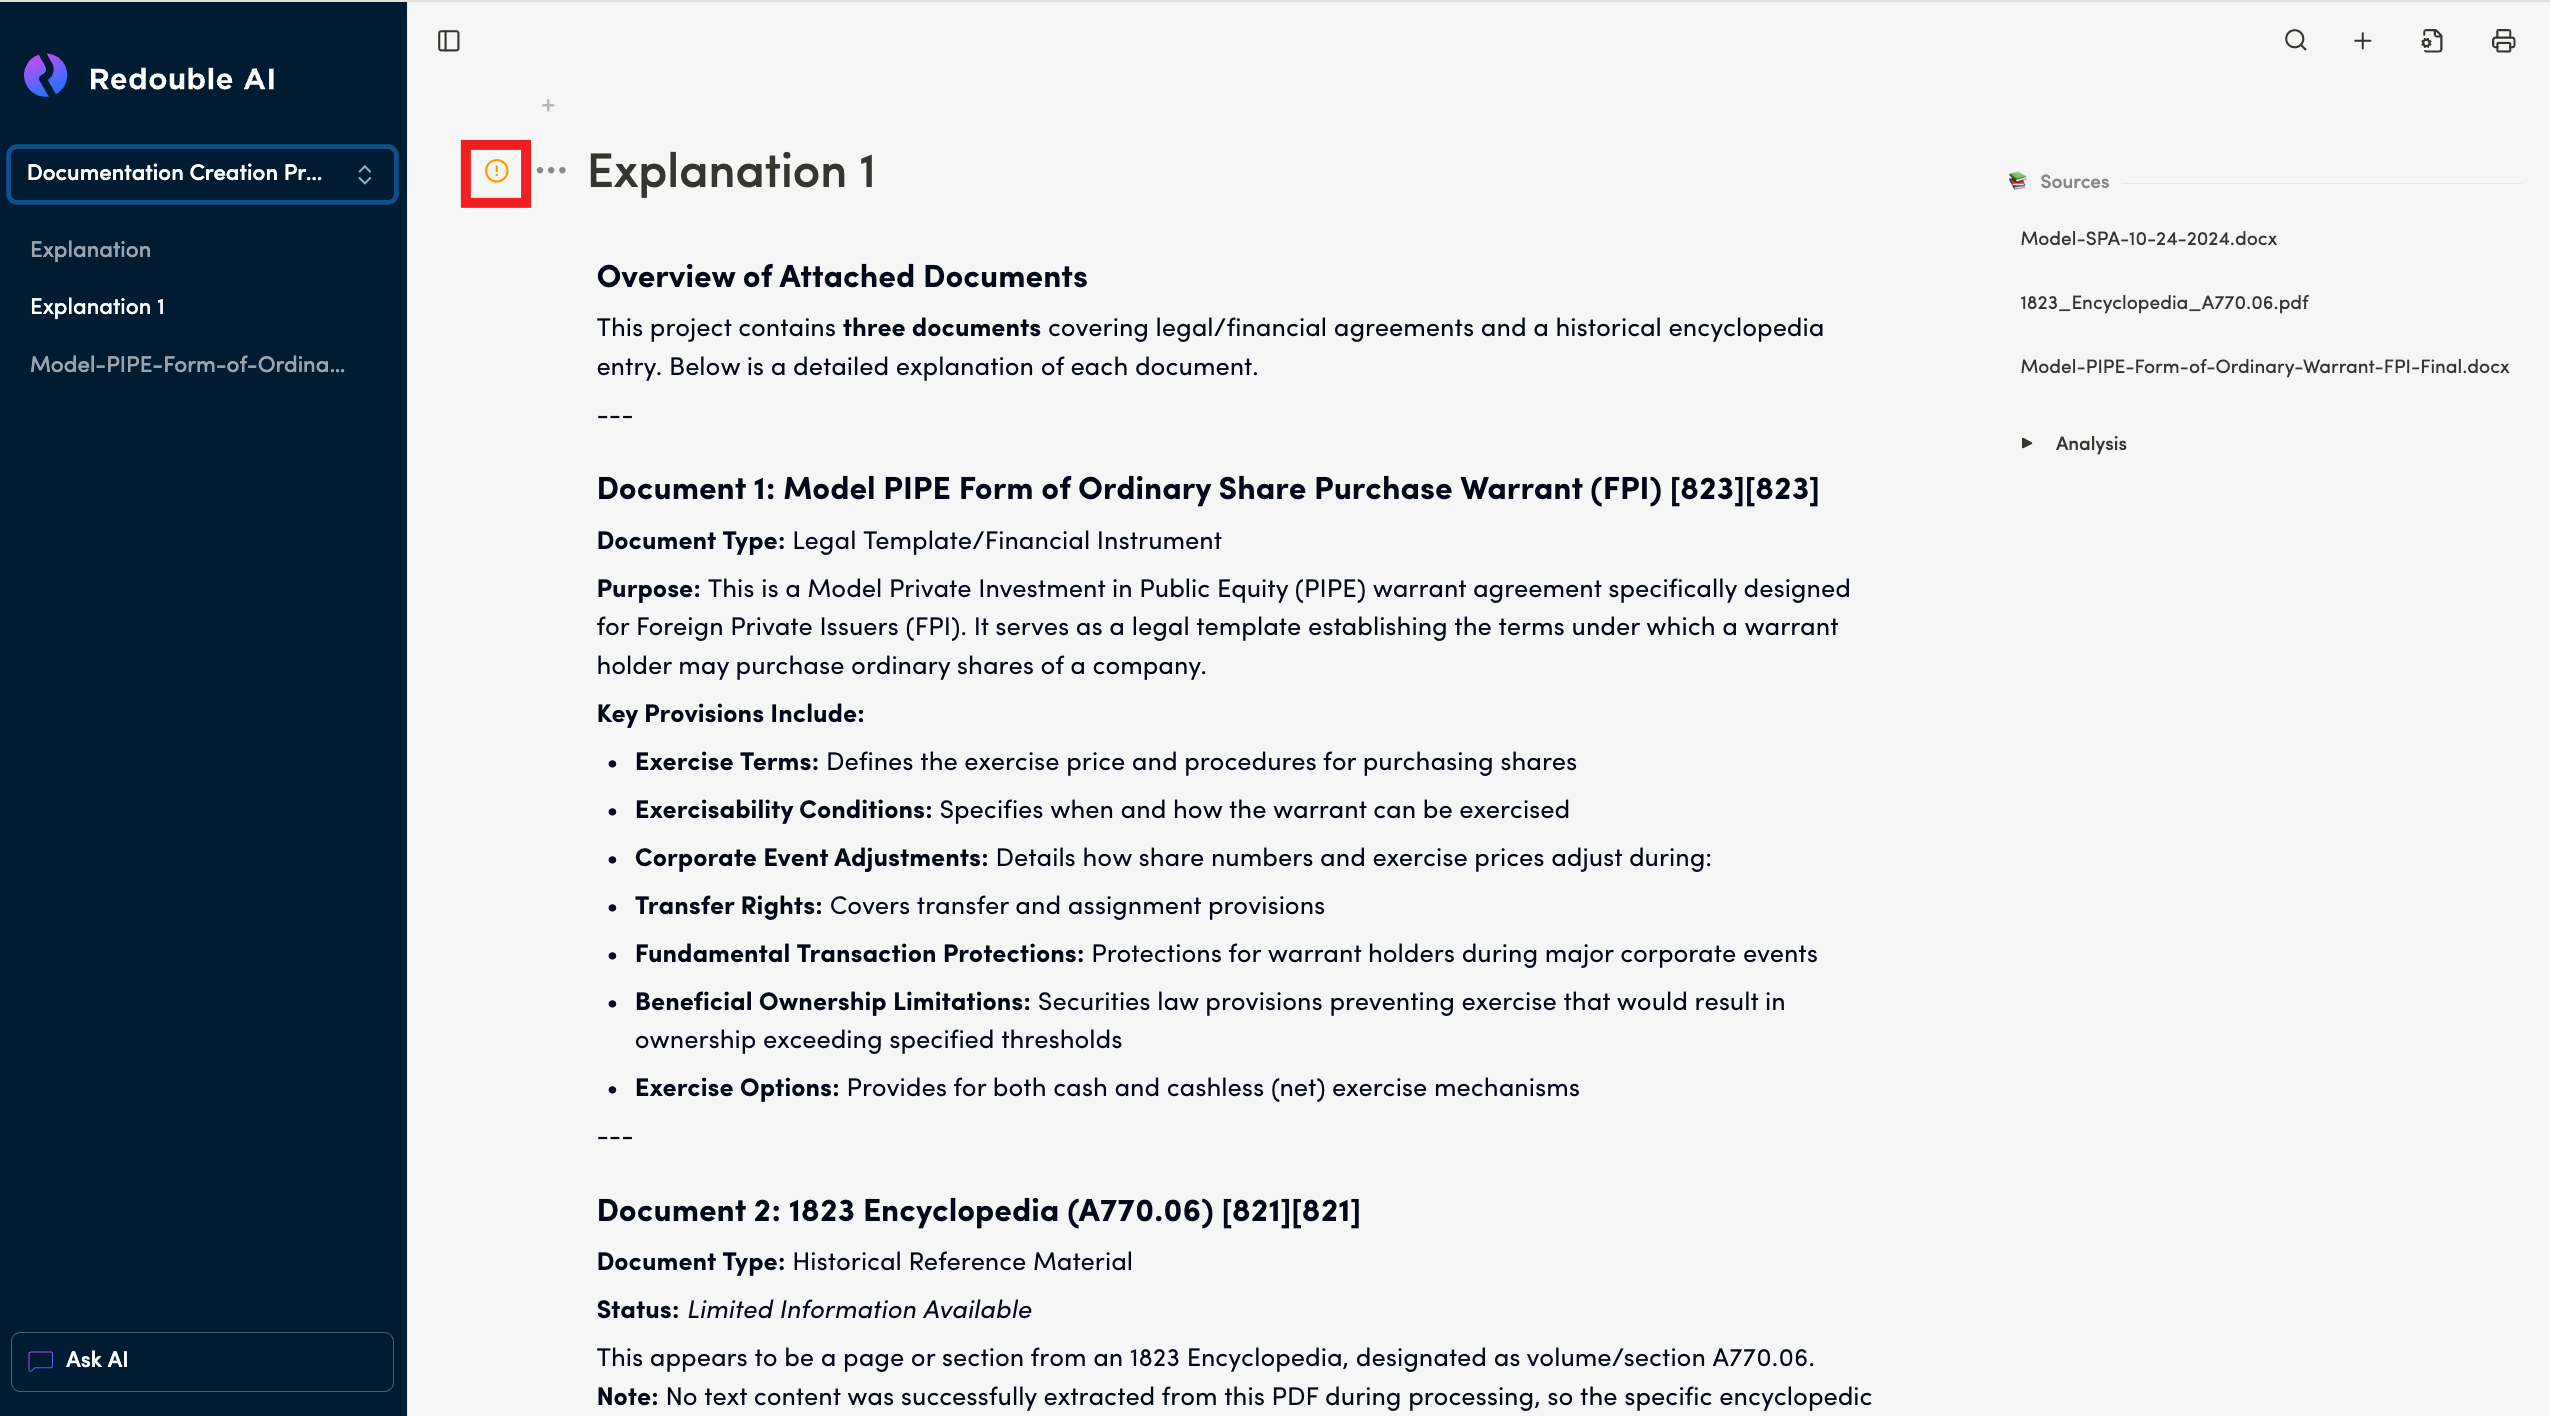
After the system completes the generation of the answer the indicator is replaced by the "AI Generated" indicator.
AI Generated
Purpose: This indicator appears after the completion of the answer generation and is assigned automatically. It can also appers after a user unchecks the "Accept" checkbox in Question Options.
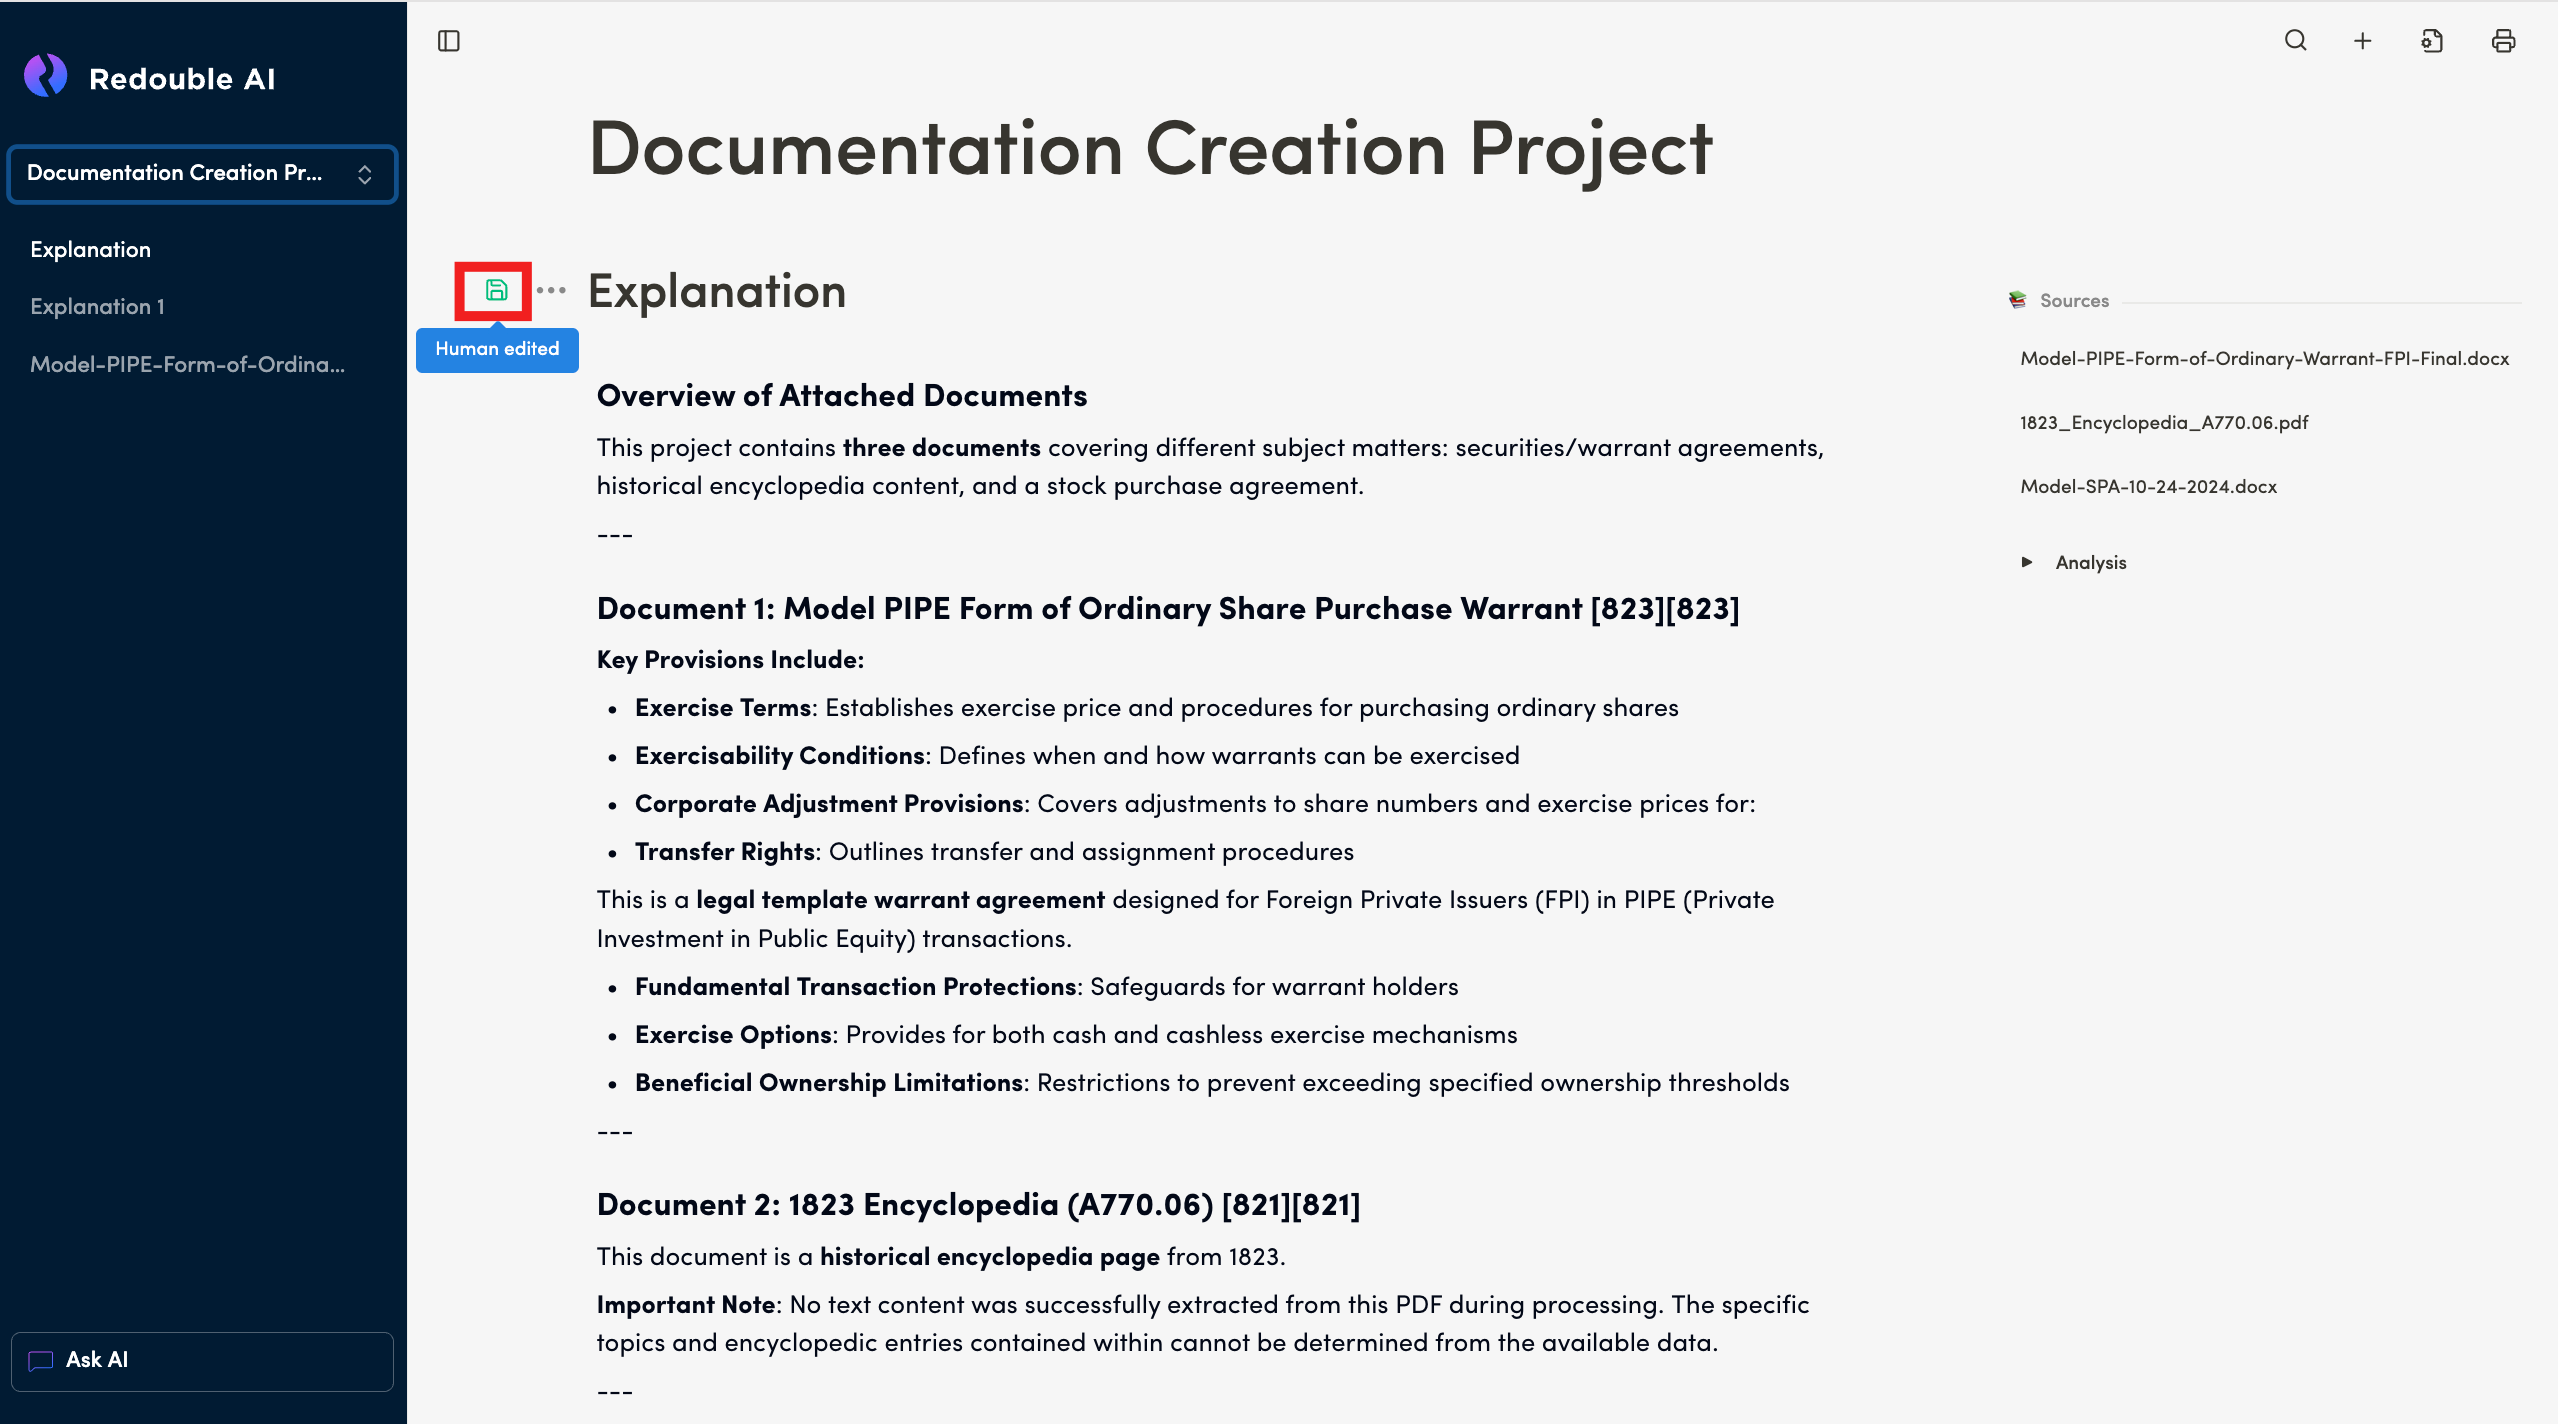
Human Edited
Purpose: This indicator appears after a user manually edits the content of an AI generated response.
Accepted
Purpose: This indicator appears after a user checks the "Accept" checkbox in Question Options.
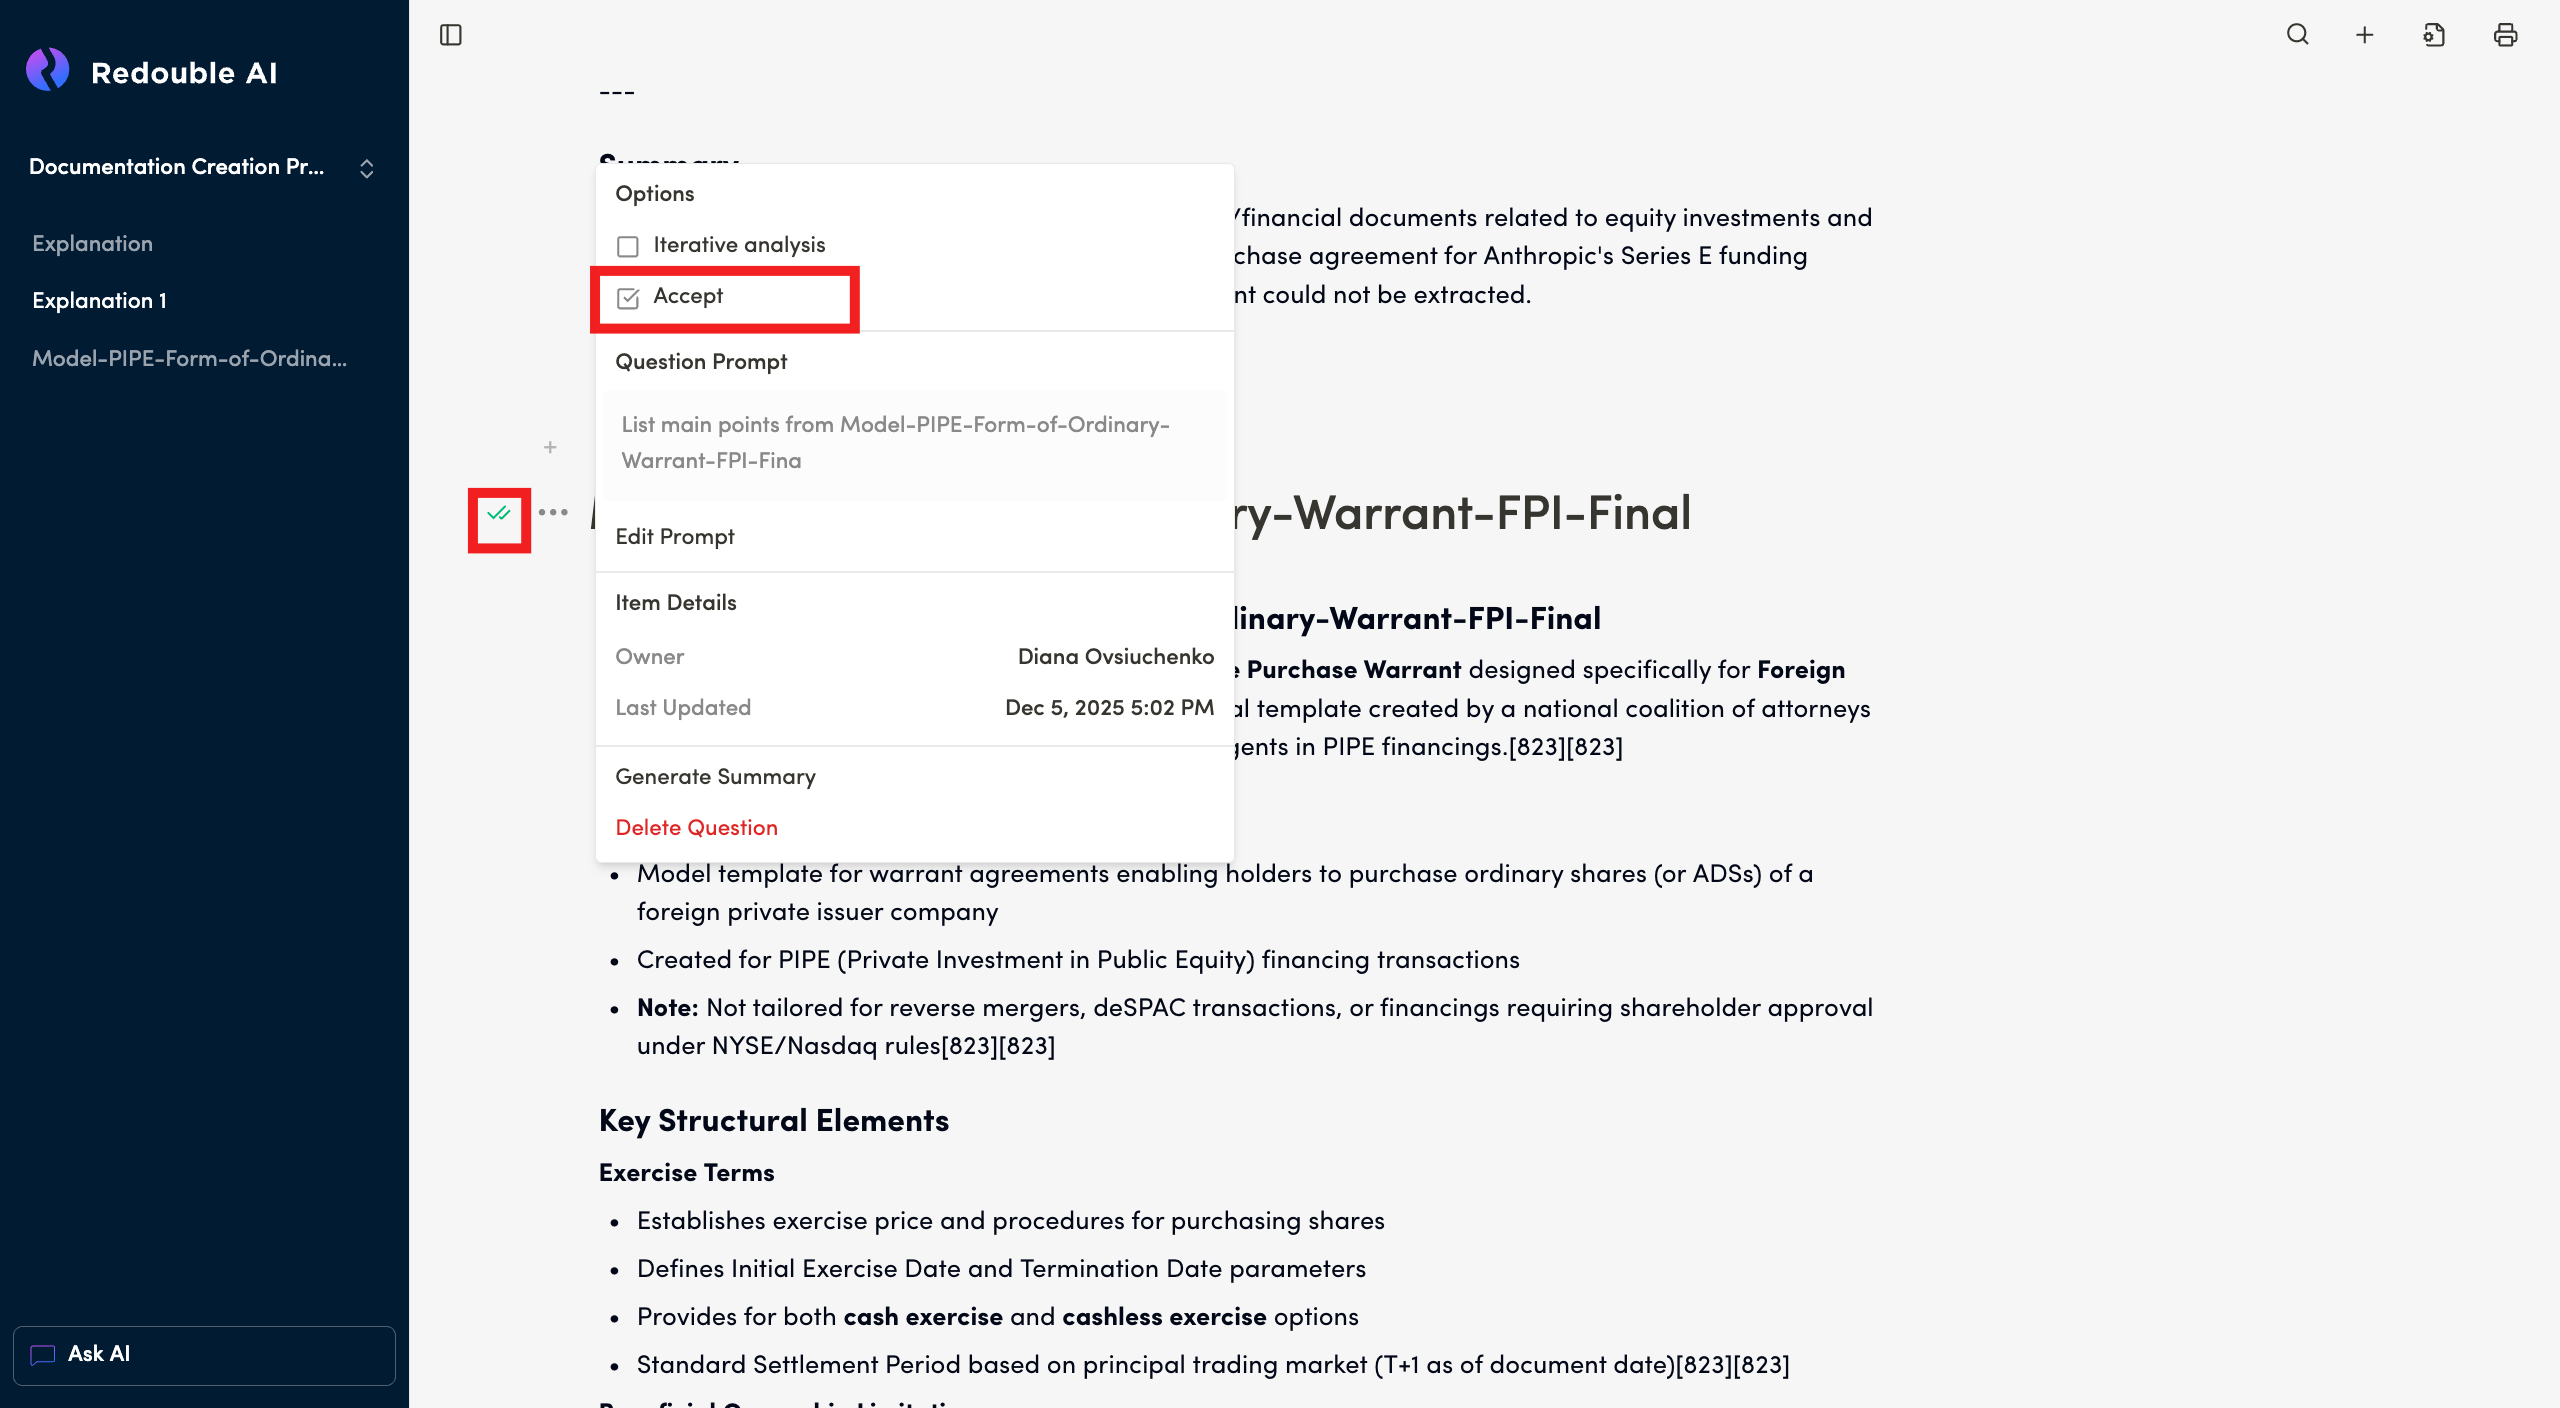
When a user unchecks the "Accept" checkbox in Question Options, the Question Status Indicator returns to its previuos state ("Human Edited" or "AI Generated").
4.2 Search content
Prerequisites:
- You are logged into the Redouble AI system
- You have at least one project
Steps:
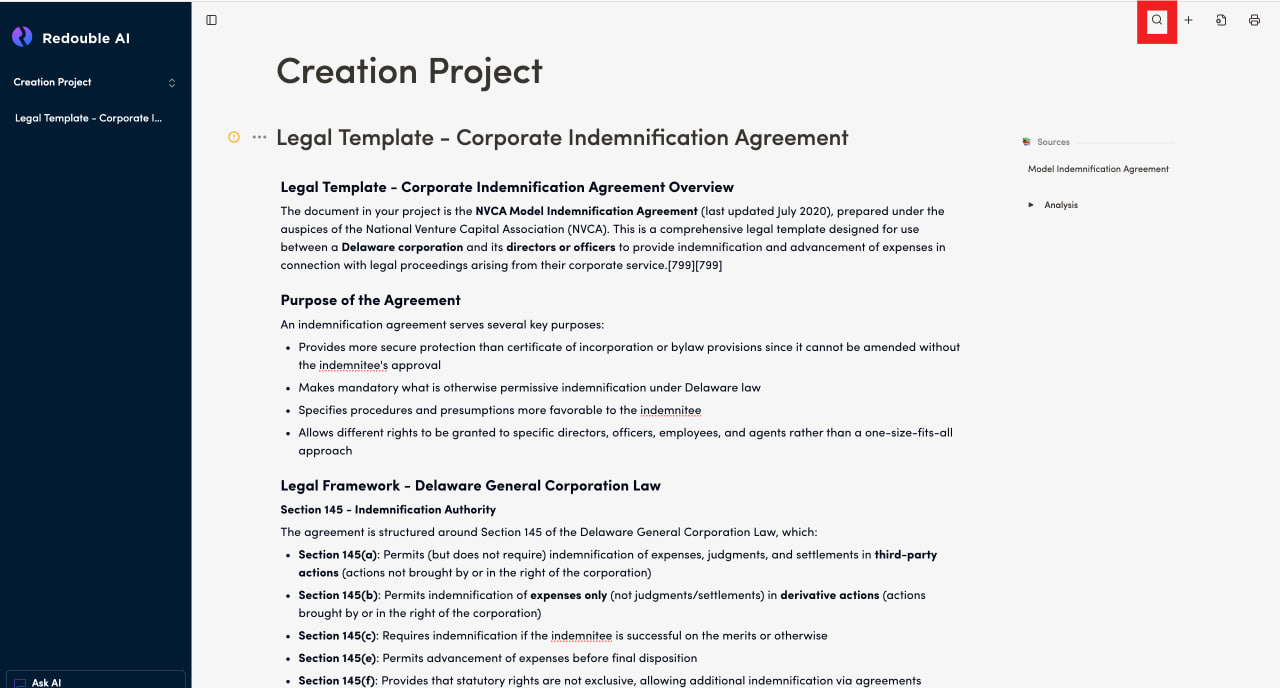
- In the top toolbar, click the "Search" icon

- In the "Search" dialog box, type content you want to find
- See the total number of matches that have been found
- Navigate from one search result to another by using the "Next" and "Previous" buttons

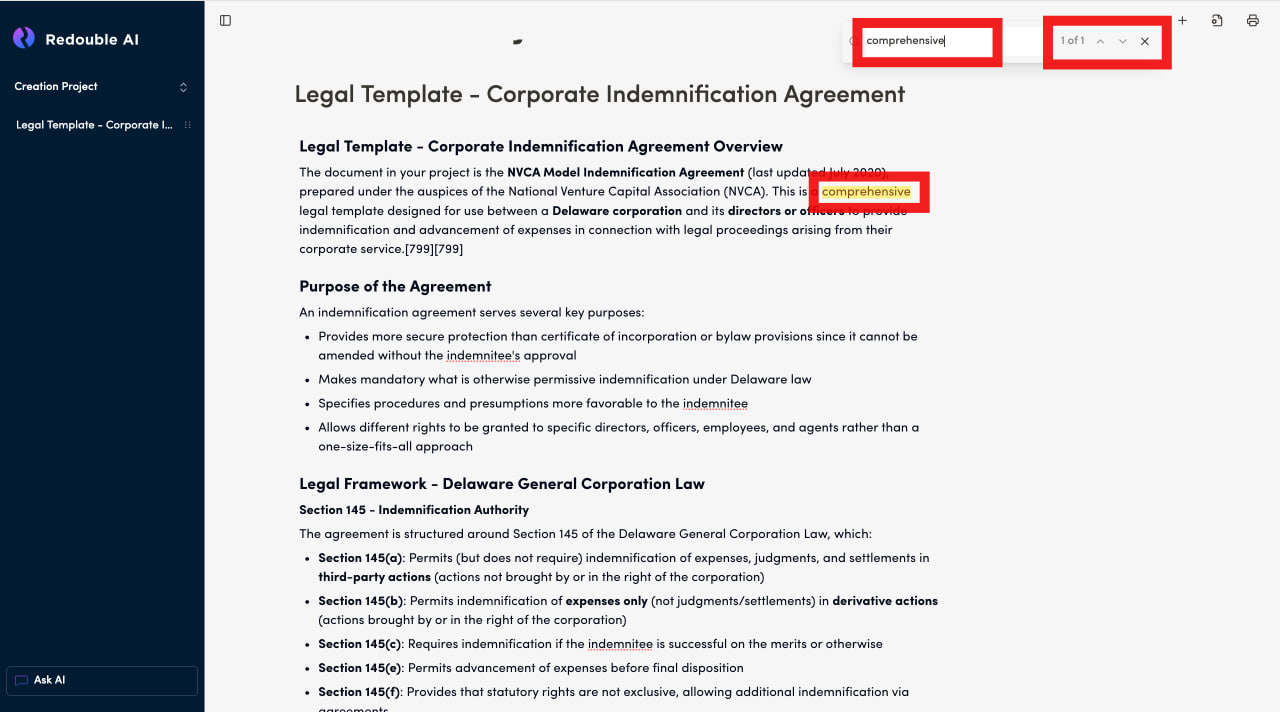
Result: A user finds the content they have been looking for.
4.3 Analysis
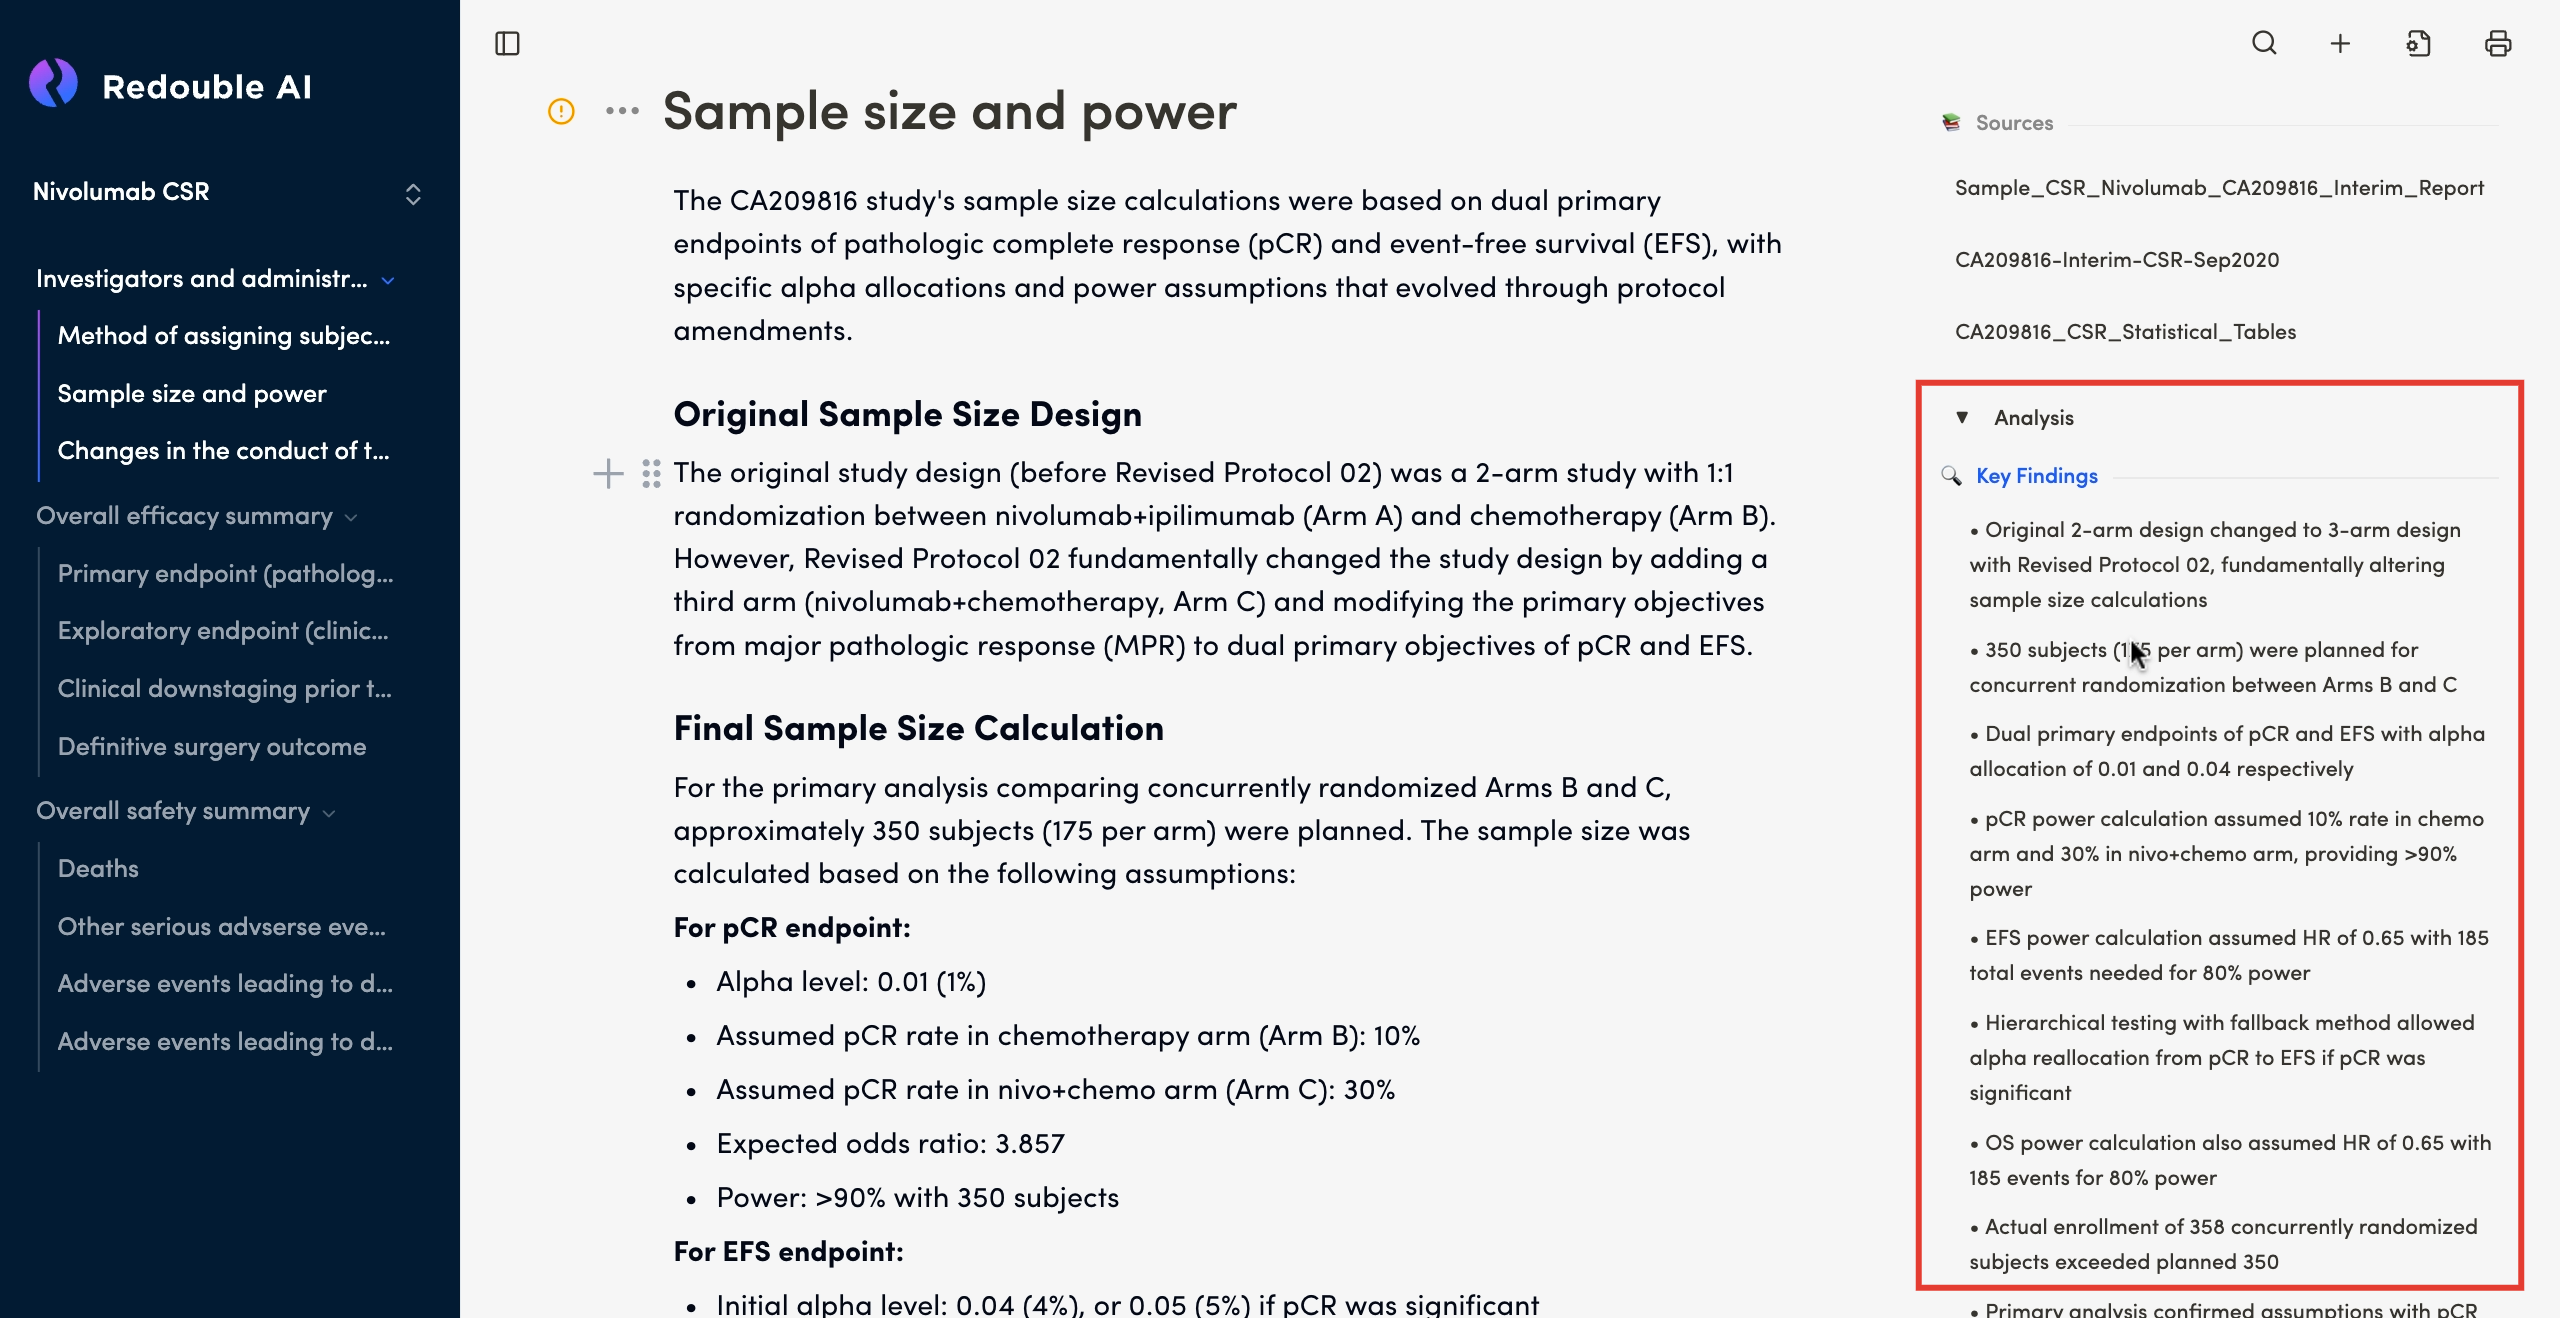
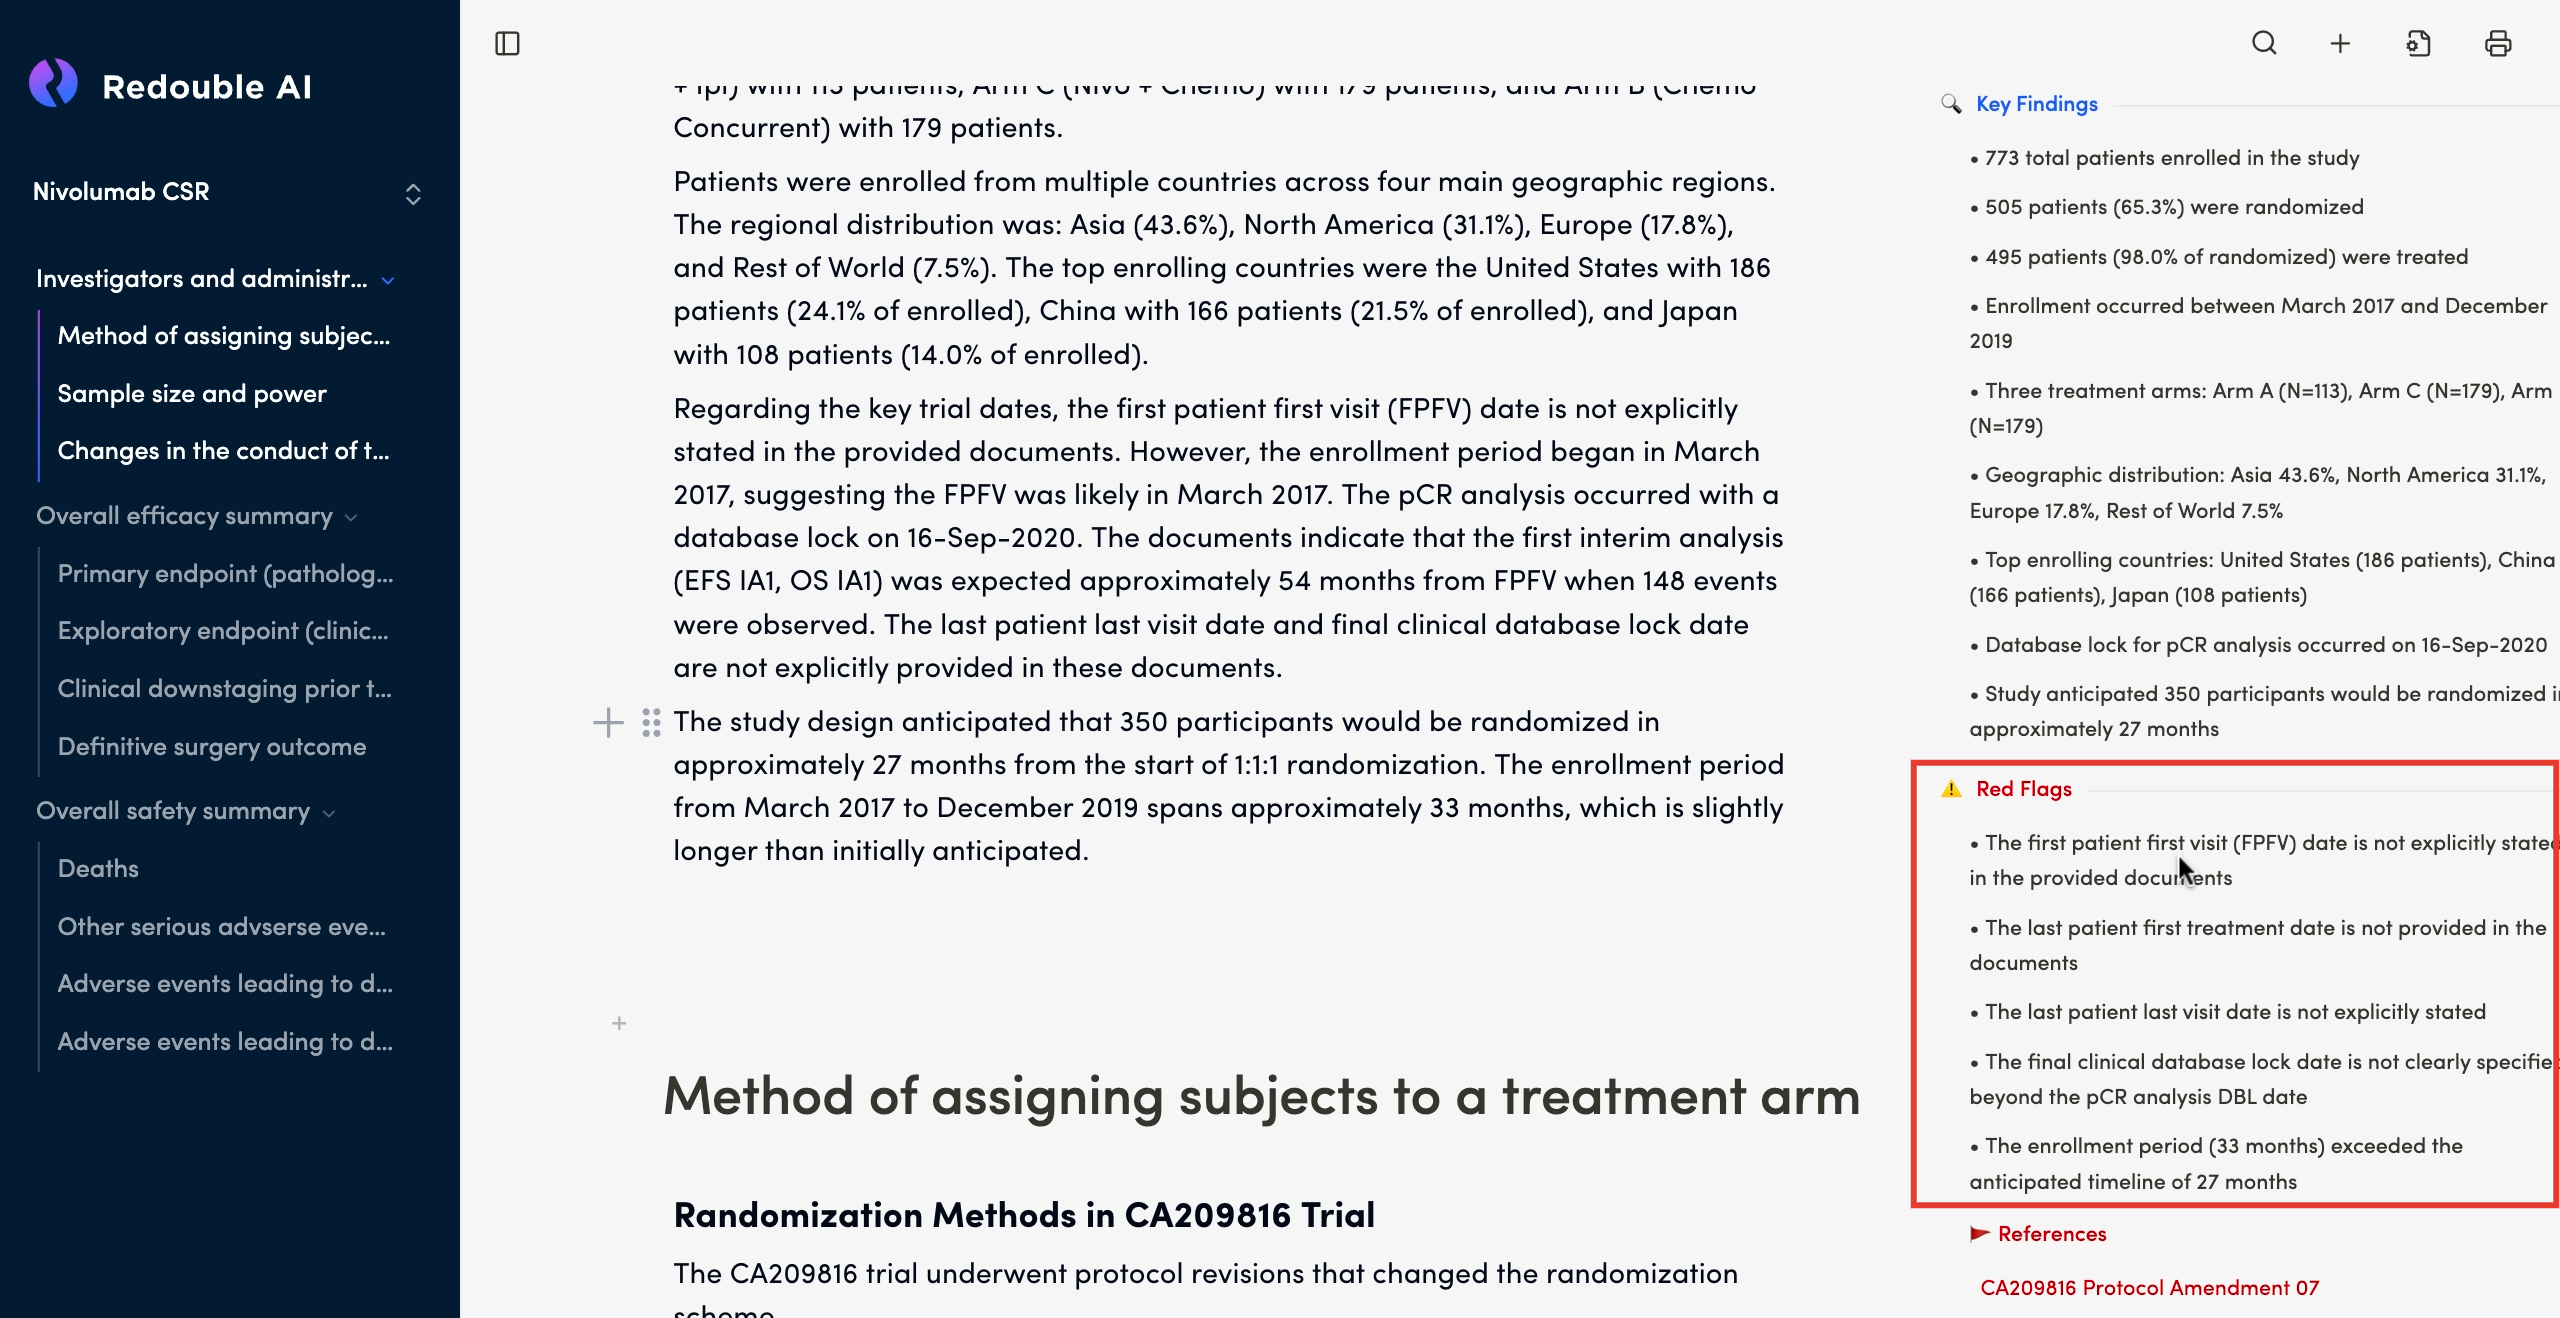
Purpose: The Analysis Section, shown on the right-hand side of the user interface, is a feature of the Redouble AI system that provides a short summary of the key points of the AI-generated response (Key Findings) and alerts the user to potential contradictions and discrepancies that the AI has spotted (Red Flags).
Appearence: Collapsible sections with color-coded headers and icons
Subsections
Key Findings
Purpose: Presents the most important conclusions and facts extracted from the documents, providing an executive summary of the AI analysis.
Red Flags
Purpose: Highlights potential contradictions and discrepancies that the AI has found in the documents for the user to review and verify. This critical section ensures users are made aware of inconsistencies or conflicting information found across different sources.
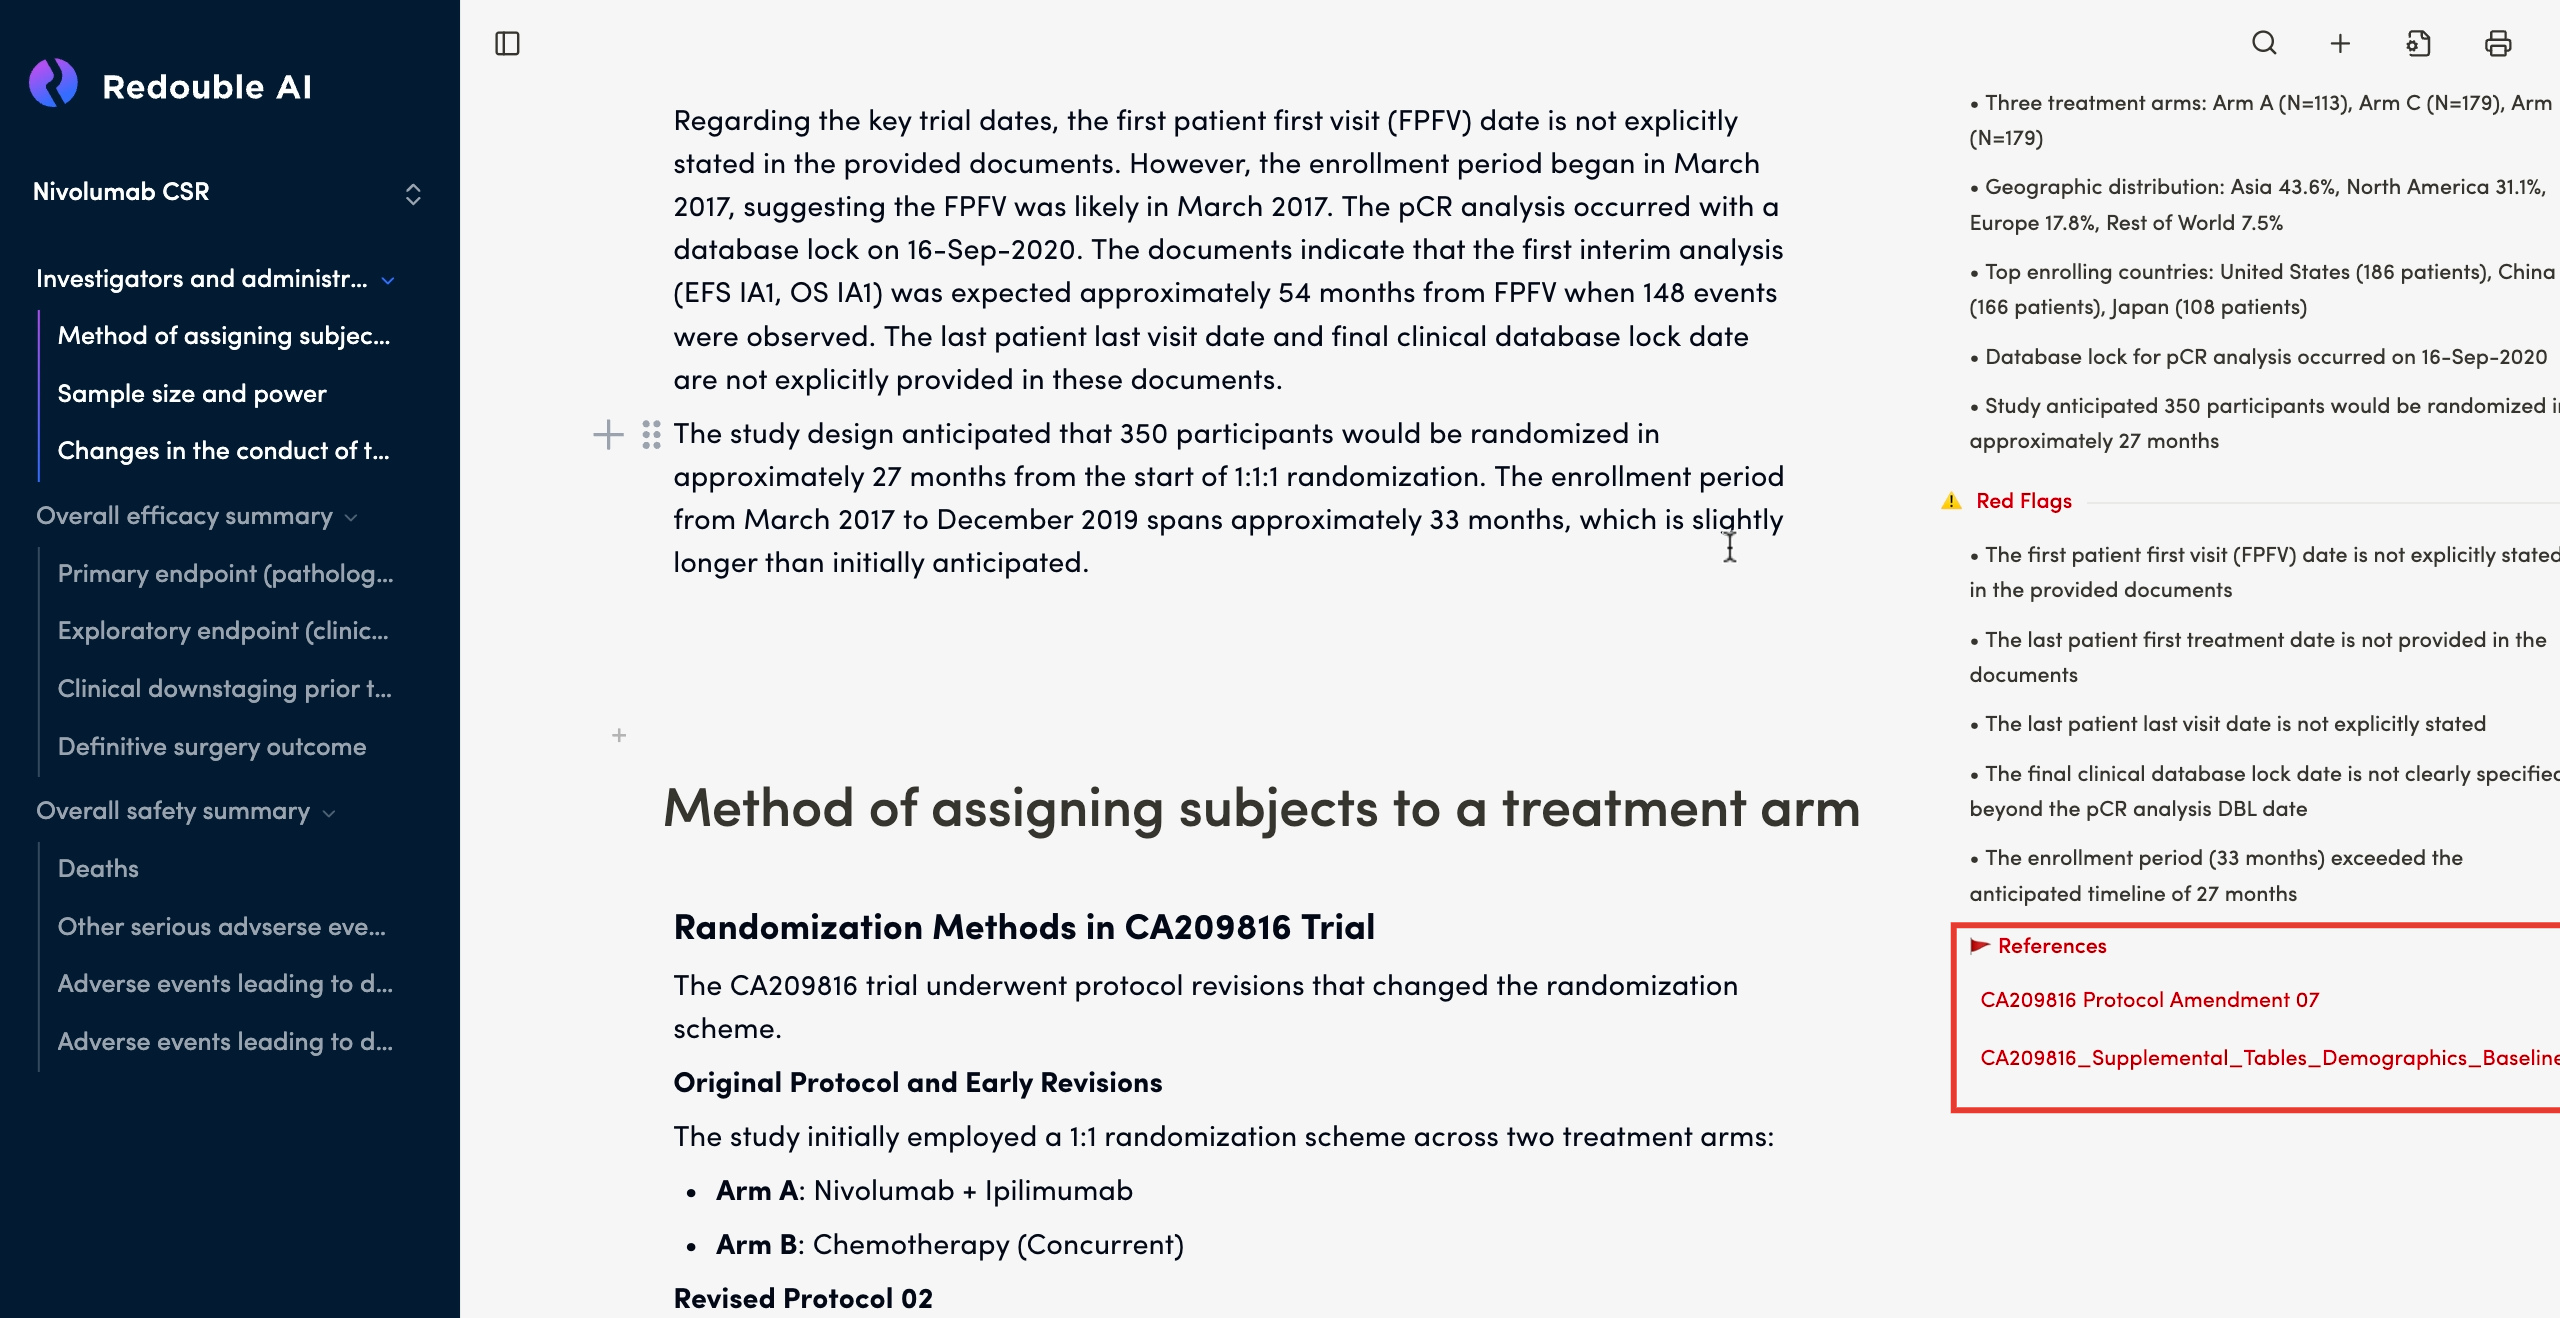
References
Purpose: Lists source documents used to generate the analysis, providing traceability and enabling verification of displayed information. Each document is shown with two names:
- Display name (shown in the list): AI-generated descriptive name for easy identification
- Original filename (shown on hover in blue): The actual name of the uploaded file
After clicking on the document Display name name, the document content will appear in a separate panel. For more detailed information please view page 5.1 View Attached Documents and 5.2 Edit Attached documents
4.4 Sources
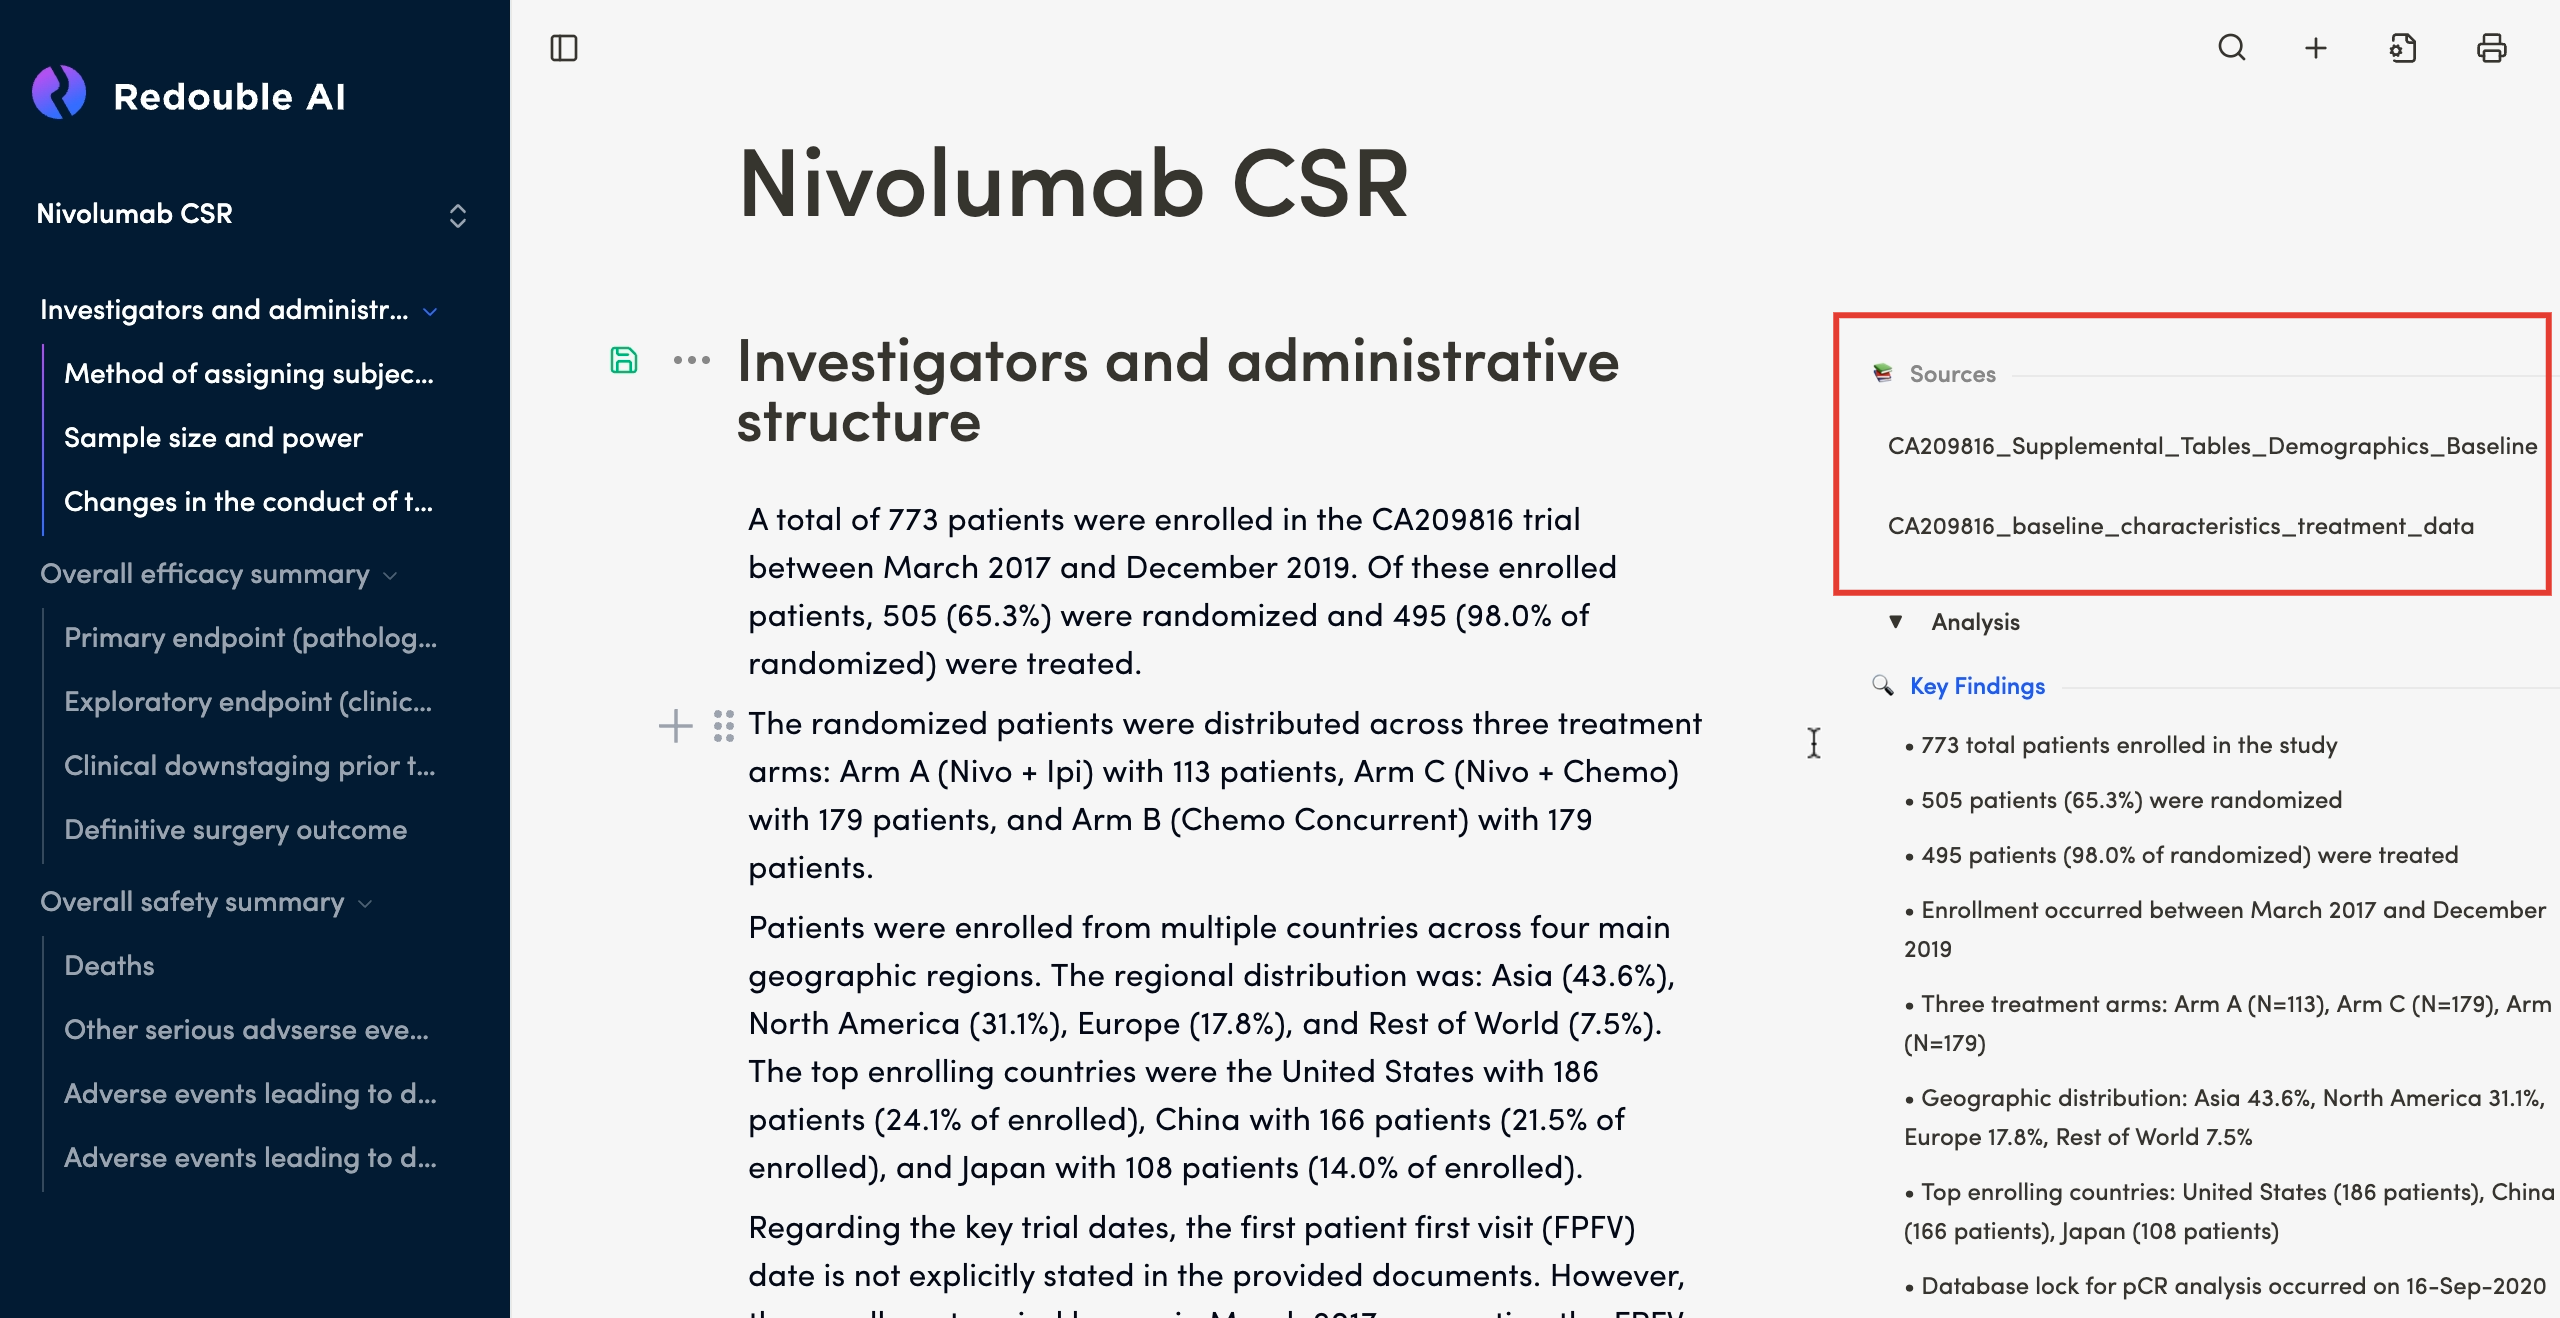
Purpose: The Sources Section is a feature of the Redouble AI system that ensures transparency and traceability in AI-generated answers. It displays all documents that contributed to the response, allowing you to verify information and access the original sources/ inputs. It is displayed at the end of an answer or in a dedicated panel on the right-hand side of the interface.
Functionality
Viewing sources
Steps:
- Generate or open an answer to a question
- Scroll to the bottom or to the side panel where the Sources are displayed
- Review the list of referenced documents
Result: You can see all documents that contributed to the answer. Each document is shown with two names:
- Display name (shown in the list): AI-generated descriptive name for easy identification
- Original filename (shown on hover in blue): The actual name of the uploaded file
Accessing source documents
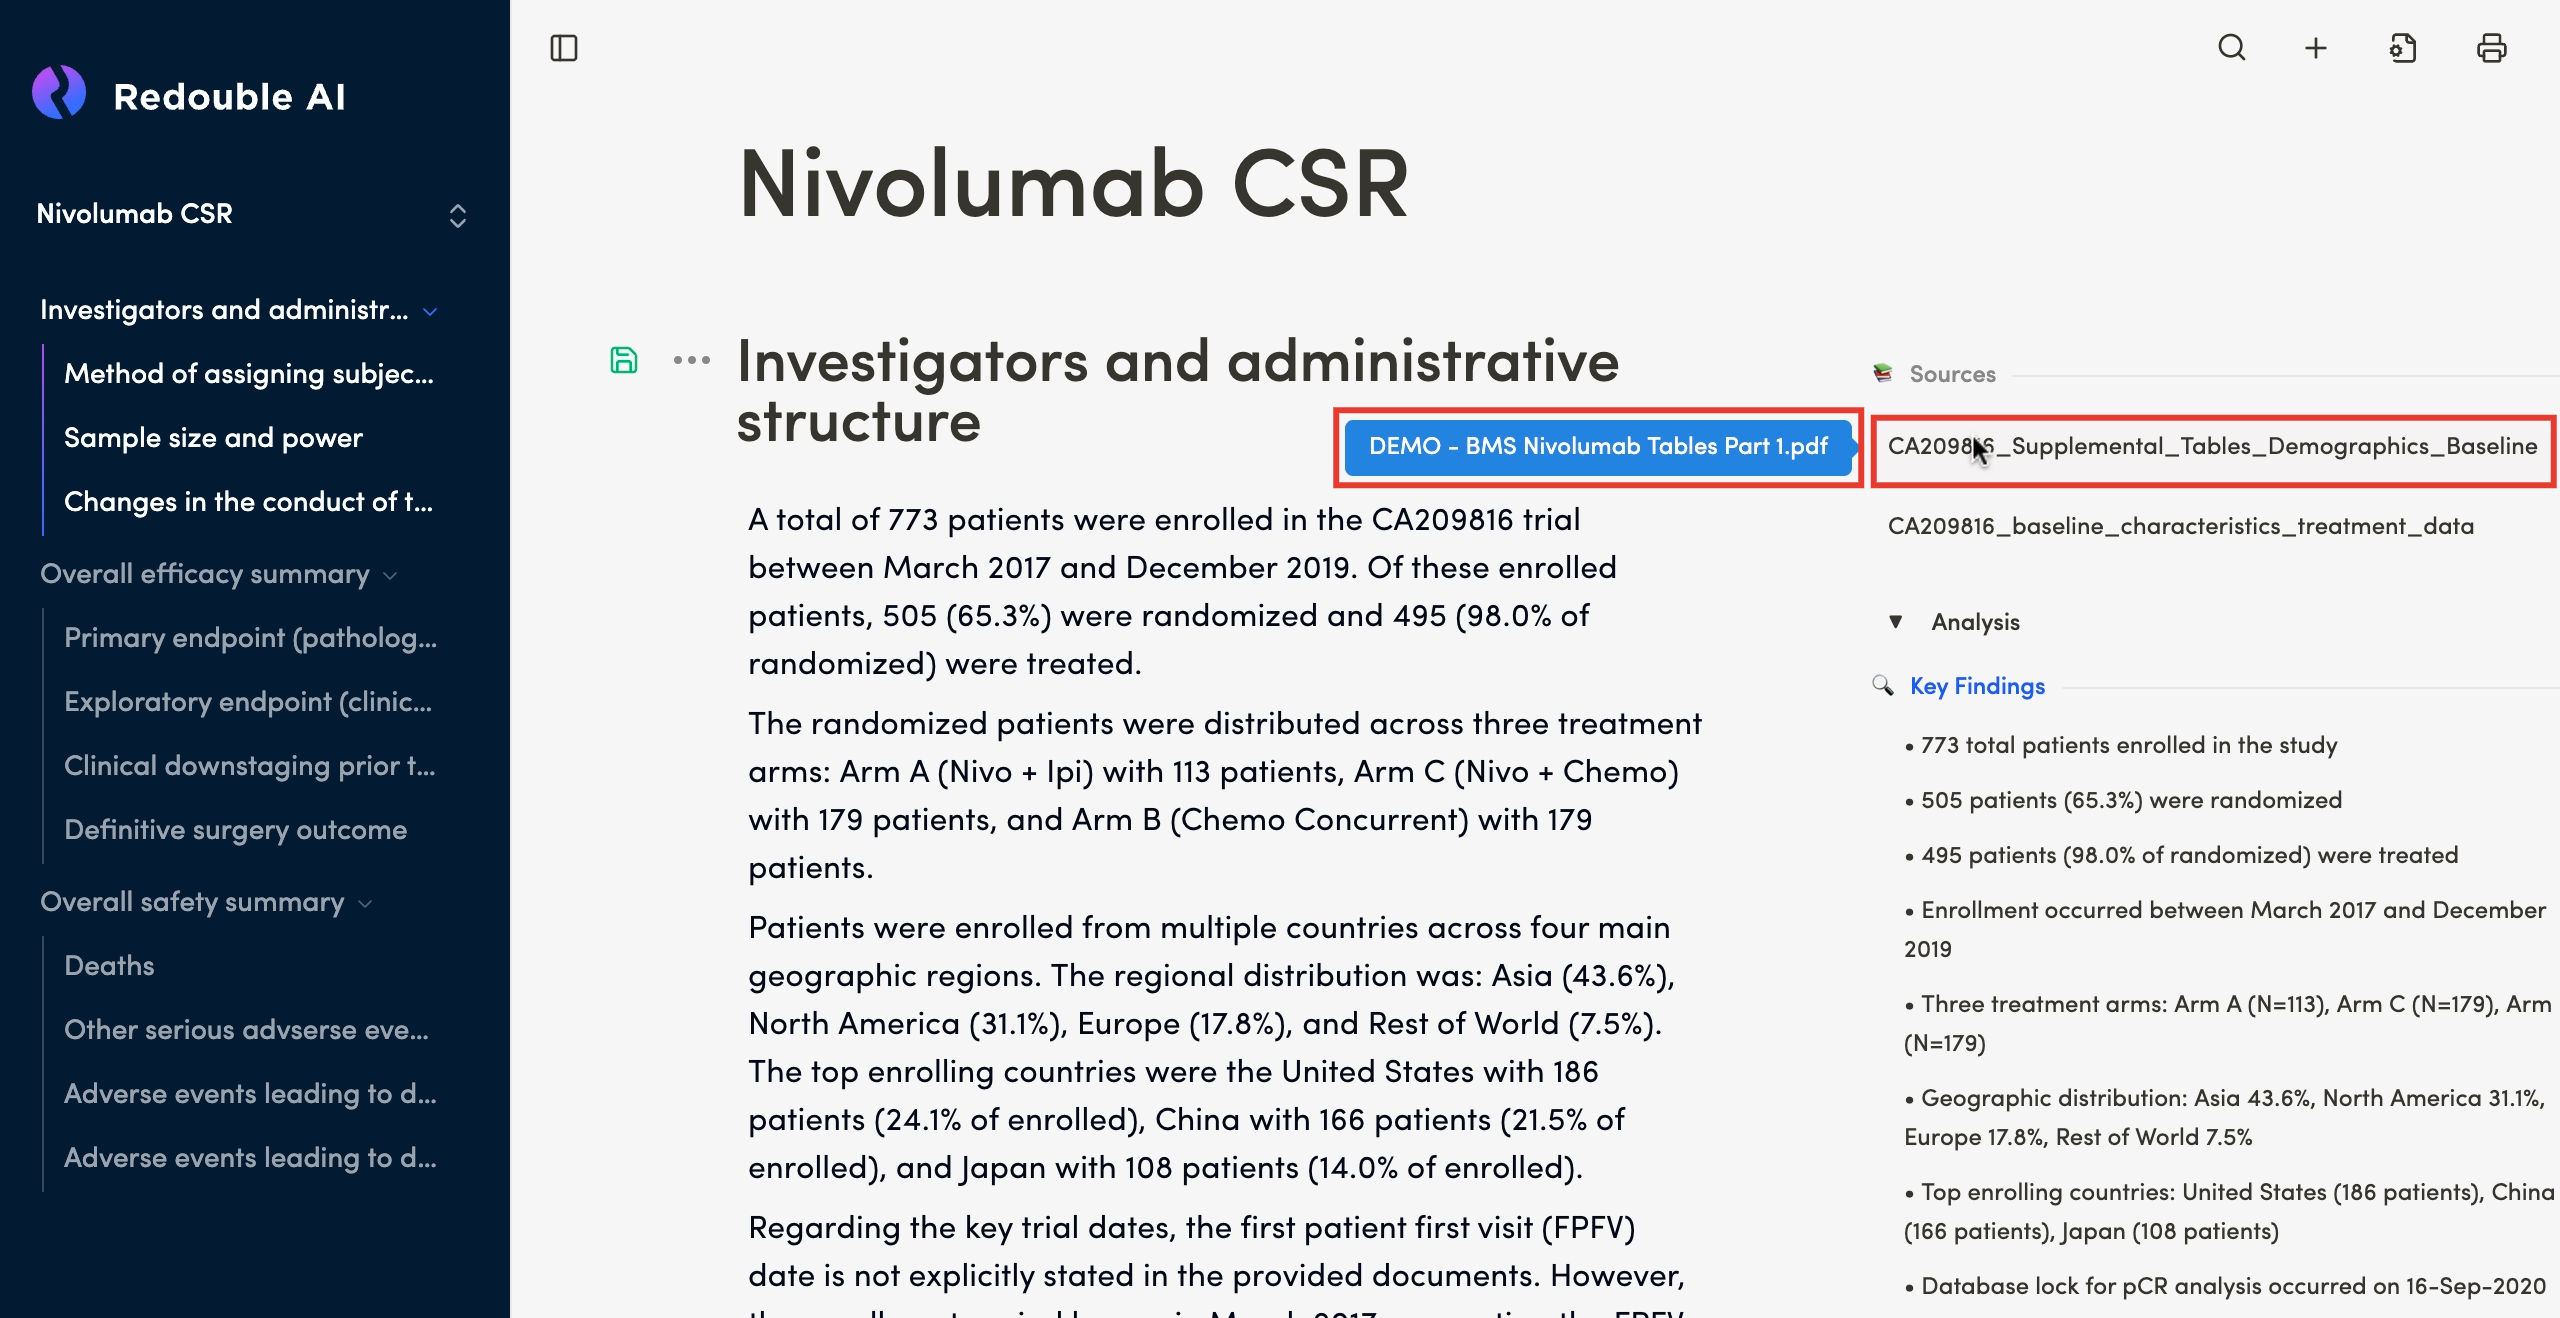
Steps:
- Locate the desired document in the Sources list
- Click on the document name in the list
- The document content will appear in a separate panel
Result: You can review the original document content. For more detailed information please view page 5.1 Edit/View Attached Documents
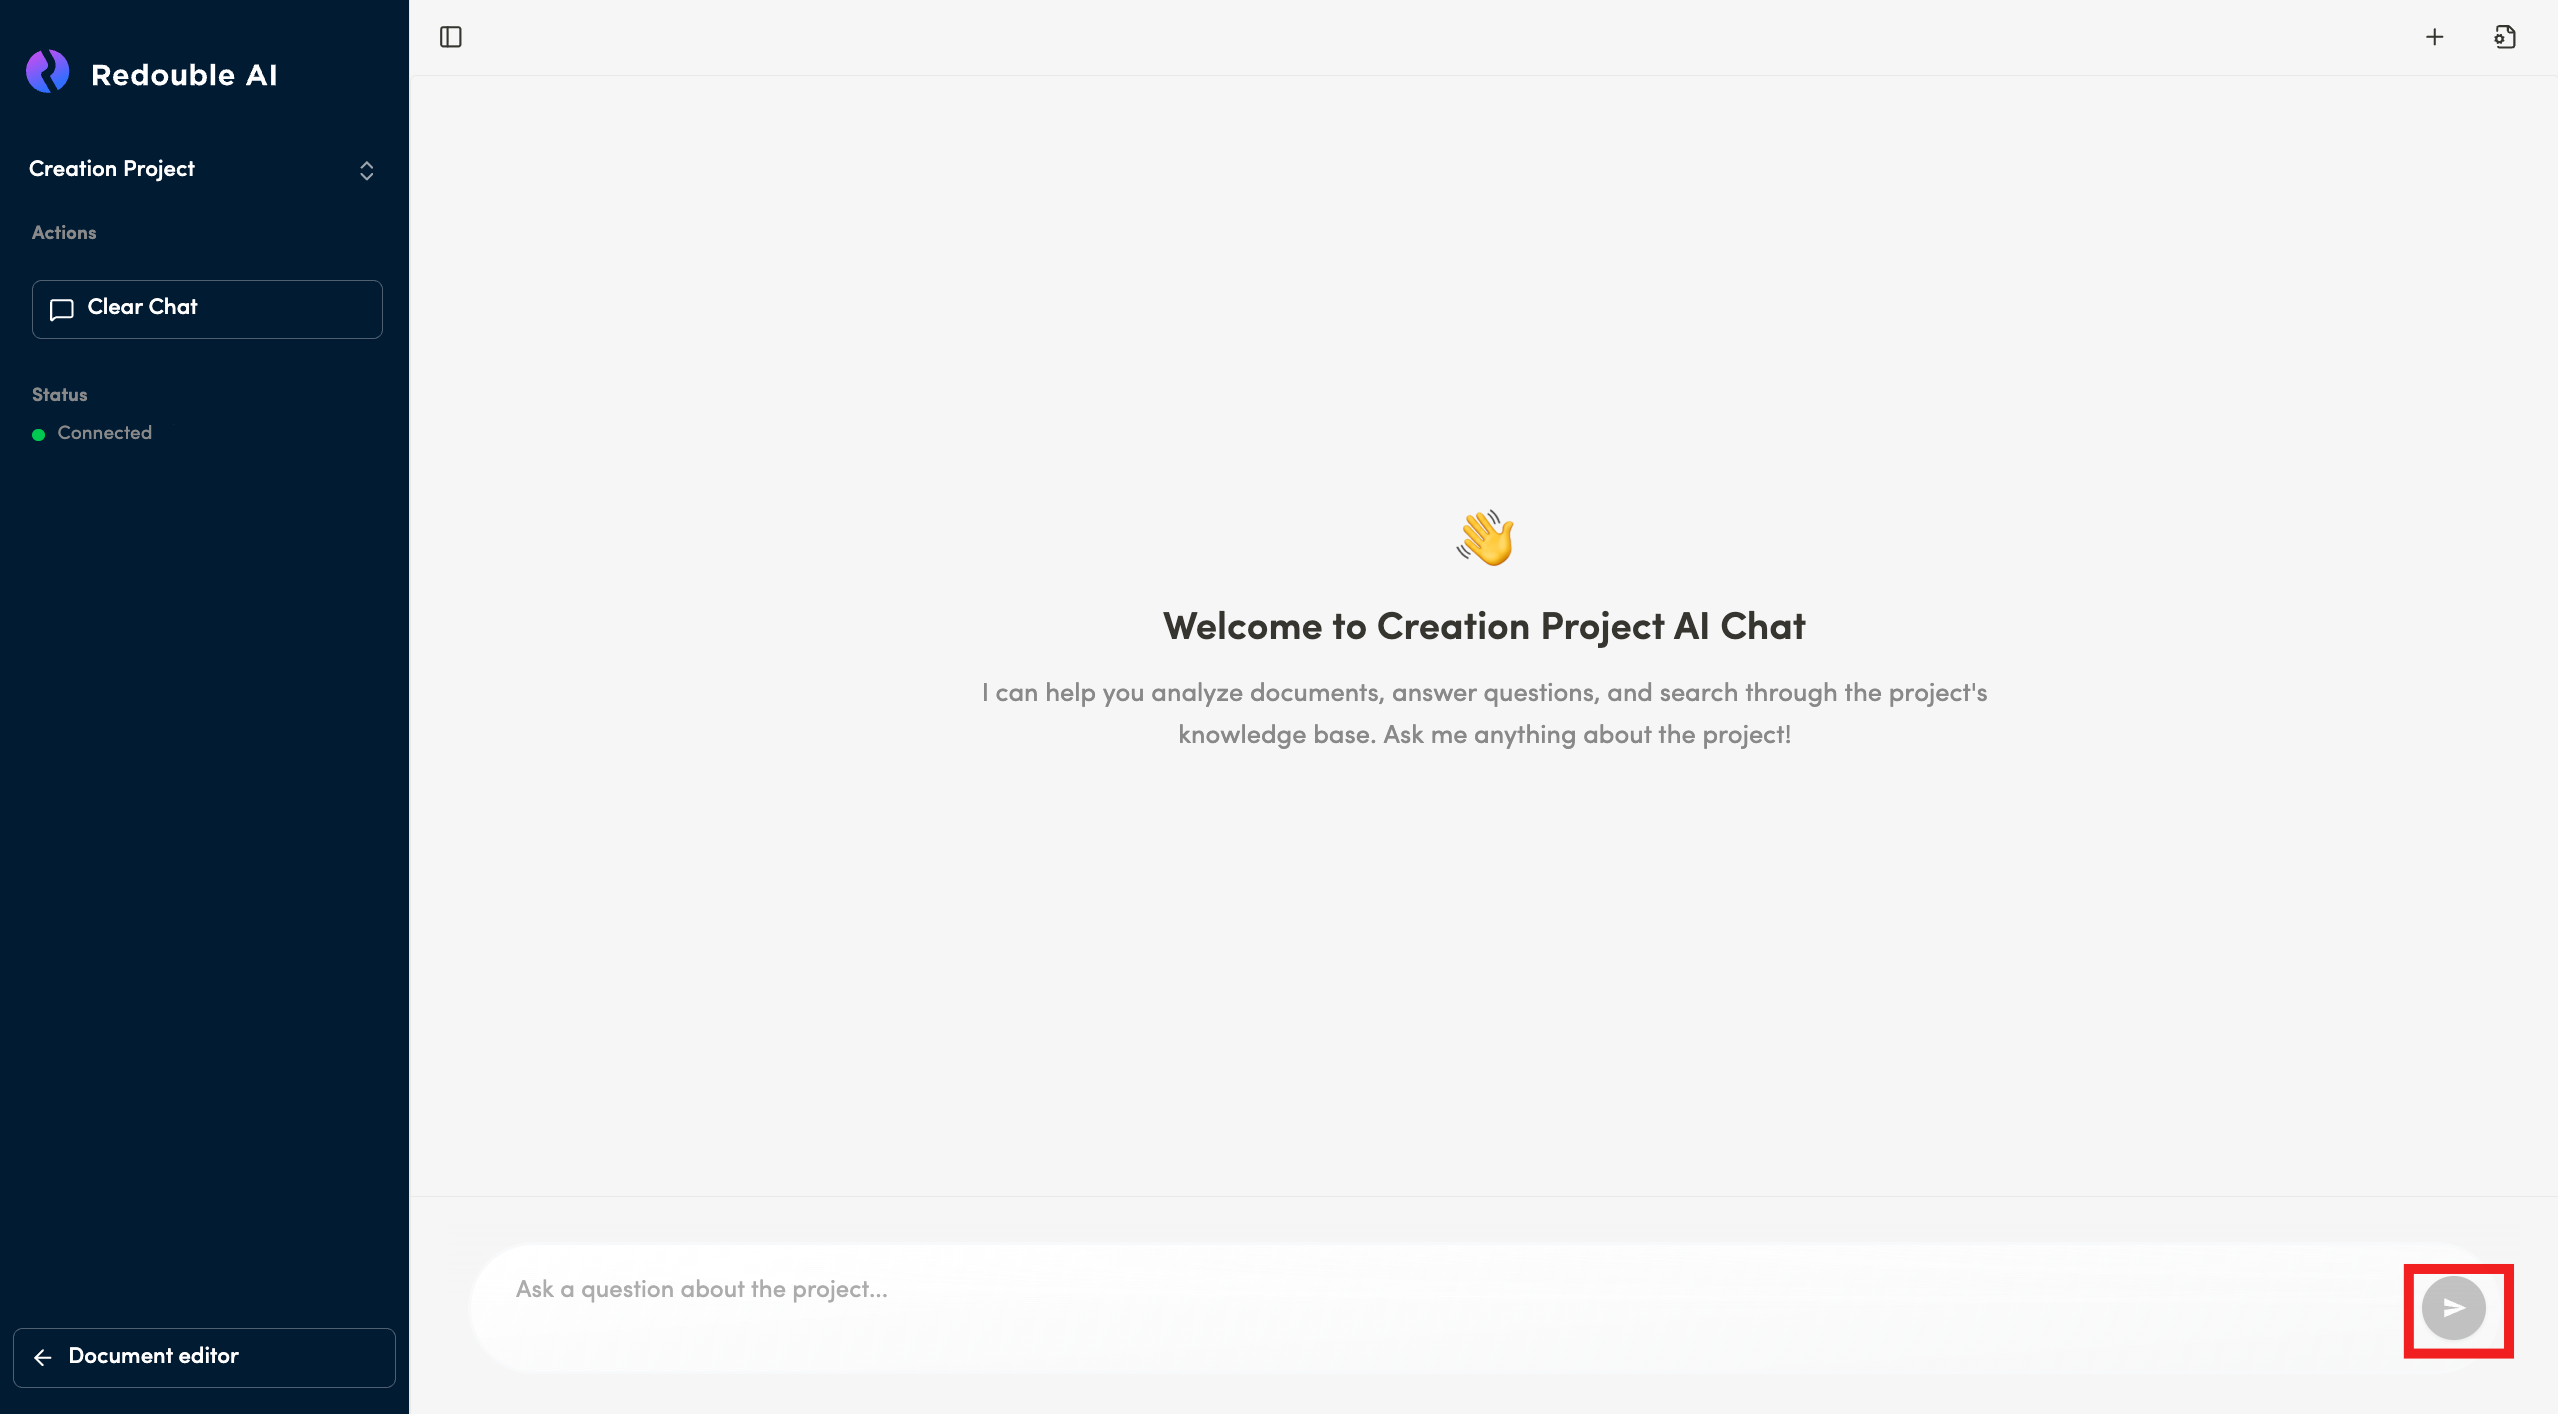
4.5 AI chat
Purpose : A conversational interface to interact with the AI assistant about your project
Access: You can access the chat from the project page by clicking "Ask AI" button
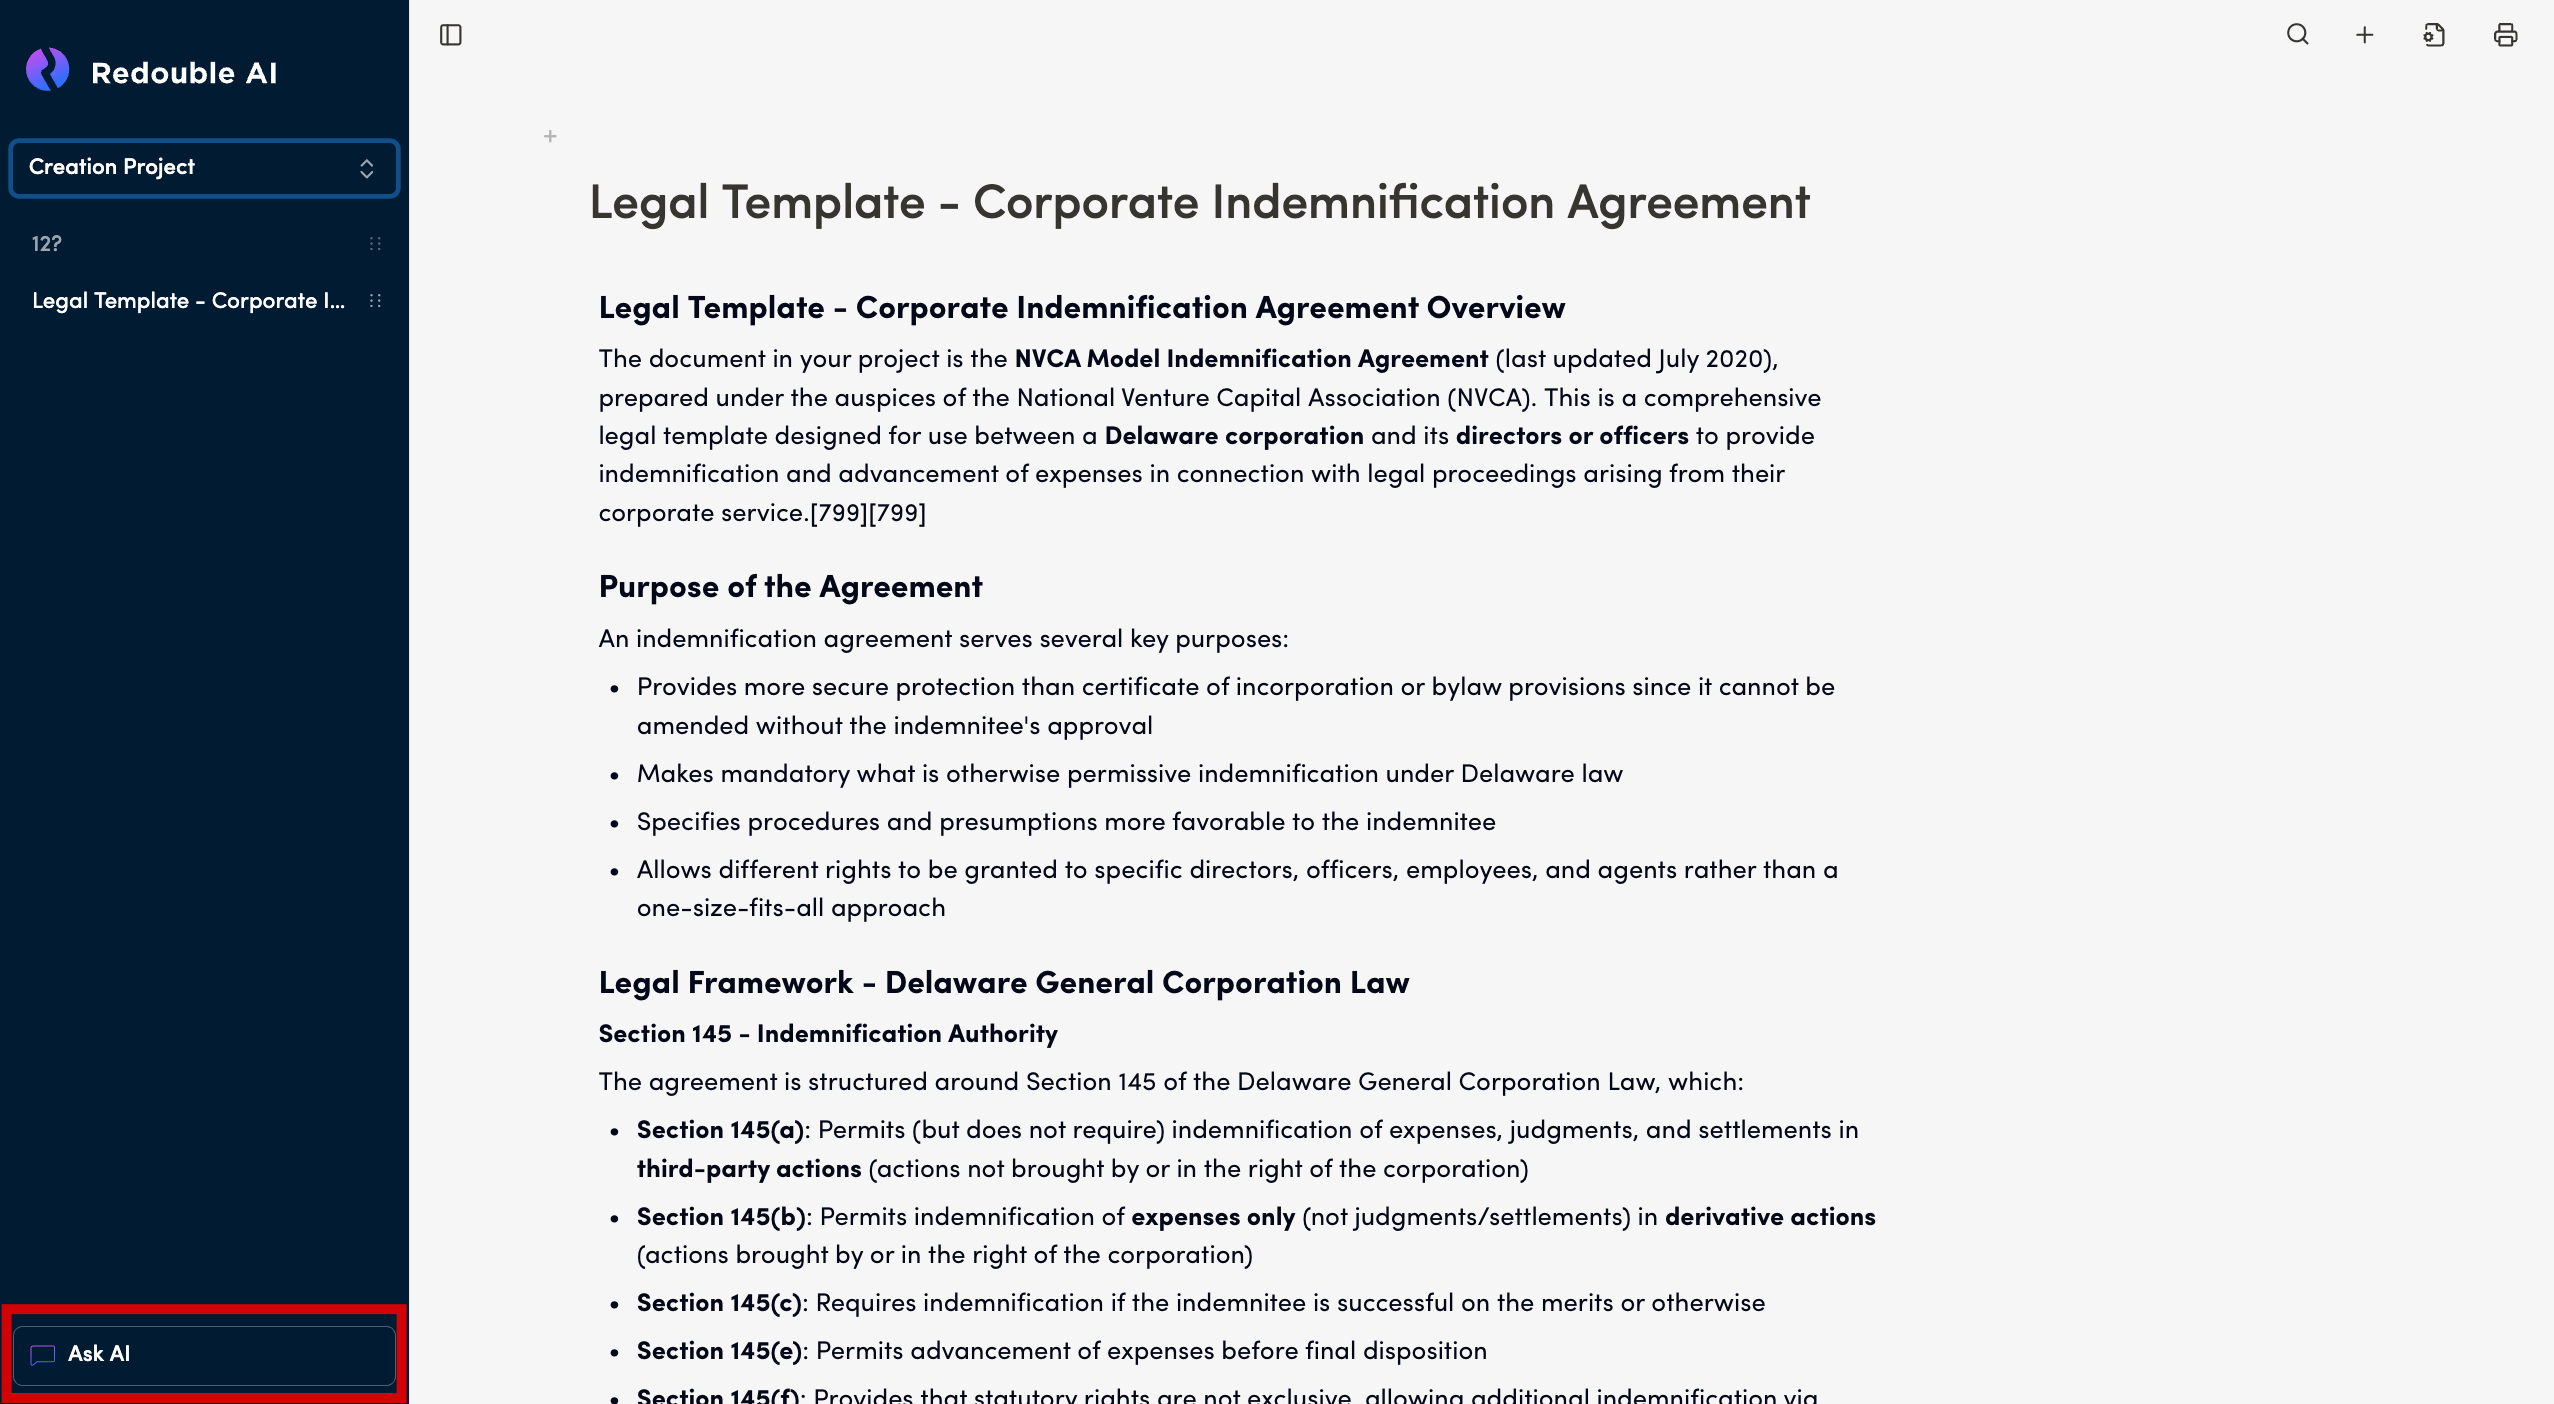
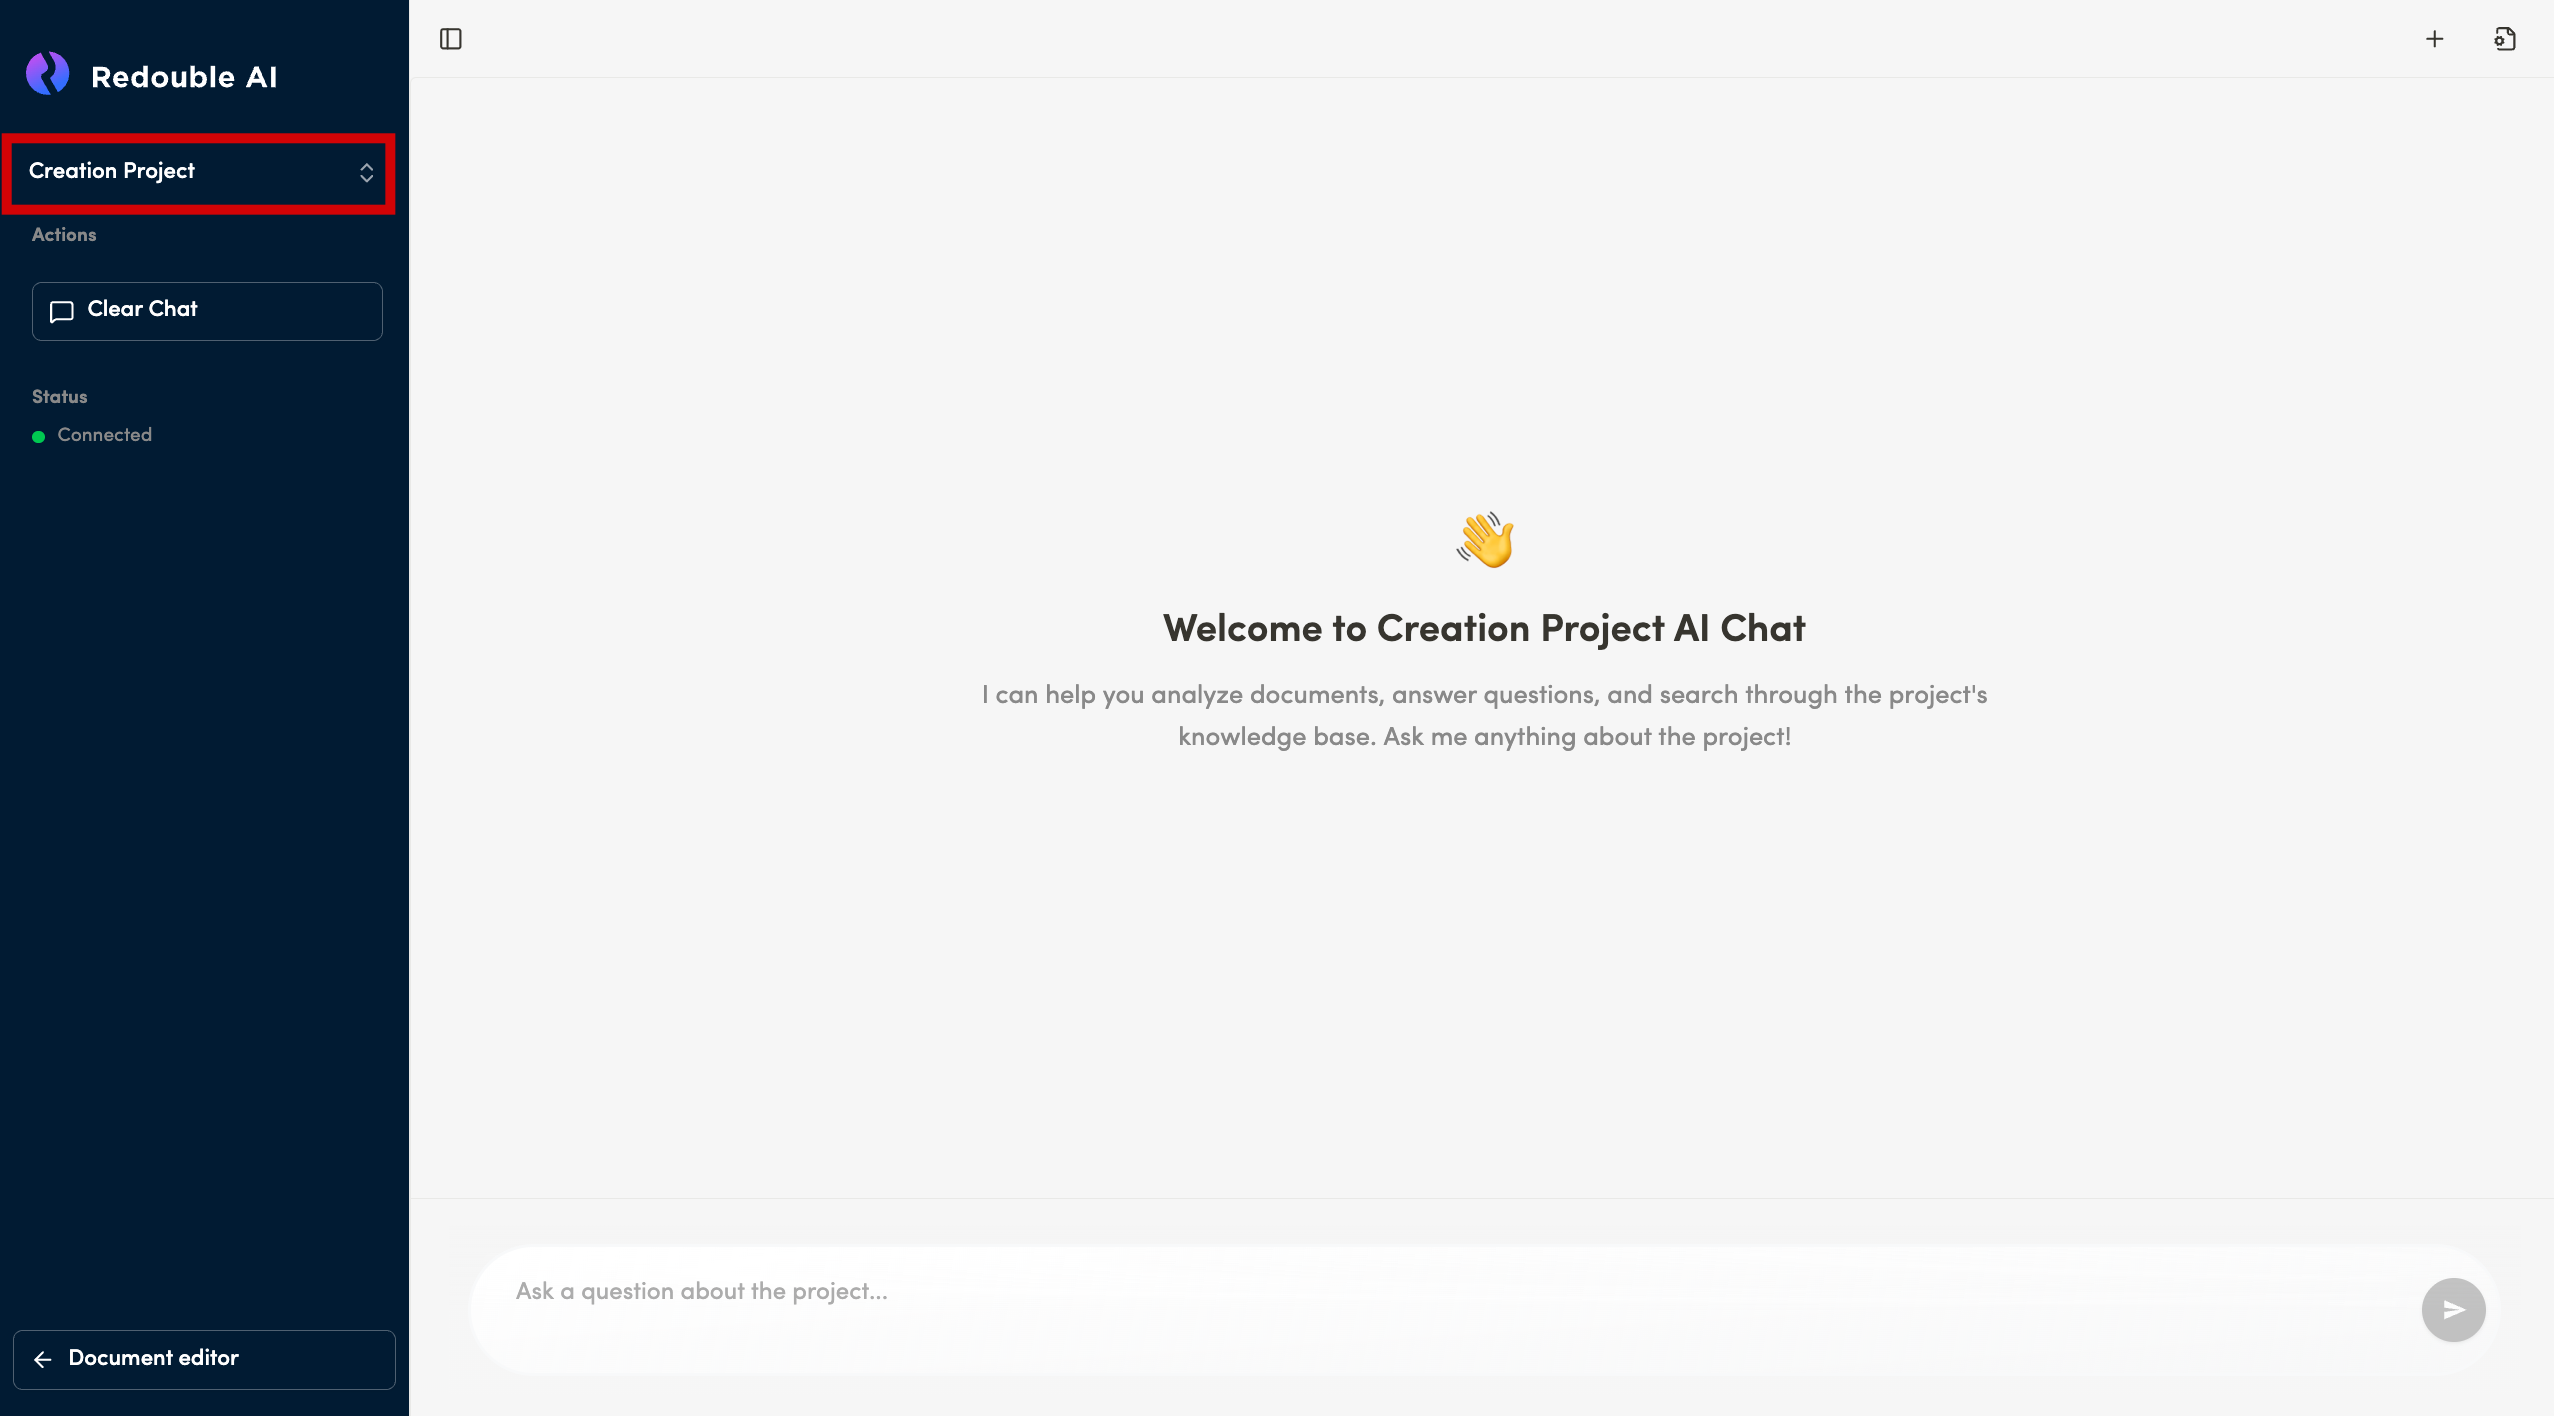
Key Components
Left Sidebar
Project Name - displays current project
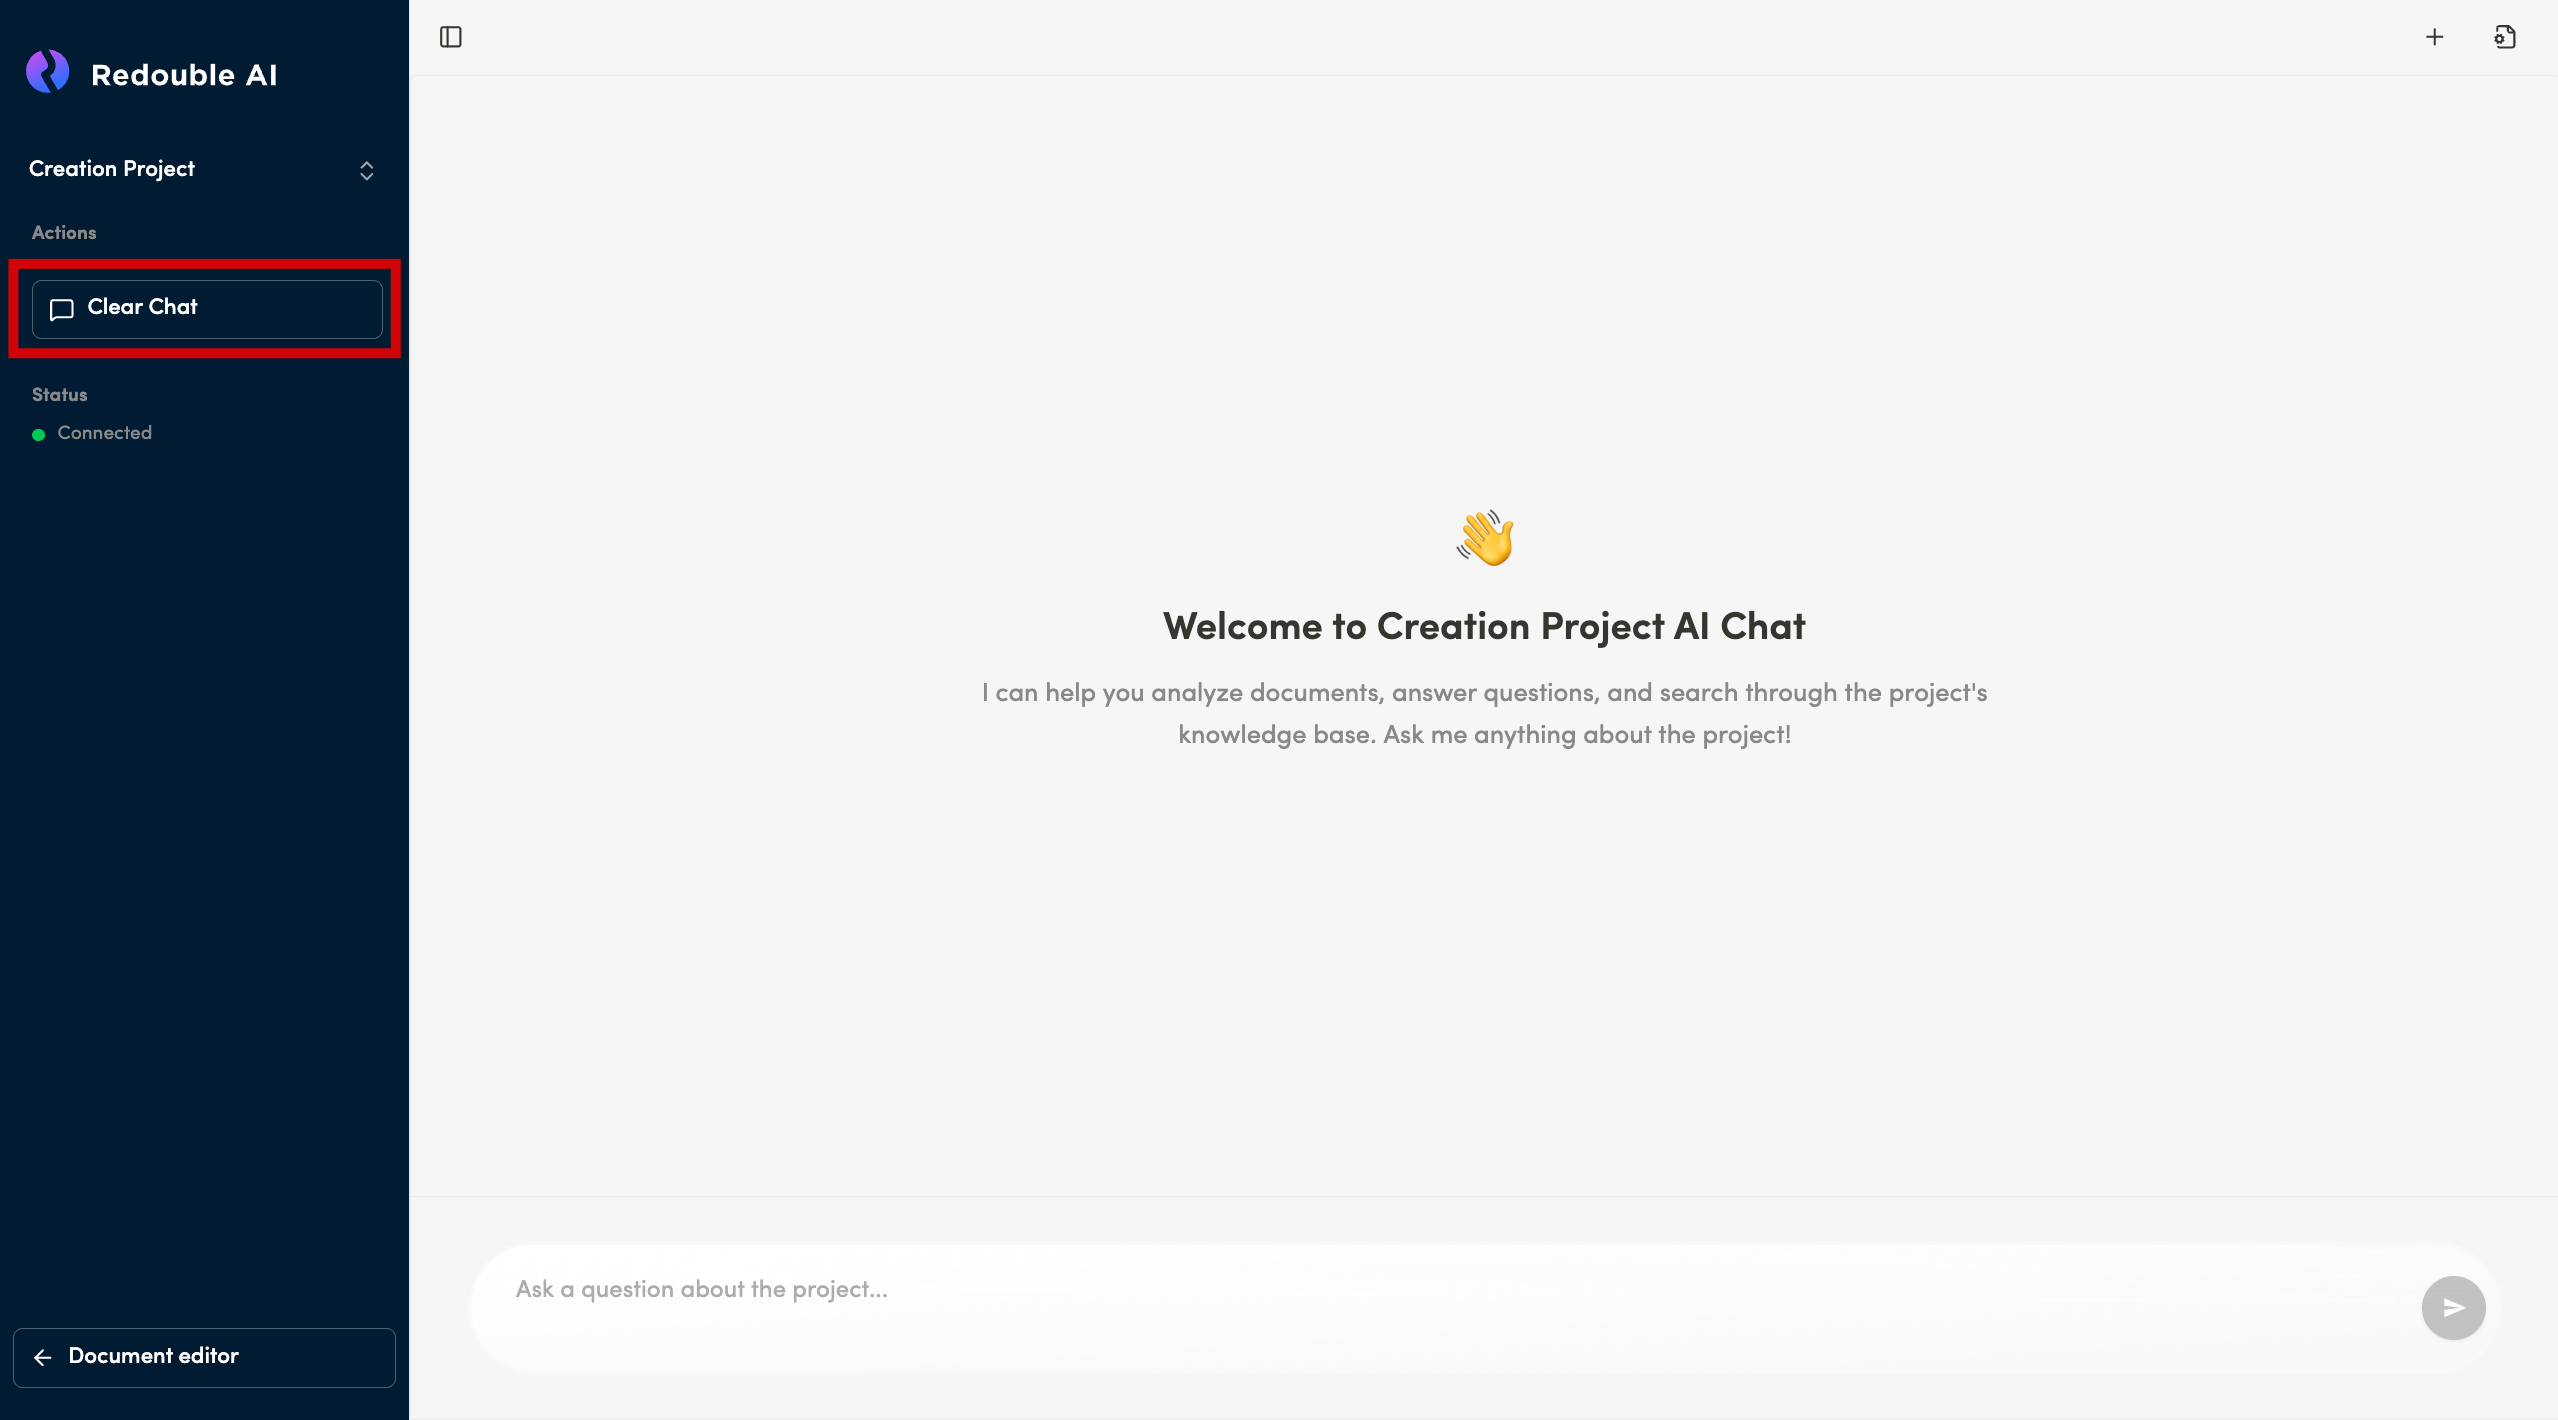
Clear Chat button - removes all messages and starts fresh conversation
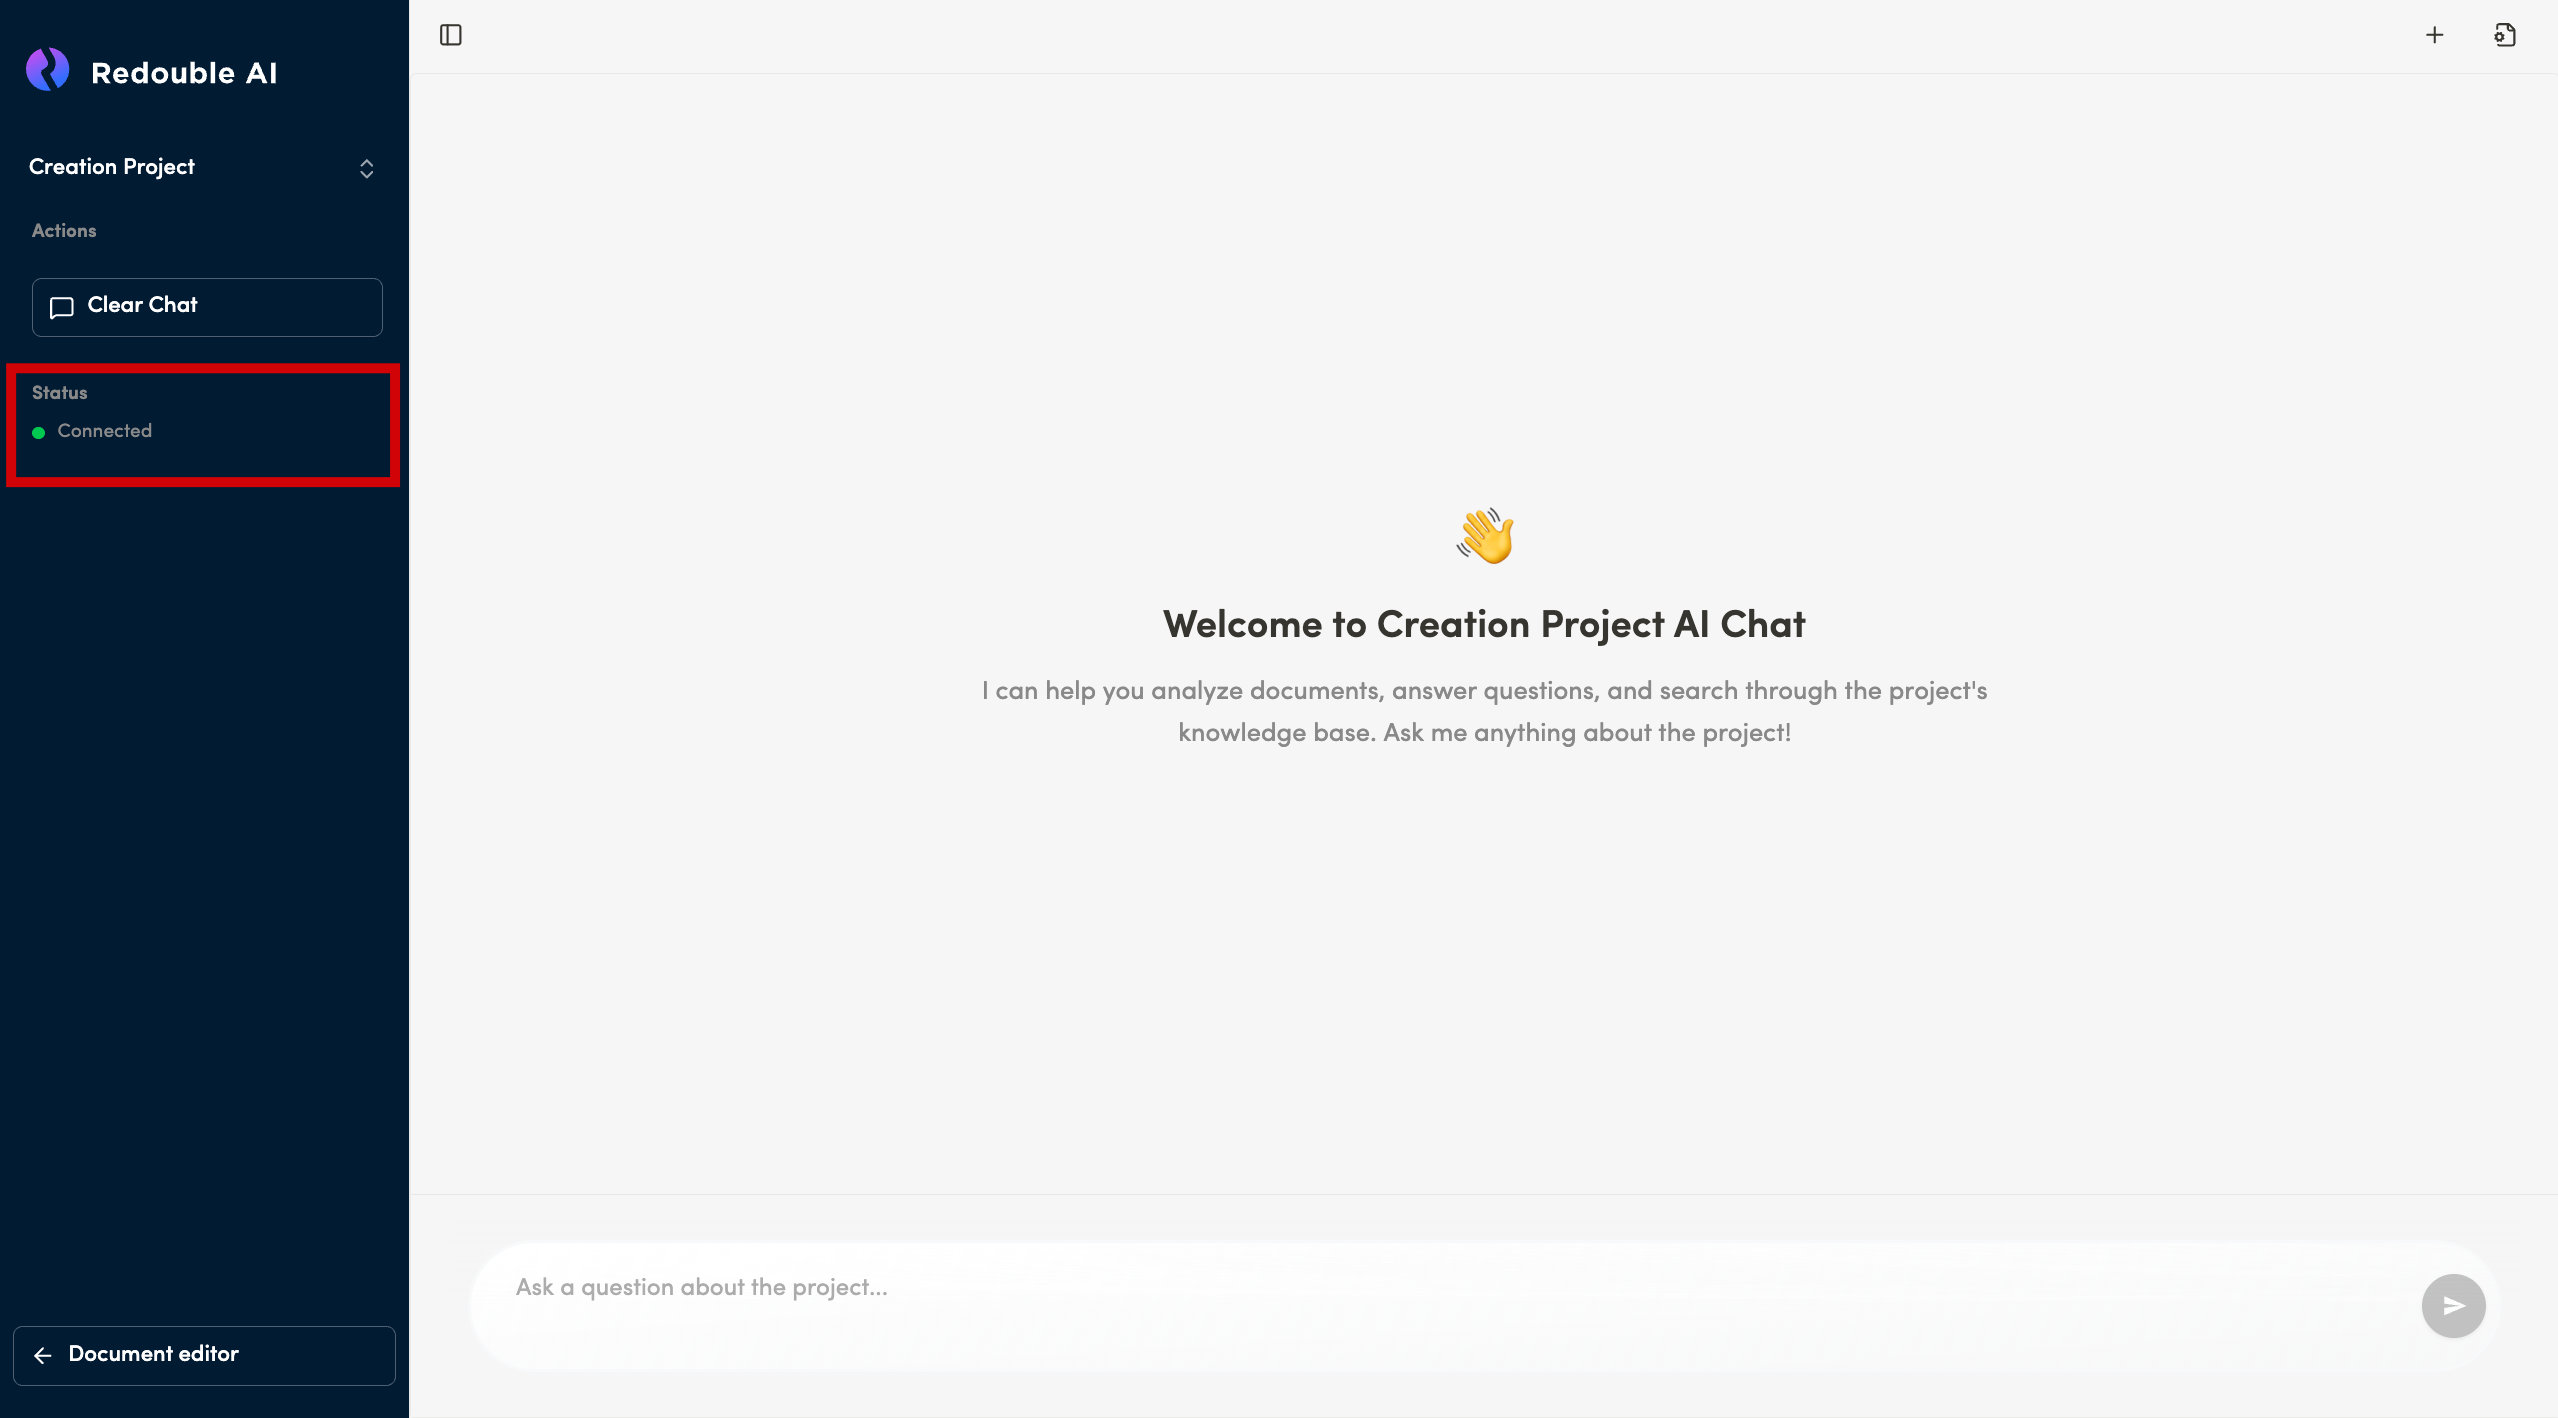
Status Indicator - can show two statuses:
- "Connected" - indicates the active connection status
- "Disconnected" - indicates that the backend is down
Document editor button - Navigate back to document editor
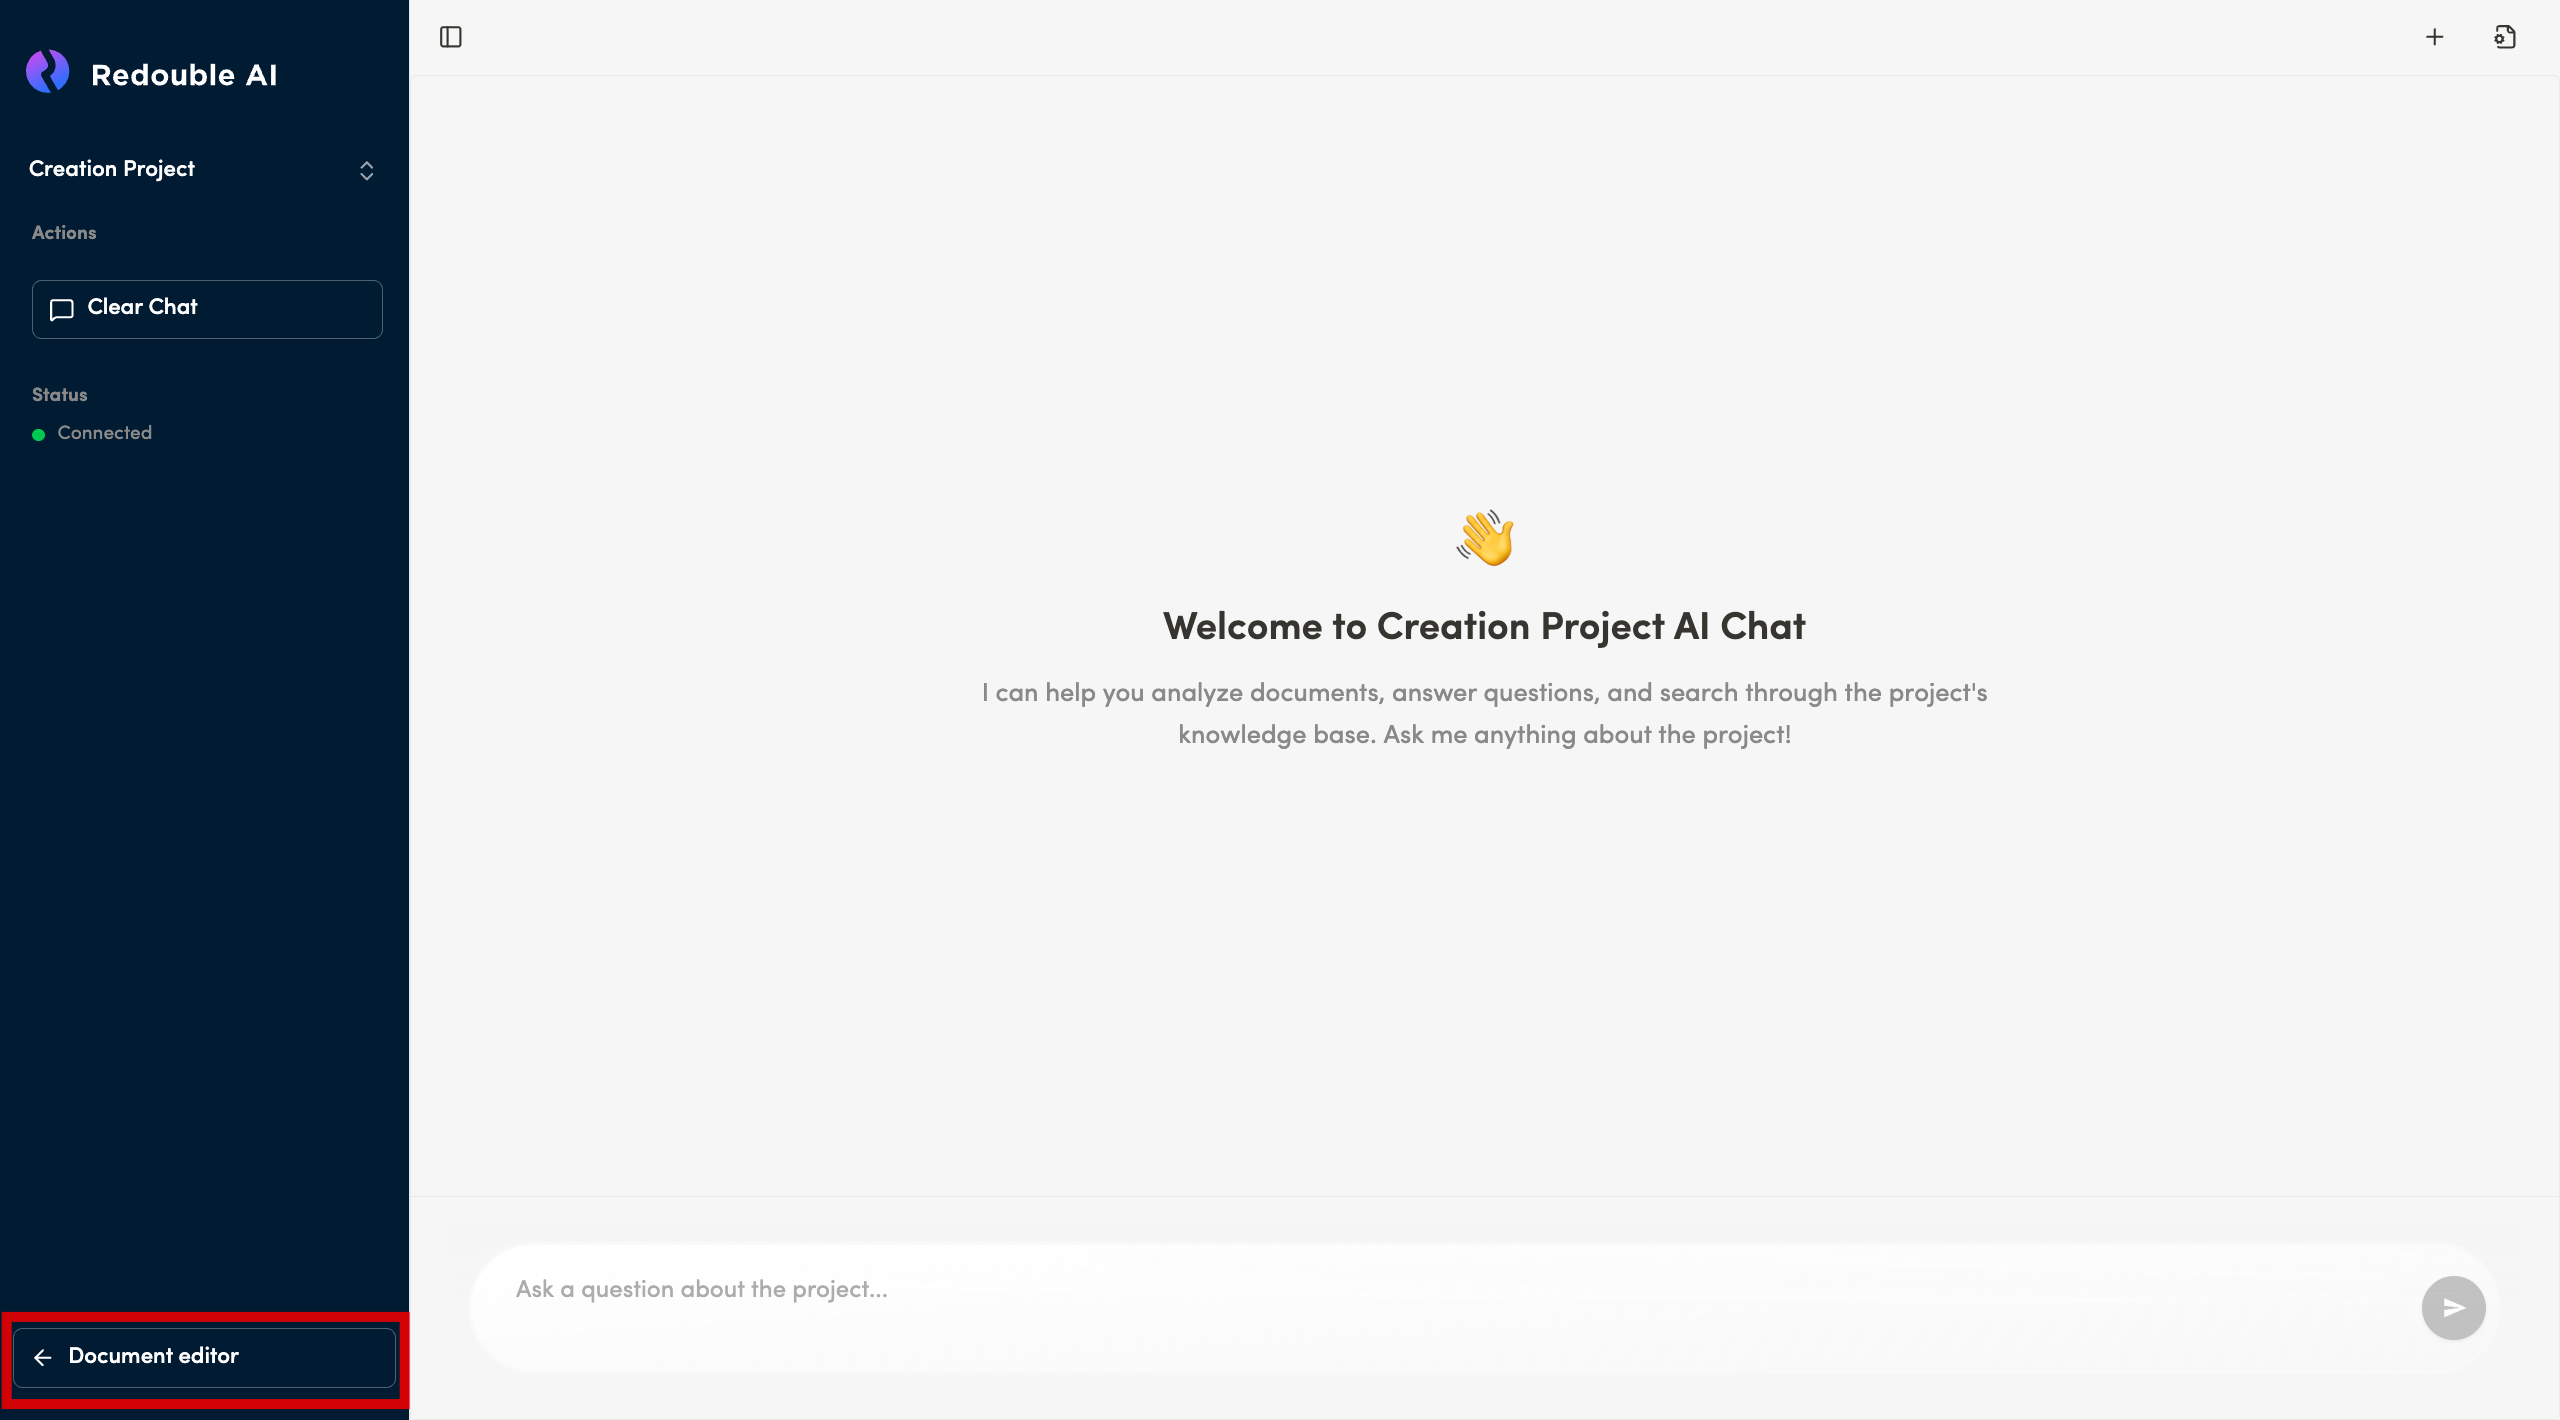
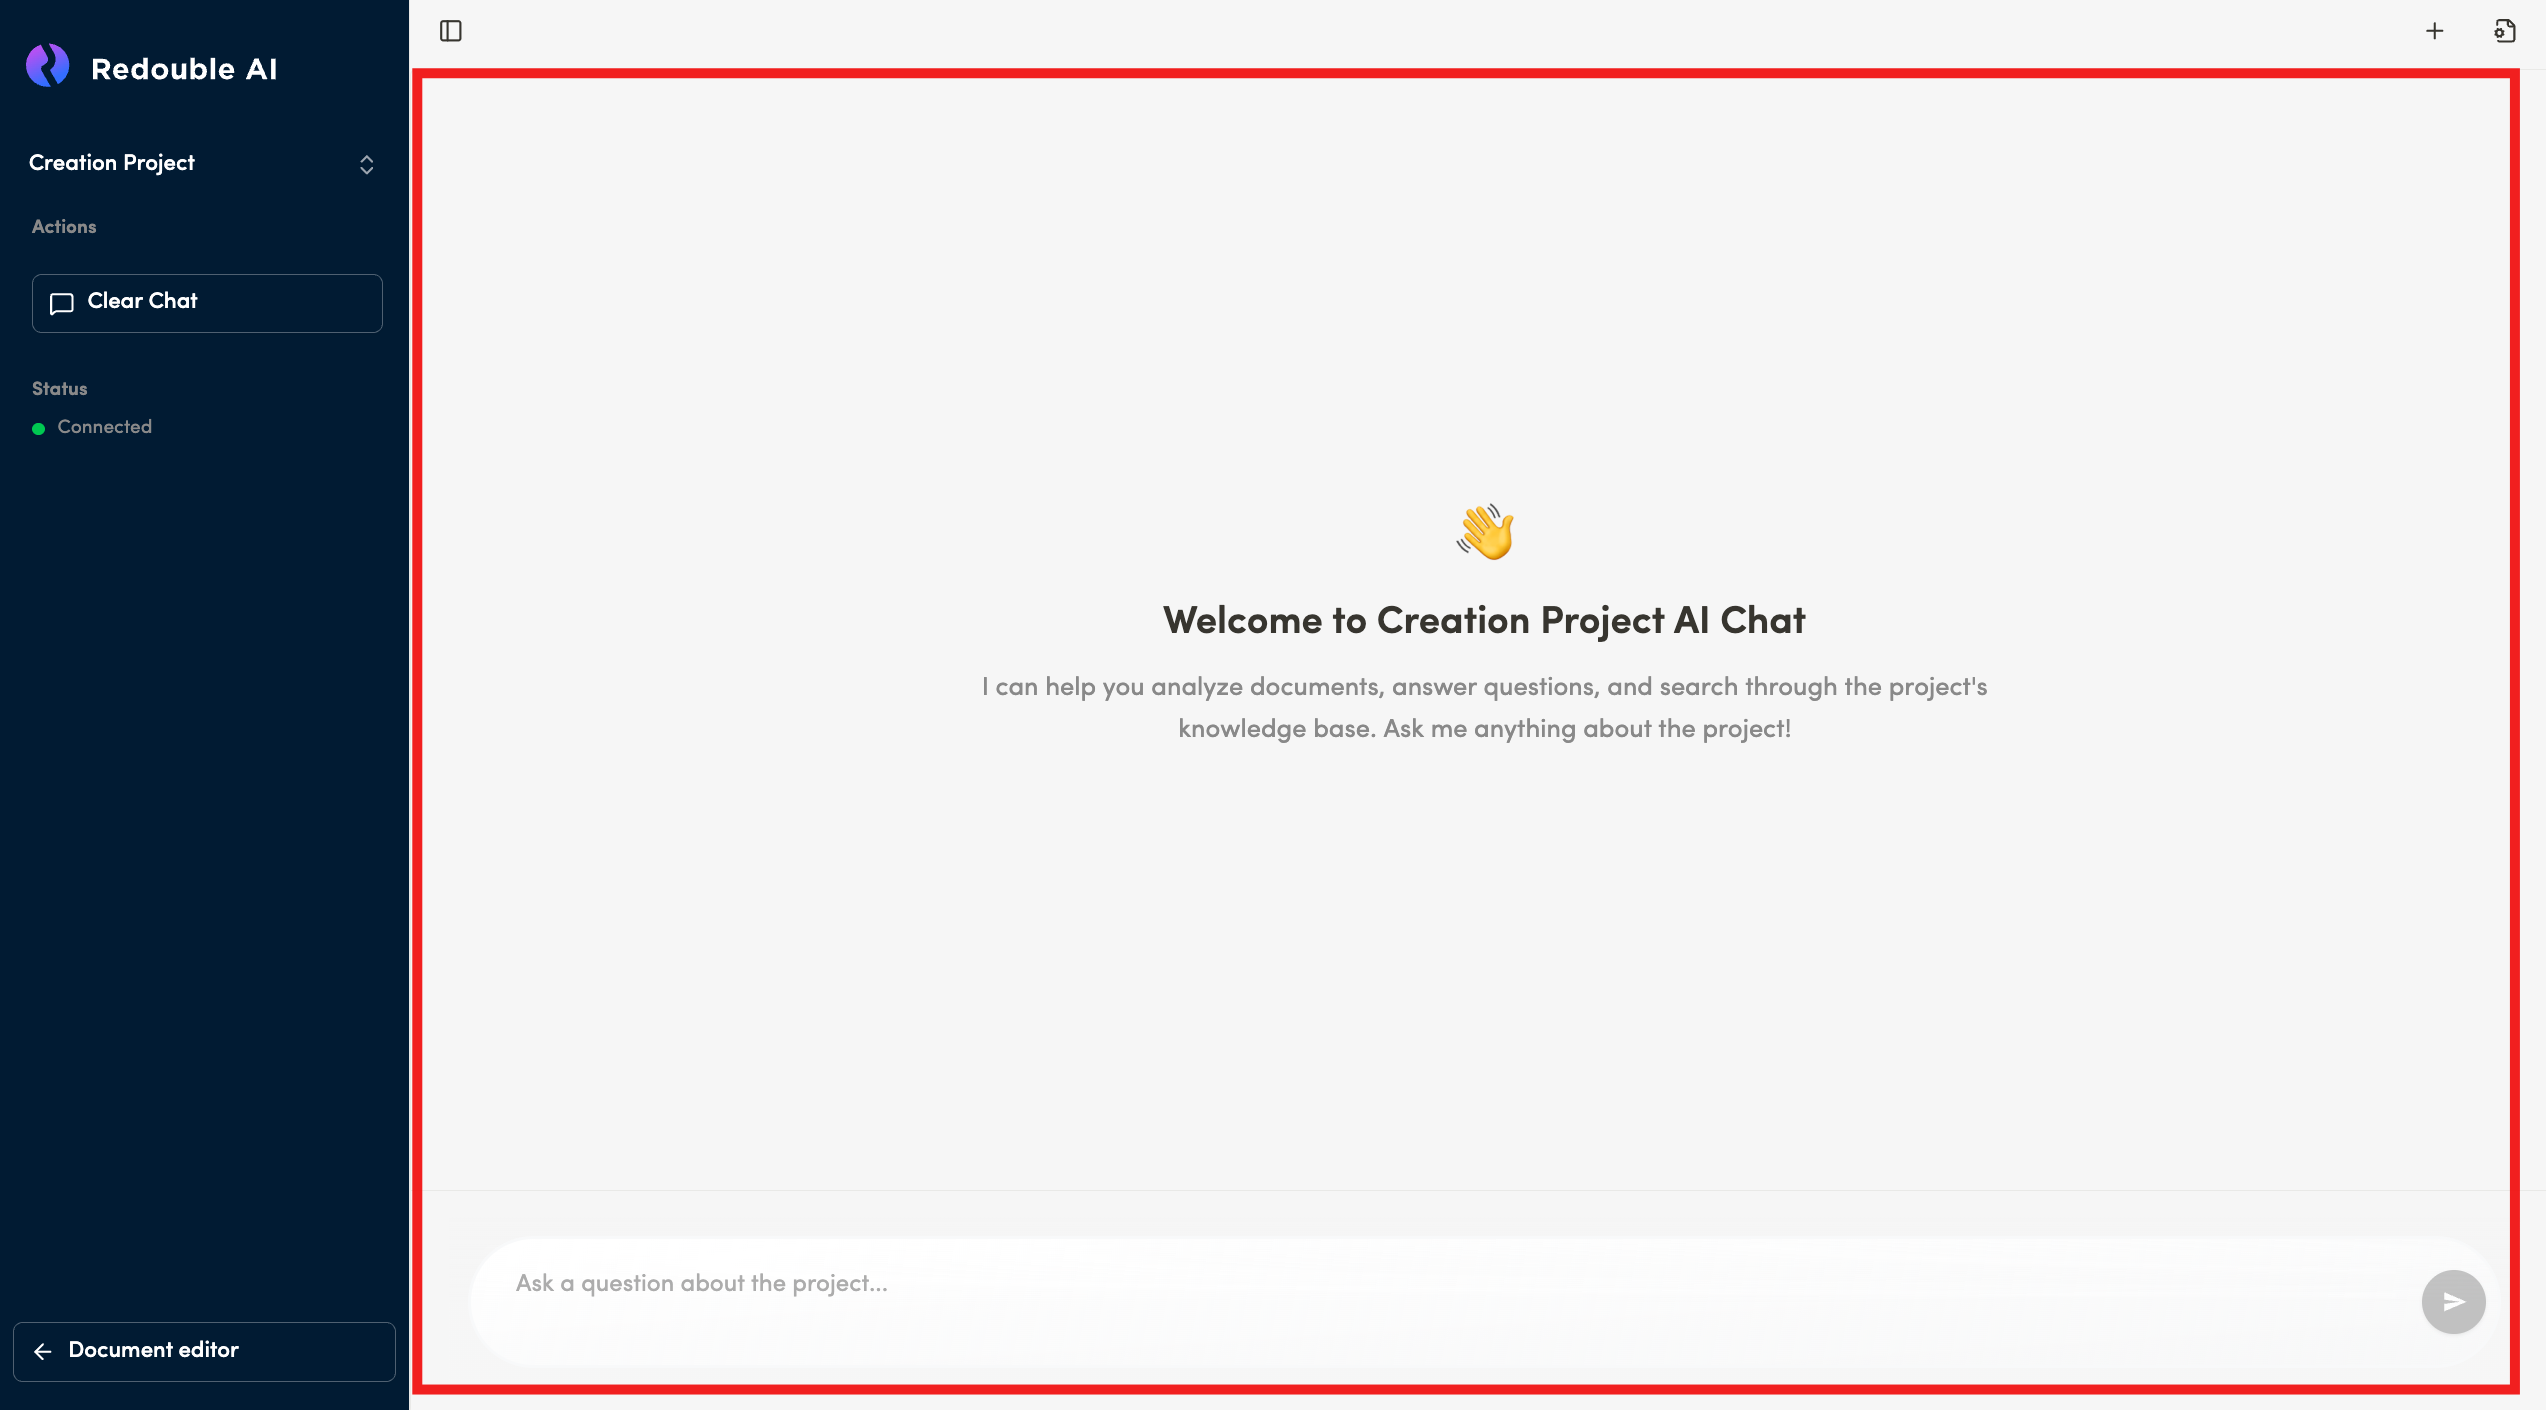
Main Chat Area
Conversation Display - shows messages between user and AI. When there is no messages, it should have text: "Welcome to Documentation Creation AI Chat I can help you analyze documents, answer questions, and search through the project's knowledge base. Ask me anything about the project!"
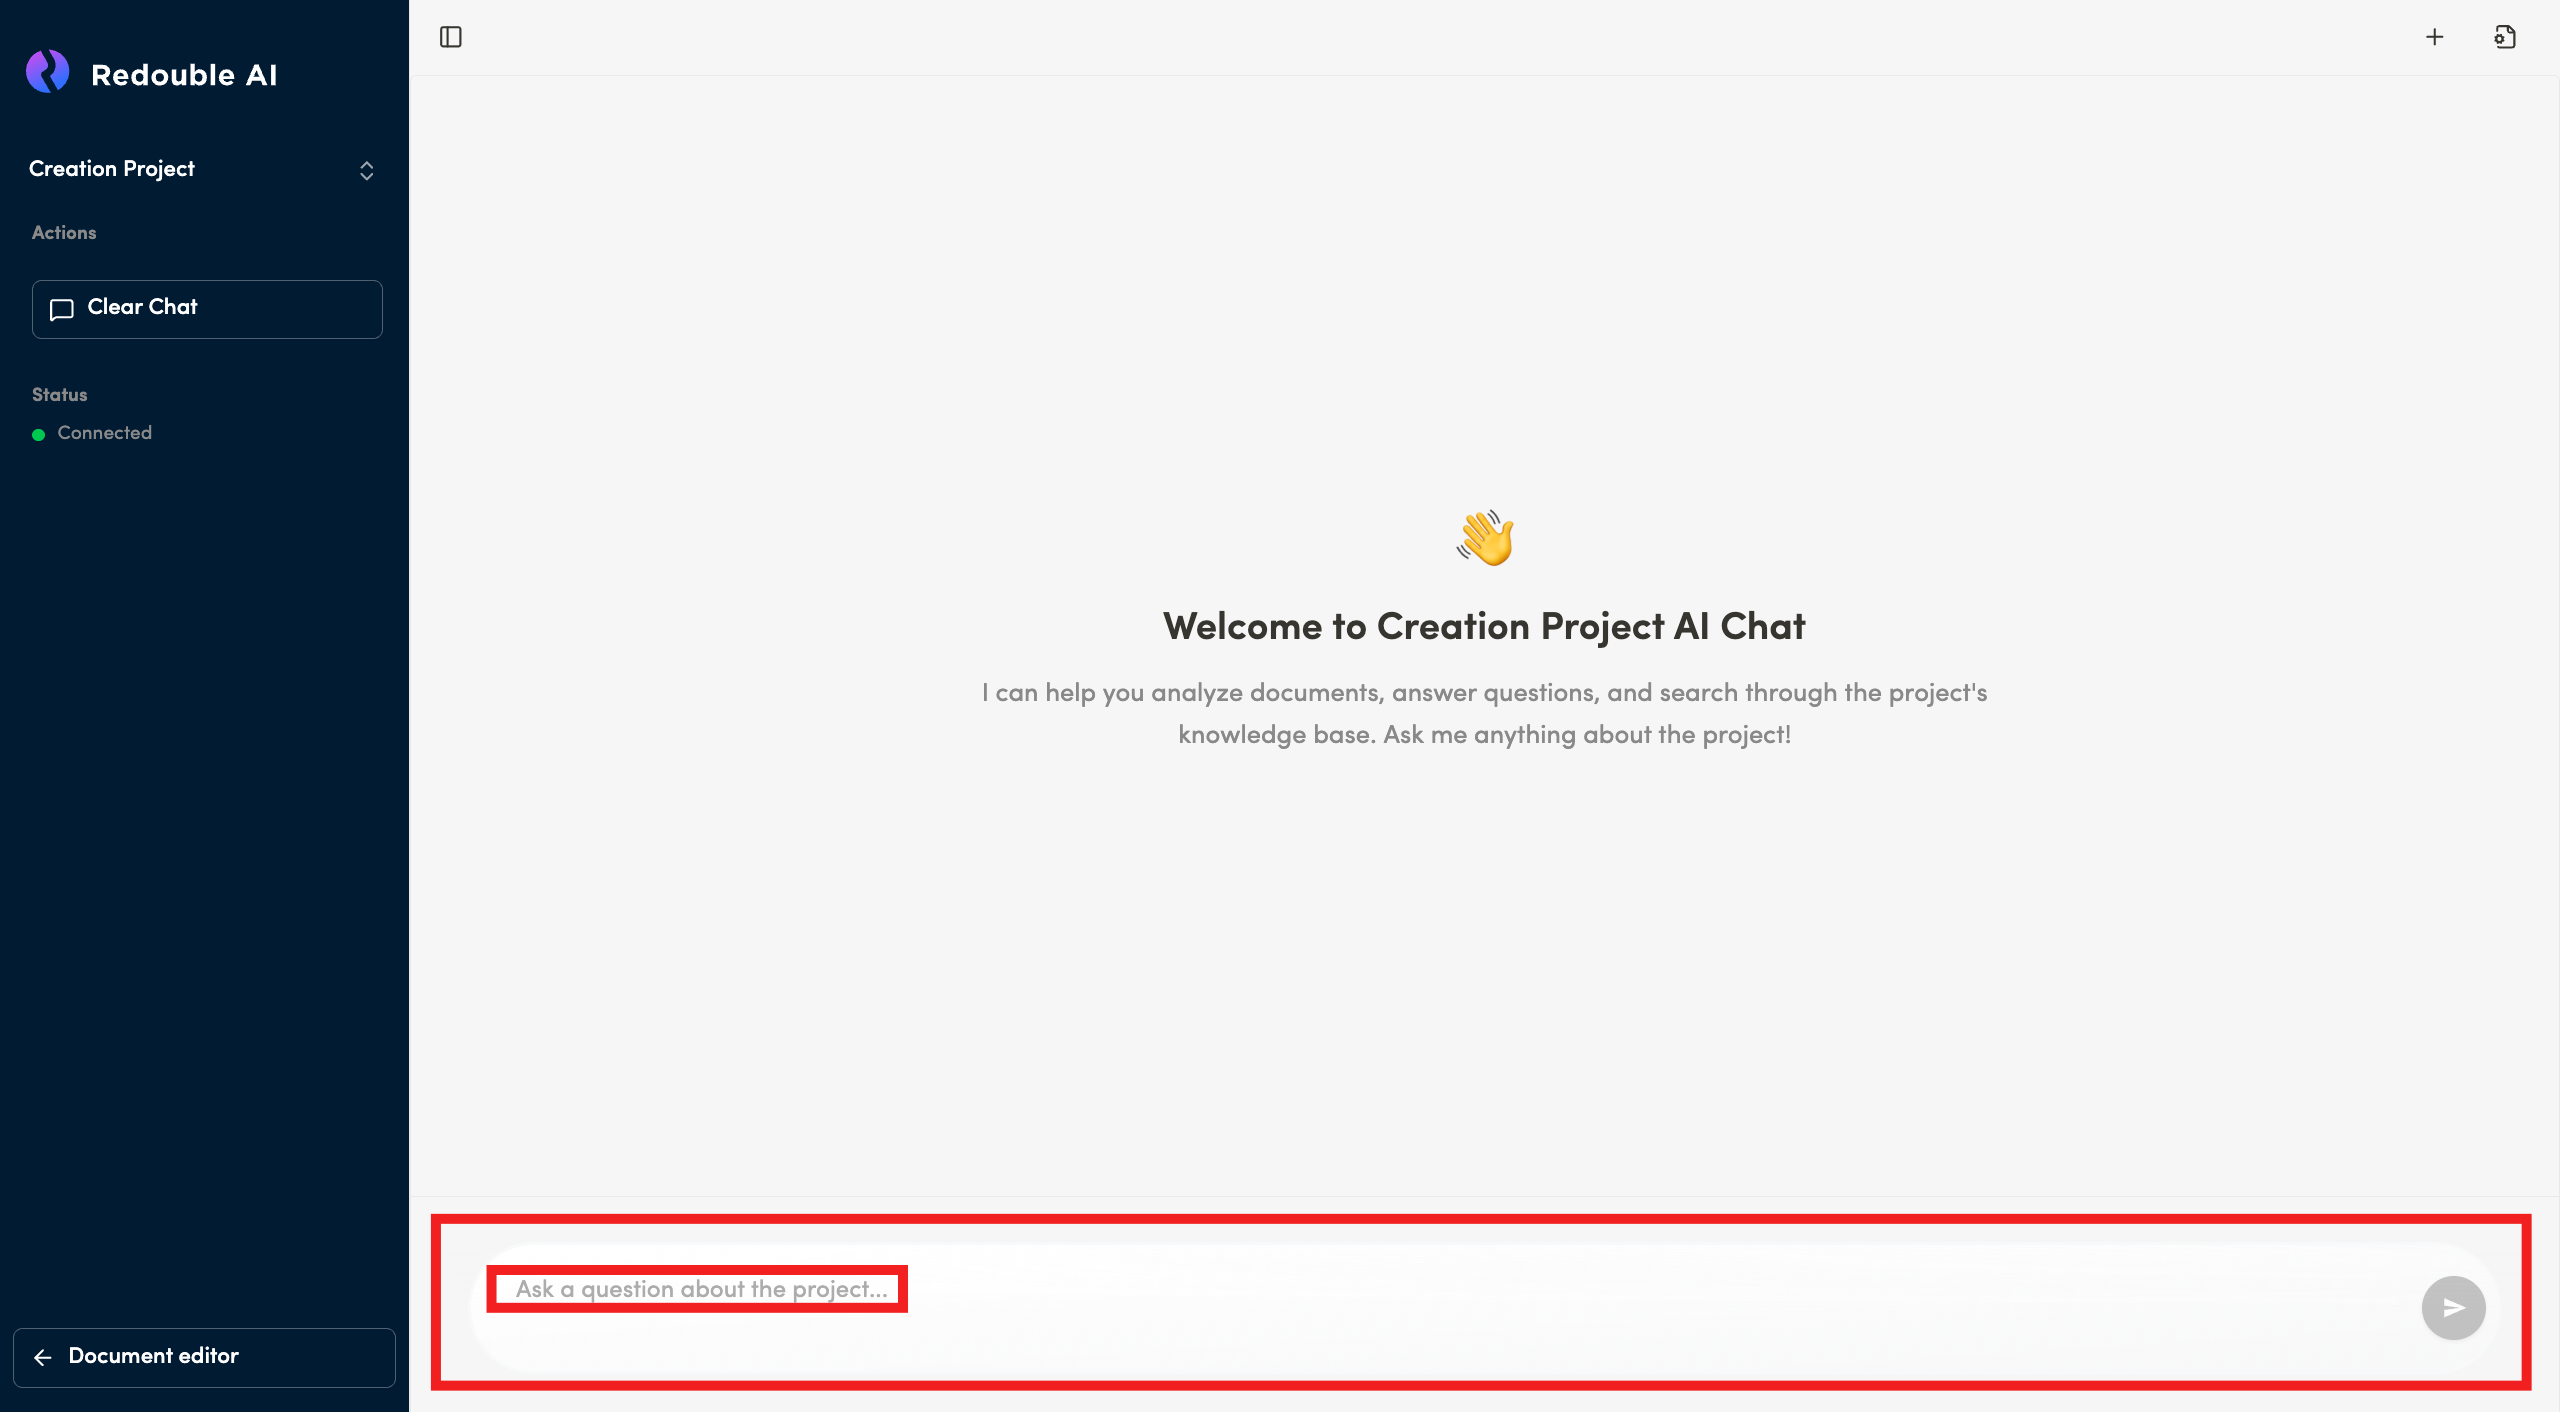
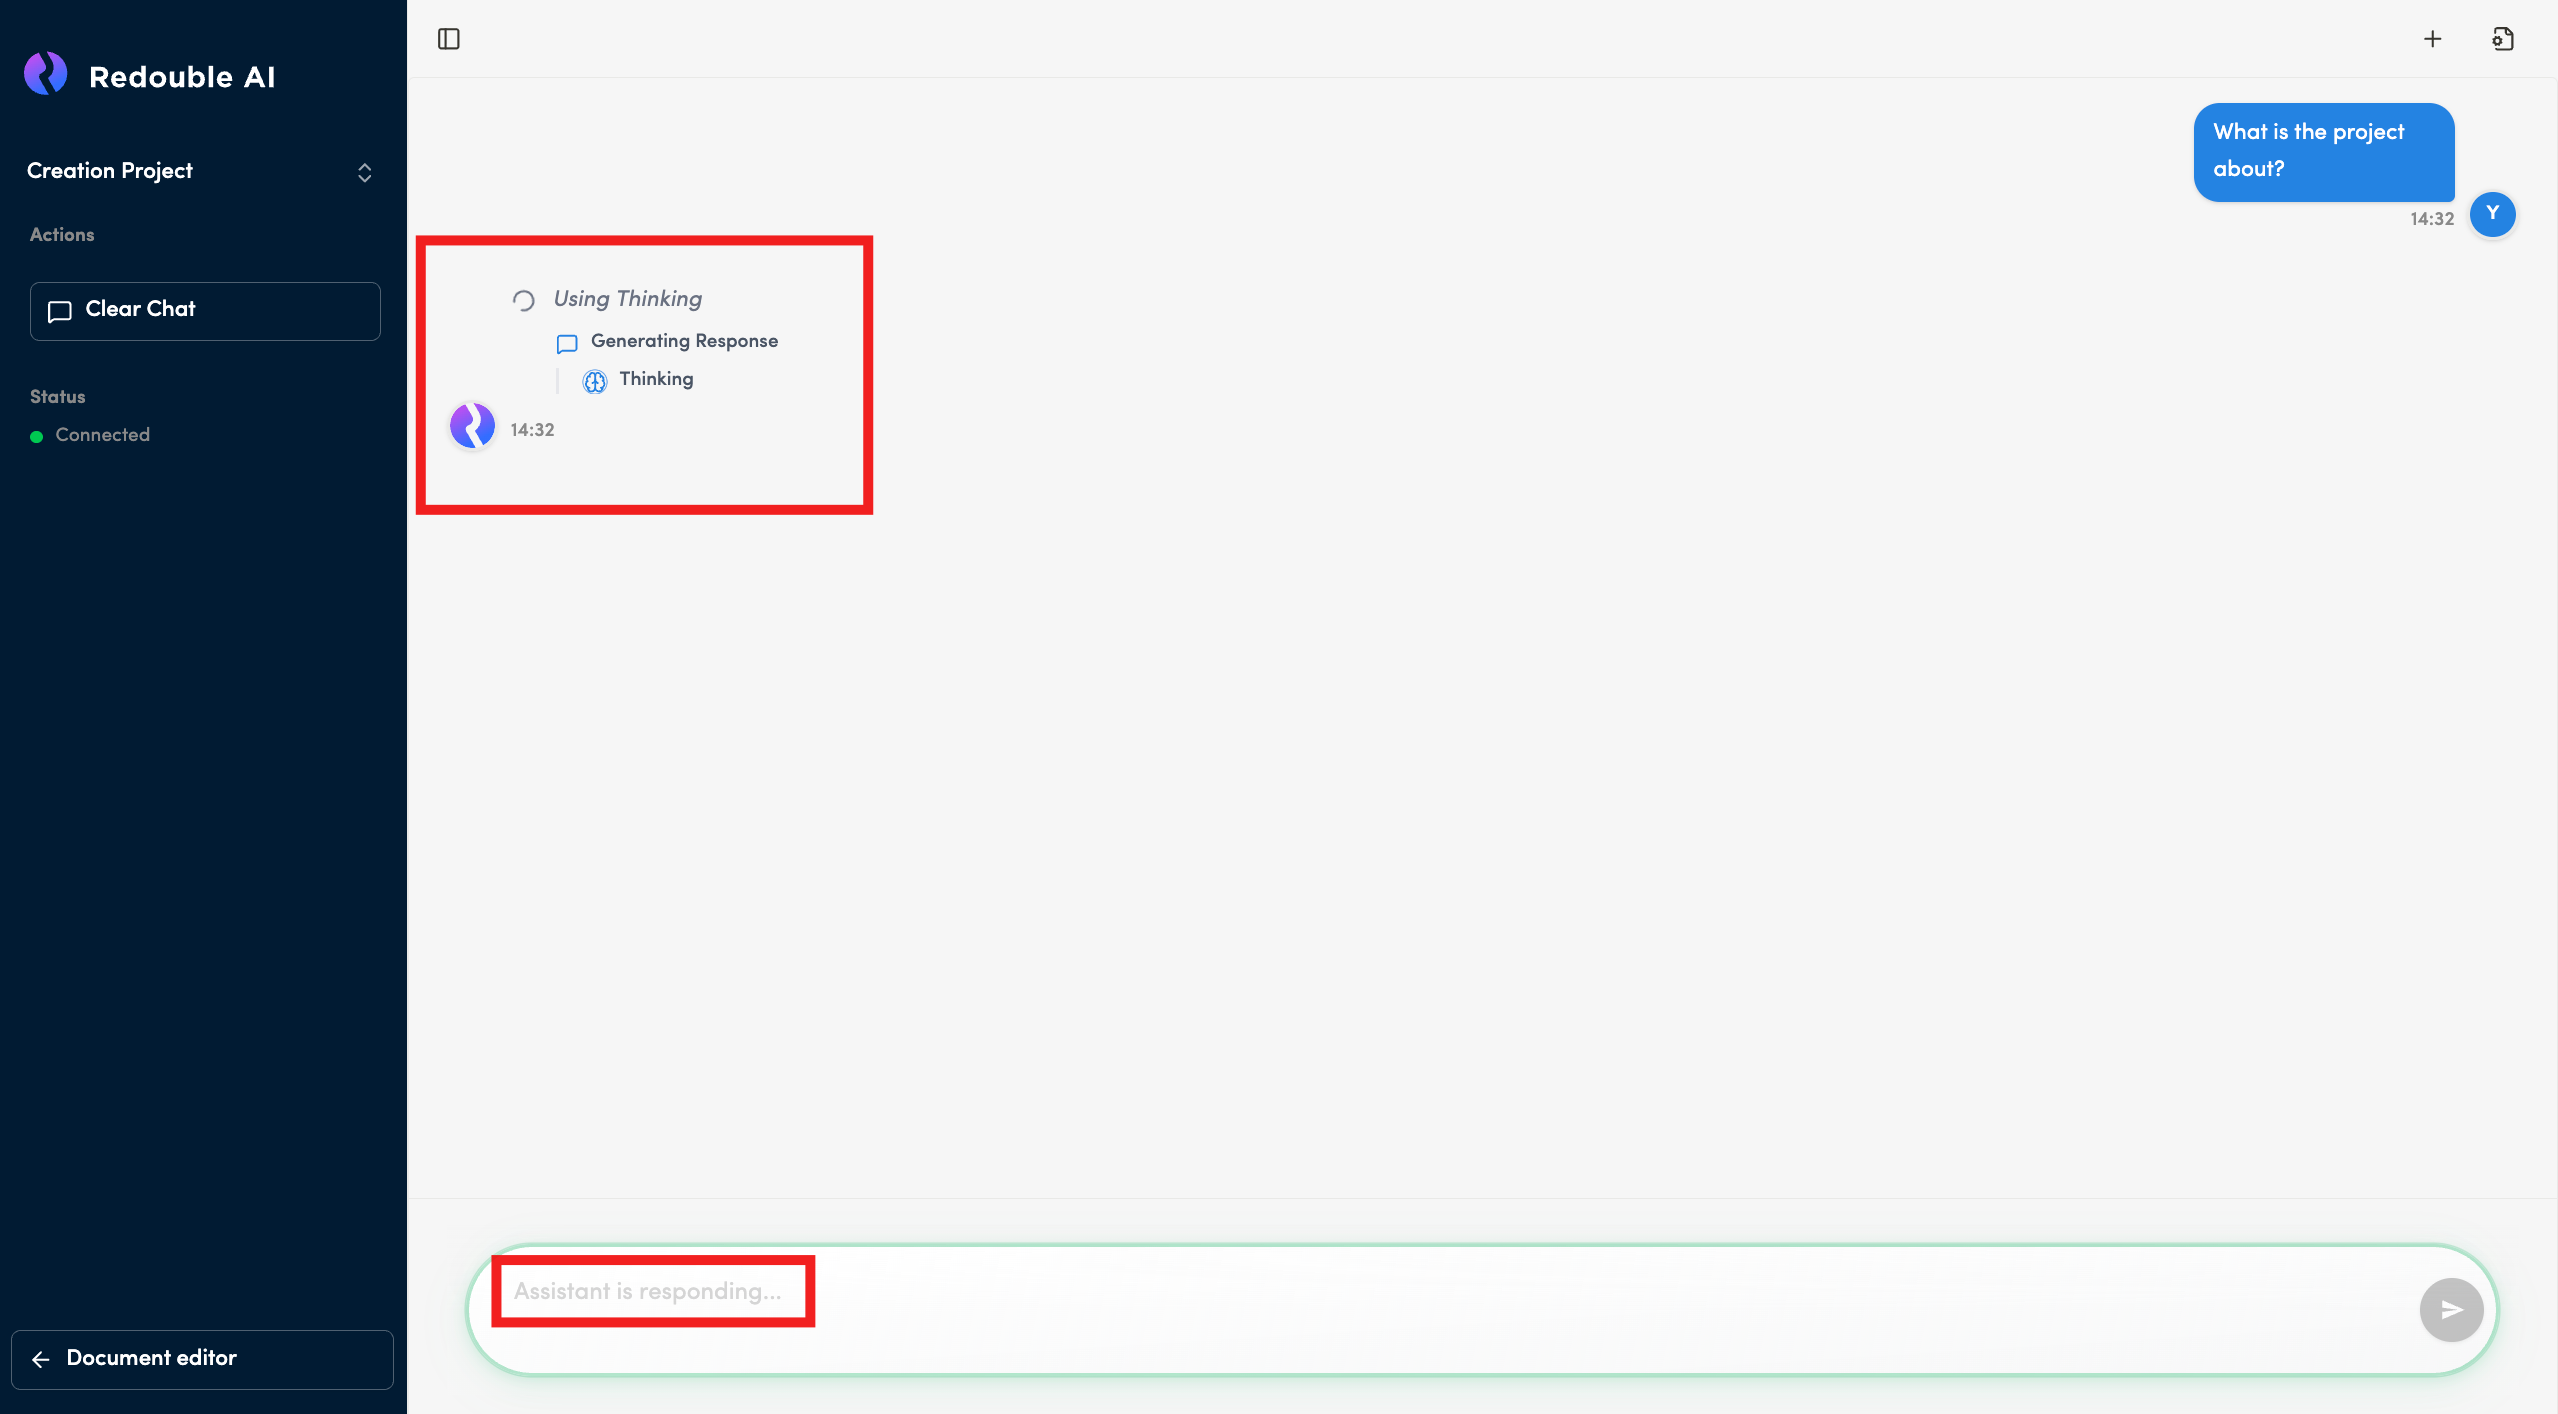
Message Input Box - text input area at bottom. Mint green border highlighting active state. Can contain hints:
- "Assistant is responding..." when AI is active
- "Ask a question about the project..." when there is no questions in query
Functionality:
User Flow:
- User types question in input box
- User clicks send or presses Enter
- Message appears in chat history
- AI shows "thinking" status
- AI generates and displays response
- Conversation continues
Use Cases:
- Ask general questions about the project
- Get quick answers without creating formal Questions
- Exploratory conversations about documents
- Clarifications and follow-up questions
5. Attached documents
5.1 View attached documents
Access: You can access Document Details panel from the Analysis or Sources section.
The Document Details View provides comprehensive information about uploaded documents, including metadata, processing status, AI-generated summary, and detailed document analysis.
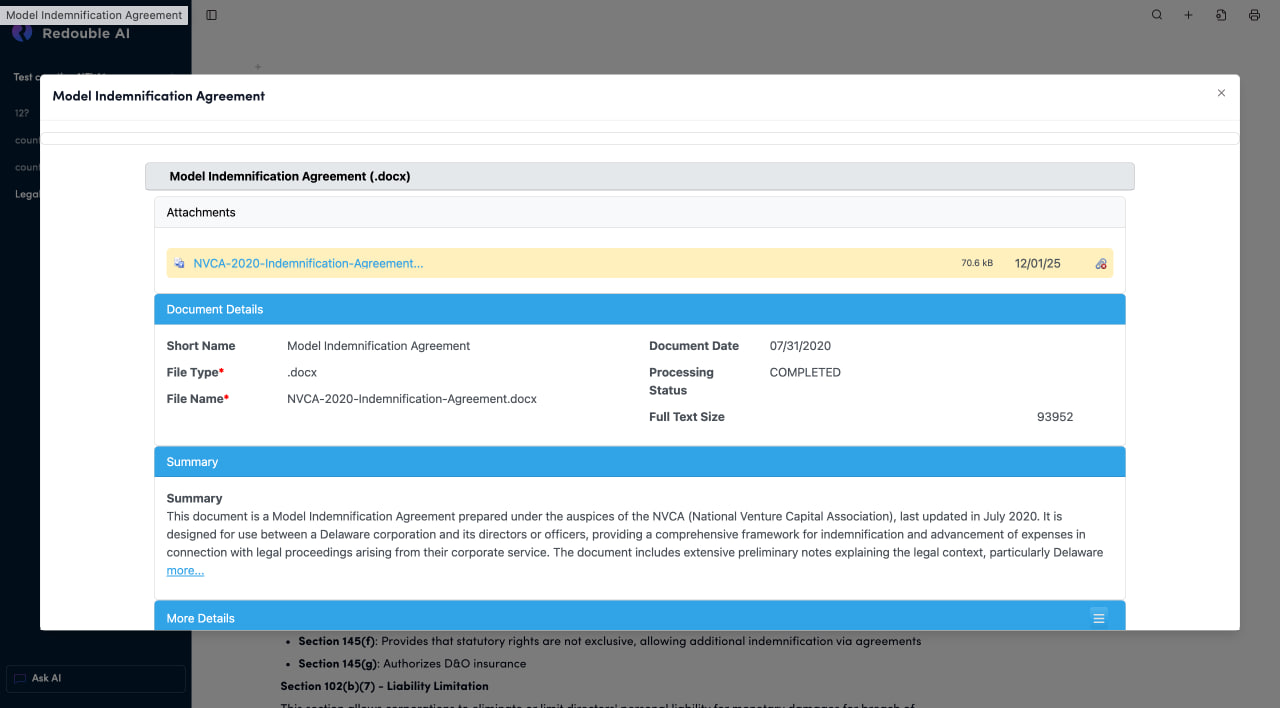
Panel Structure
Document Title Bar
- Displays the document name at the top of the panel
- Close Button (×): Located in the top-right corner to close the panel
Document Name Bar
- Displays document name with file format in parentheses
- Appearence: Gray horizontal bar below the title
Purpose: Primary identifier showing the document name and file type at a glance.
Section: Attachments
Purpose: Shows the source file(s) associated with this document entry.
File Entry Components:
- File Icon: Document type indicator (PDF, Word, etc.)
- File Name: Clickable blue link to download/view the file
- File Size: Size of the attachment
- Date: Upload or modification date (format: MM/DD/YY)
- Link Icon: Action icon on the right for additional options
Available Actions:
- Click file name: Download or view the attachment
- Click link icon: To delete attachment
Section: Document Details
This section displays metadata about the document, organized in a two-column layout. Visual Style: Yellow/cream colored header bar with "Document Details" title
Fields Overview:
- Short Name: Brief identifier for quick document recognition
- Document Date: Date associated with the document content
- File Type: File format extension (required)
- Processing Status: Current processing state (Completed, Processing, Failed, Pending)
- File Name Original filename as uploaded (required)
- Full Text Size: Size of extracted text content in characters
Section: Summary
This section displays the AI-generated summary of the document content
Visual Style: Yellow/cream colored header bar with "Summary" title
Summary Field
- Type: Multi-line text display
- Purpose: Concise AI-generated overview of the document's content
- Auto-generated: Yes, during document processing
Content Includes:
- Document type identification
- Key purpose and function
- Main parties or entities involved
- Primary subject matter
- Important context or background
"more...":
- Located at the end of the summary text
- Click to expand and view the full summary
- Useful for longer documents with detailed summaries
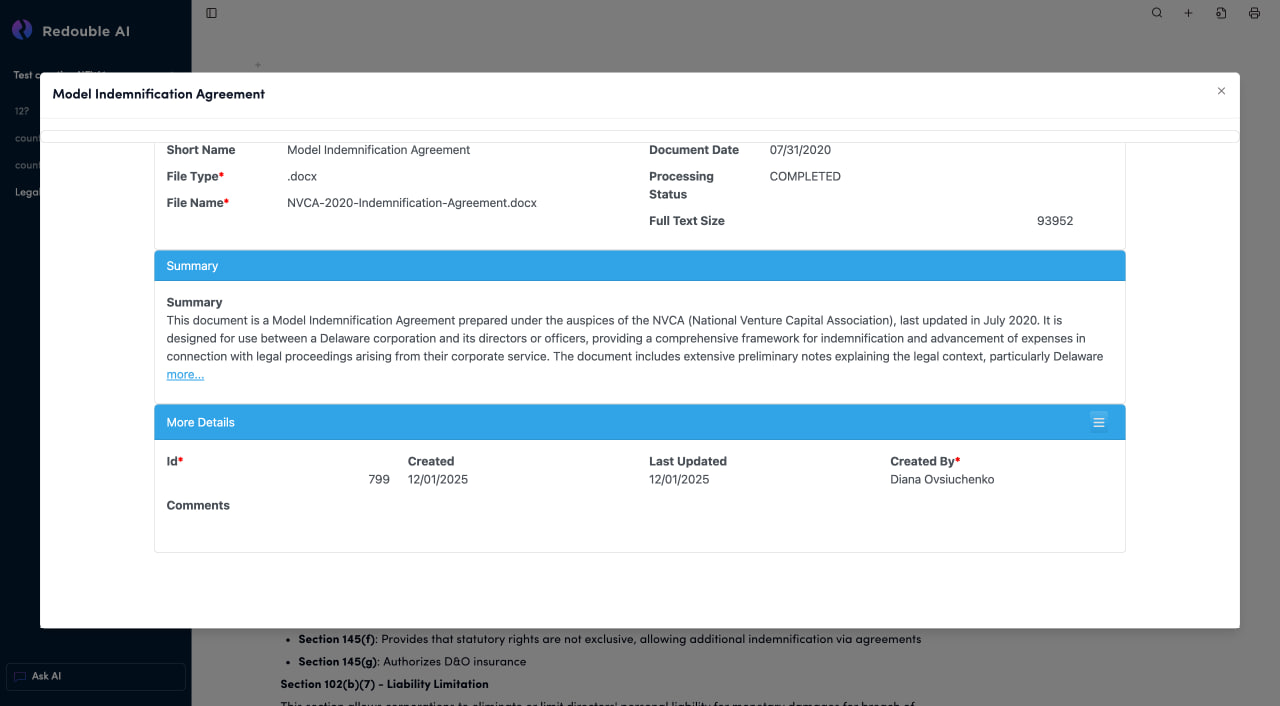
Section: More Details
This section contains system metadata about the document record, as well as AI-extracted detailed content from the document.
Visual Style: Blue collapsible header bar with "More Details" title
- Id: Unique system identifier for this document record (required, auto-generated)
- Created: Date when the document record was created in the system
- Last Updated: Date of the most recent modification to the record
- Created By: Username of the person who created the document record (required)
- Comments Free-form text field for notes about the document
Field Details:
Id (Required)
- Type: Numeric
- Auto-generated: Yes
- Immutable: Cannot be changed after creation
Created
- Type: Date
- Format: MM/DD/YYYY
- Auto-generated: Yes
Last Updated
- Type: Date
- Format: MM/DD/YYYY
- Updates when:
- Metadata is edited
- Attachments are added/removed
- Document is reprocessed
Created By (Required)
- Type: Text (username)
- Auto-generated: Yes, based on logged-in user
Comments
- Type: Multi-line text field
- Purpose: Free-form notes about the document
- Usage:
- Document notes and observations
- Processing issues or special handling
- Review comments
- Team communication